CSC 216/s08/own career
Using Eclipse with JUnit for WebCAT
by Daniel Marcus and Will Hedrick
Formatting Conventions
Java Code will look like this.
PseudoCode will look like this.
Commands will look like this.
Tip: Tips will look like this.
A string of menu commands will be marked as follows:
File => Save As
A string of keys will be marked as follows:
[Ctrl]+[Alt]+[Delete]
Instructive Graphics Will appear as follows:
Eclipse, JUnit, and WebCAT
This activity will guide you through basic usage of the Eclipse IDE and JUnit for use with Webcat. Please have a computer available on which you may install Eclipse IDE. Also, please note that the following conventions will be used to draw attention to different parts of the article.
The problem
WebCAT is a software developed by Virginia Tech that allows you to submit your Java programs and have them graded in near-real-time. WebCAT tests your programs using something called JUnit. Eclipse is well integrated with JUnit, and provides an easy to use interface for evaluating your programs with JUnit. The challenge for this activity is to build a simple calculator that would pass the tests on WebCAT which would check the calculator using the following JUnit test cases:
public void testAdd() {
		Operations Calculation = new Operations(2, 2);
		assertEquals(Calculation.add(),4);
	}

public void testAddNegative() {
		Operations Calculation = new Operations(5, -2);
		assertEquals(Calculation.add(),3);
	}
Participation: Setting Up
For this activity, you can work with a partner. Either way, make sure you have a laptop with Eclipse available to you.
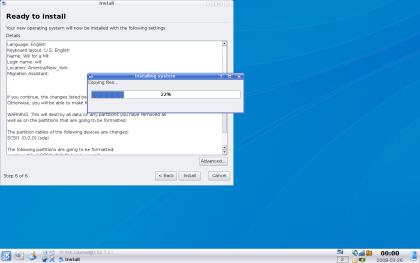
It is often useful to install Eclipse onto a Linux environment, because it more closely mirrors the actual testing environment where your code will be compiled. I won't go into details, but in particular, installing Ubuntu Linux, or one of its derivatives such as KUbuntu, is very easy. Note that here, you install JUnit as well.
On a Debian-based Linux such as Ubuntu, installing Eclipse should be as easy as
apt-get update
apt-get install eclipse junit
or
apt-get update
aptitude install eclipse junit
On an RPM based distribution such as Red Hat Linux or Fedora Core
yum install eclipse junit
should do the trick.
You can also install Eclipse graphically through the package manager, such as Synaptic, Adept, or simply what will be marked as "Manage Software","Manage Packages","Add and Remove Programs", or something similar in your menu.
Tip: On pure Debian, GCJ is installed instead of sun-java. Make sure to install sun-java and remove GCJ or Eclipse will not work quite right, and will likely frustrate you a great deal.
Windows and Mac OSX users will likely want to visit http://www.easyeclipse.org/site/home/ and download from there. EasyEclipse is just a pre-packaged version of Eclipse which will save you time and energy in the long run.
You can then install JUnit with the TPTP plugin: http://easyeclipse.org/site/plugins/eclipse-tptp.html
The Activity
We're assuming that your teacher has given you the following directions:
Create a simple calculator that will be graded by WebCAT. You calculator should have two classes, one that serves as a "Driver" and is called "Calculator" The other class will be called "Operations" and will have methods that perform various calculations on two numbers. You should construct a method in Operations.java called add() that takes no input but takes the sum of the numbers created with the instance of the Operations object. add() should return the resulting sum as an integer. The two numbers should be taken in from the command line, and if two arguments are not passed into the program at the time of execution, it should fail elegantly and produce an error. Points will be deducted for not having the appropriate classes, having the add() method inside Calculator.java, or if the program fails to display an error and exit when no command line input is given. The execution command should be formatted as follows:
java Calculator [int1] [int2]
Here is a simple pseudocode structure for the classes:
Calculator.java:
main($arguments){
	if($arguments != 2){
		Exit
	}else(CONTINUE){
		Create Operations Object($arguments) = $result
		Print "The sum is: " $result
	}
}
Operations.java:
constructor($num1, $num2){
	Store $num1, $num2
}
method add(){
	return $num1 + $num2
}
Remember, it should pass the test cases given in the problem above.
First, open Eclipse and make yourself at home.
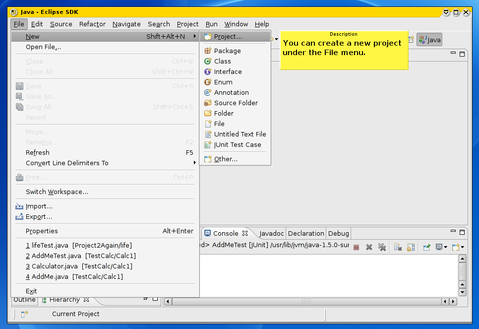
Eclipse manages the different programs you write as "Projects."
Go to File => New => Project... to start a new Java project.
Look along the toolbar to find the small green button with the letter "c" in a circle. This is a small menu to create new files. You can use it to create a new class. Based on the directions, you'll want to create two.
Tip: Look in the directions for the names of the classes. If you name them wrong, it'll be difficult to fix later, so it's best to get them right the first time.
The two that you'll want to create are called Calculator.java and Operations.java. Note, however, that in the dialogue that Eclipse presents, you don't enter the .java suffix, and that you can have Eclipse automatically create a stub for the main() method.
Now, I'll give you the code for Calculator.java and Operations.java I recommend you type it, rather than copy and paste, so that you can see some of the features Eclipse has to help you program. If you want to copy a particular line or block, you can use the usual commands [ctrl]+[c] for copy, and [ctrl]+[v] for paste. If you're on a mac, you'll use [command] key instead of [ctrl]. As always, pay attention to your whitespace to keep your code neat and readable, and use comments to make it clear what each piece of code does.
Calculator.java:
public class Calculator {

	//Static numbers to work with:
	private static int num1;
	private static int num2;

	/**
	 * @author [Your Name]
	 *
	 * Class that calls different operations
	 * on two numbers.
	 *
	 */
	public static void main(String[] args) {

		// Check arguments passed in from command line
		int numberOfArguments = args.length;

		if(numberOfArguments != 2){
			System.out.println("To run the calculator,
			you must enter two numbers to be worked with.");
			System.exit(0);
		}else{
			num1 = Integer.parseInt(args[0]);
			num2 = Integer.parseInt(args[1]);
			System.out.println("Thank you.
			You have entered the numbers "+num1+" and "+num2+".");
		}

		Operations Calculation = new Operations(num1, num2);

		System.out.println("The sum is: "+Calculation.add());
	}
Operations.java:
public class Operations {

	private static int number1;
	private static int number2;

	//Constructor to store num1 and num2 as Numbers
	public Operations(int num1, int num2) {
		number1 = num1;
		number2 = num2;
	}

	public int add(){
		//Add Numbers
		int Sum = number1 + number2;
		//Return Sum
		return Sum;
	}
}
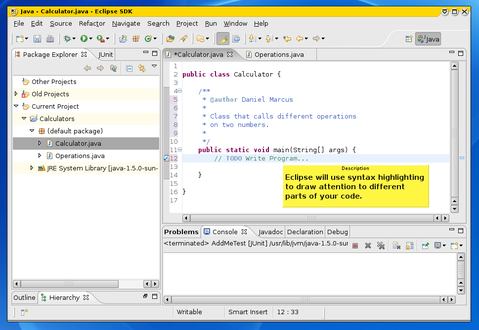
Like any good IDE, Eclipse will use syntax highlighting to alert you to different parts of your code. In particular, it's useful to note that Eclipse will use draw a gray box around the leading ( or { of a block of code, and will underline unknown commands. Eclipse also has powerful autocomplete features such as adding trailing quotes and brackets automatically.
Eclipse has a built-in library of Java's commands, and it's usually pretty good at knowing what you're aiming for. It'll drop down suggestions in a box, and if you see the one you want, you can click on it to have Eclipse fill it in. If it's a command that takes arguments, Eclipse will put in something generic for you to modify. This can be useful if you can't quite remember the way something works.
For example, let's say you can't remember how to make a program terminate. Start by typing:and watch as Eclipse shows you the possible completions, including the one you're looking for,System.e
System.exit(0);
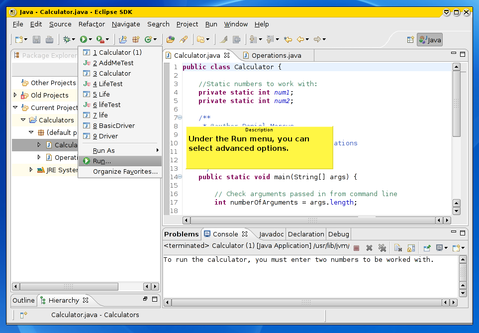
Another useful thing about Eclipse is that it can pass in arguments when a program is executed. For this example, we'll pass in "2 2", which should yield "4" as the sum. In order to tell eclipse to pass those arguments, you need to open the advanced run options, which you'll find under the green "Run" button, which has the "Play" triangle on it.
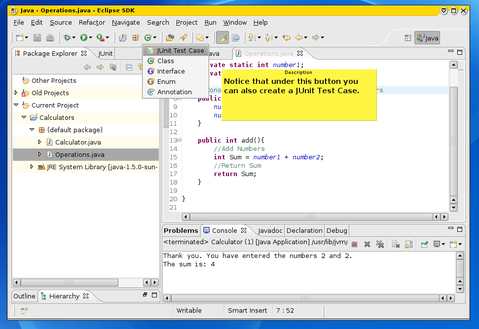
Once the dialogue is open, find your Class, and the "Arguments" tab, and add "2 2" into the box. If all goes well, when you execute the program this time, it should display the sum of 4 rather than failing. If you look under the same menu that you used to create your classes, you'll see that there is also an option for a new JUnit test case.
Now that the code seems to be working, we need to make sure that it will pass the test cases that webcat will give it. In order to do that, we're going to use Eclipse's built in JUnit functionality.
Tip: Make sure that you have "Operations.java" selected in your tabs and your package manager so Eclipse knows which class you want to test with JUnit.
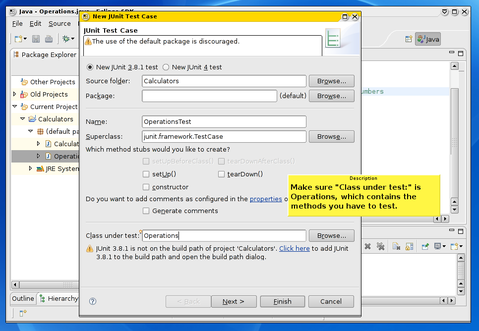
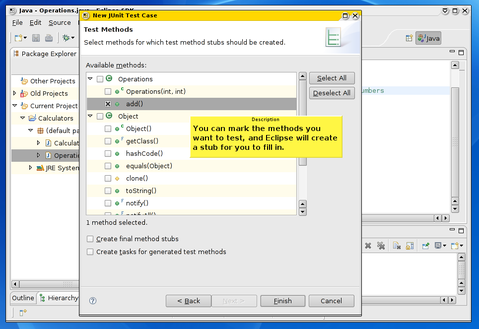
The wizard will lead you through the process of not only creating a new JUnit file, but also choosing methods in the class to test. Select the add() method to have Eclipse generate a stub.
Tip: Don't be surprised if you execute the JUnit test to find it fail immediately. By default, Eclipse makes all the method tests fail, so you may want to comment out any that you haven't written yet. You can remove the comments later to fill it in and perform the test.
Unless you explicity add JUnit to the build path, you'll get a lot of red squiggley-errors right away. Click the red error symbol in the column on the left to get a list of options that Eclipse can try to fix the problem. One of them should be to add JUnit to the build path, and all the squiggleys will go away. Whenever you see the red icon, you can click it for suggestions. Eclipse is a smart software, and can even write code like try-catch statements automatically when it sees that they're needed.
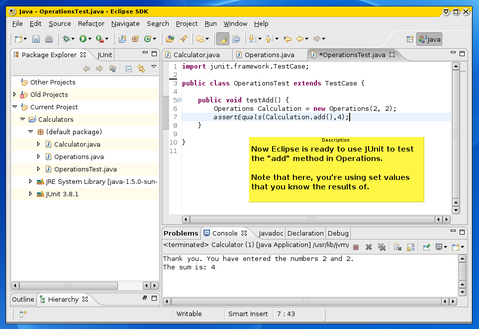
The test cases that you're given above are actually copy-and-paste to what you should have in your JUnit test case. In other words, if you copy and paste the given test cases into your JUnit test case, you can see on your own computer the tests and results that WebCAT will perform and record.
Tip: DO NOT modify the test cases! If they don't work on your computer, they WON'T WORK on WebCAT! Rather, modify your code to work with the test cases.
You should now be able to execute the JUnit test as you would a normal class, and get a nice green bar as you see in the screenshot below.
If you want to see what it looks like when a test fails, however, change the assertEquals to check to see if 2+2=5 (which it doesn't).
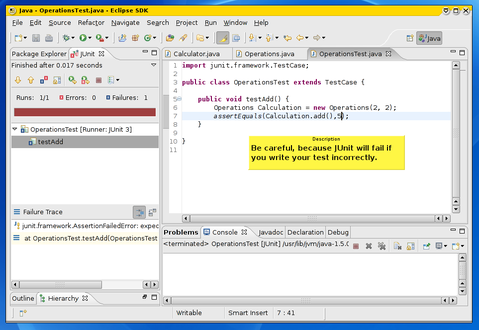
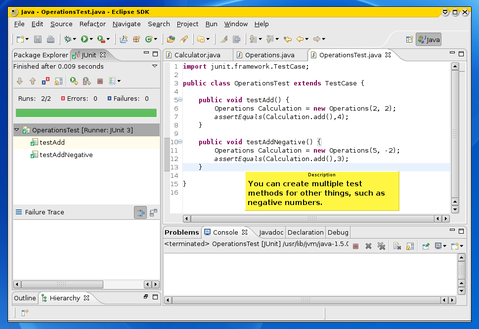
You can continue to add more methods, each of which JUnit treats as a separate test to be as thorough as you want. Adding tests won't necessarily get you brownie points on webCAT, but it will help you further proof your own code. For detailed information on the types of tests that can be used: http://junit.sourceforge.net/javadoc/junit/framework/TestCase.html
Further Exercises
Having a good understanding of Eclipse and JUnit is essential to your success in programming Java and with WebCAT. Add to your calculator a method for subtraction, and try to get it to pass the following test cases. Remember to keep it in the same organization, so your subtract() method should go in Operations.java and be called by Calculator.
Practice Test Cases for Subtraction:
public void testSubtract() {
 		Operations Calculation = new Operations(6, 4);
 		assertEquals(Calculation.subtract(),2);
 	}

public void testSubtractNegative() {
 		Operations Calculation = new Operations(-3, 6);
 		assertEquals(Calculation.subtract(),-9);
 	}