CSC/ECE 517 Spring 2022 - E2230. Integrate Suggestion Detection Algorithm
Problem Definition
This project builds on the work which was done by E2150. This project was added to introduce a new feature in the expertiza which will help reviewers to get feedback for the review provided. When the reviewer will hit a button for getting the review, on the backend API’s will be called and provide the response to the reviewer. Currently, there are suggestion, sentiment and problem detection algorithms which are coded as a web-service. We need to remove issues and work on to provide a scalable and extendable solution for the given problem. We also need to fix and work on some issues with UI such as the order of the rubric and also need to address if some non-text item appears in the rubric.
Previous Implementation/Issues to Address
- The previous team had created a response_analysis.html.erb file in which they have written a script for making a call to the API once the request for the feedback has been done. In the UI, they have a button for saving the review and also for getting feedback for the review. When the review clicks the button a script is called in which they are handling all the steps.
- They have created .yml files which contain information for the type of metrics and also URL of all those APIs. They are loading all the data in those .yml files and then calling a function for getting all the comments which the reviewer has provided, after the comments are fetched, they are converting the comments into JSON and then requesting output for that particular comment object.
- The real issue arises when the responses are coming, they are calling a function for combining the api output, in which they are dealing with the responses by conditional statements, they are checking the metric for the API and based upon that they are processing the output. Also, they are not generalizing for the parsing of the output. Since the current API’s are providing the output in JSON format, they have parsed the output in JSON format. We are proposing to generalize the solution by considering API’s which can provide output in any other form than JSON.
- The issues with the previous implementation are that they are not considering the API’s which do not provide output in JSON and since our task is to integrate API’s we are also considering the solution which can handle any new API in the future with minimal code change.
Previous UI Implementation
The following image shows how a reviewer interacts with the system to get feedback on the review comments.
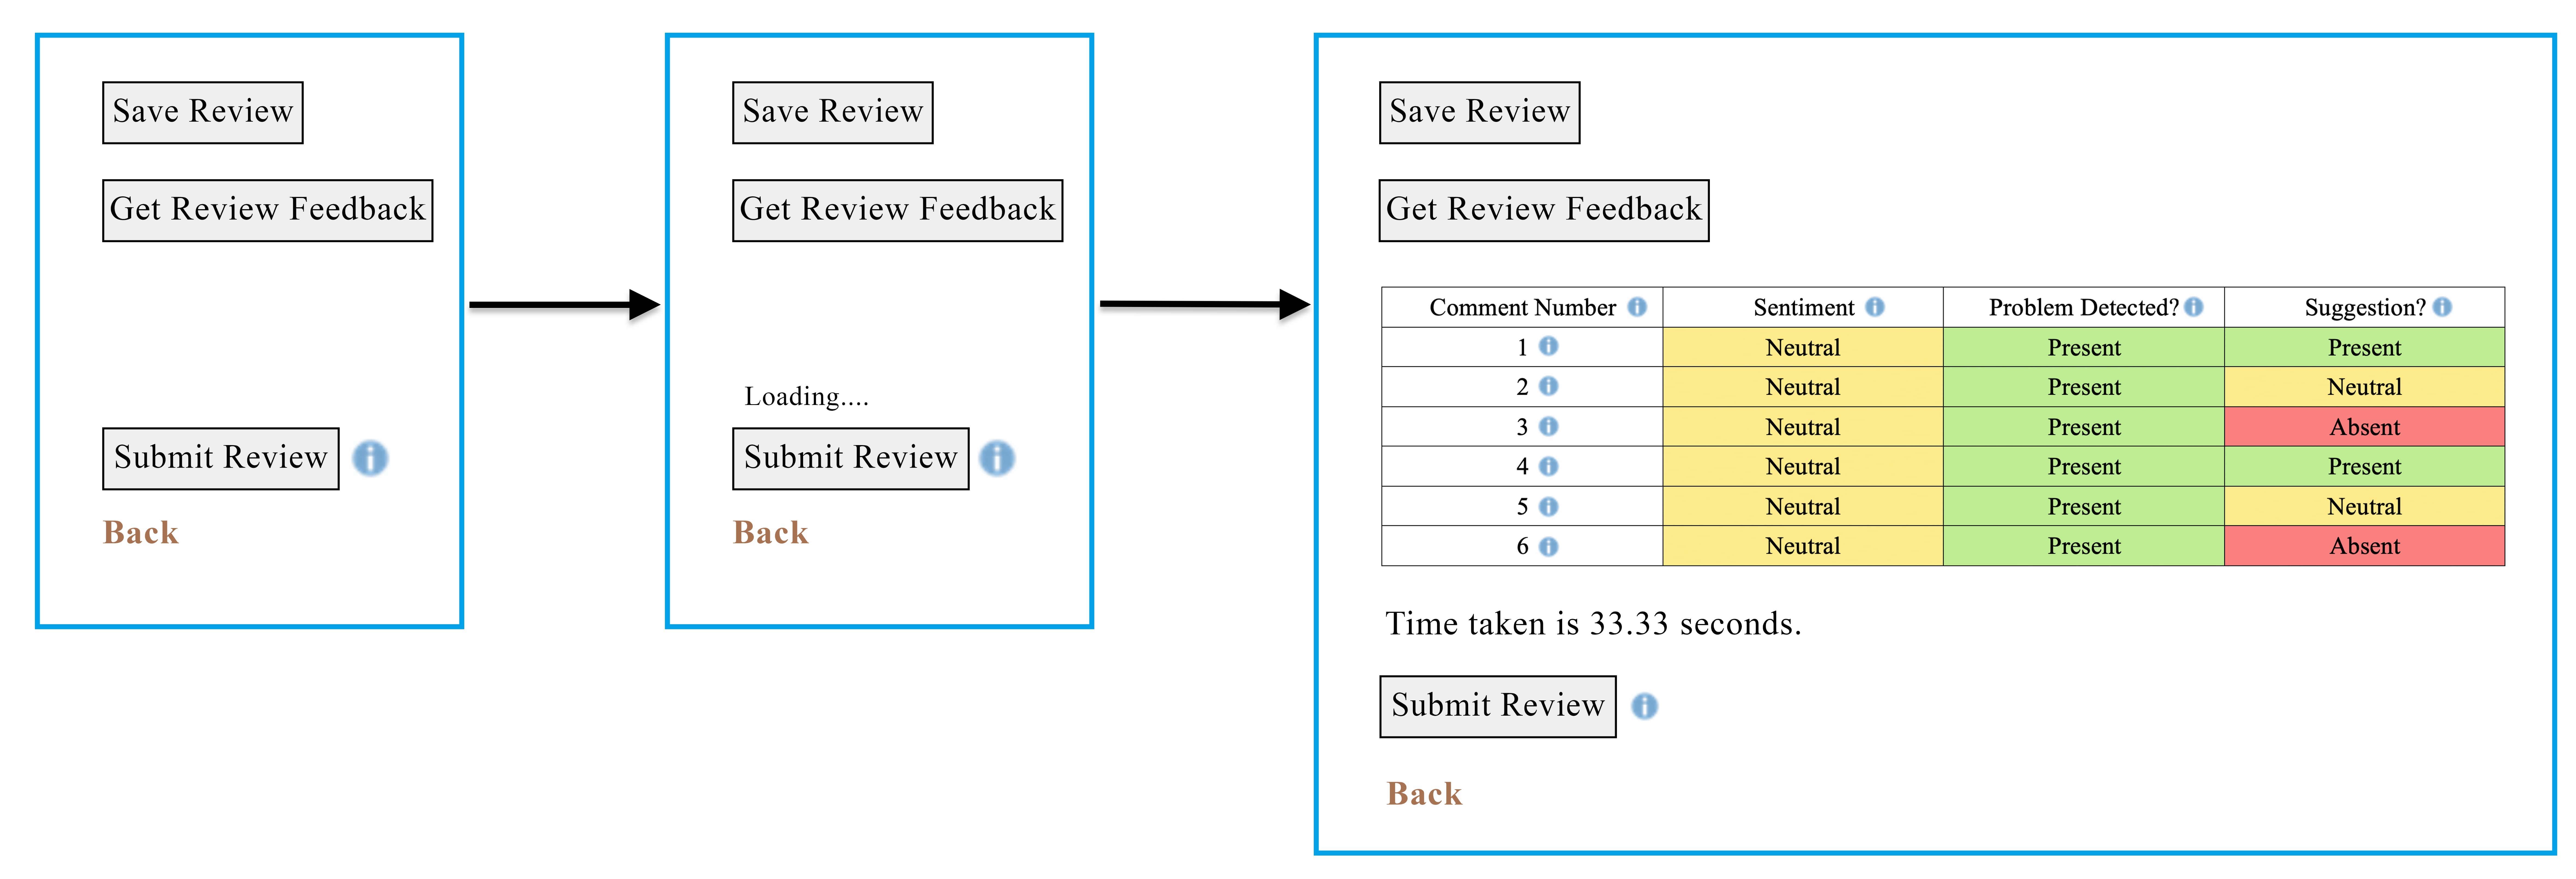
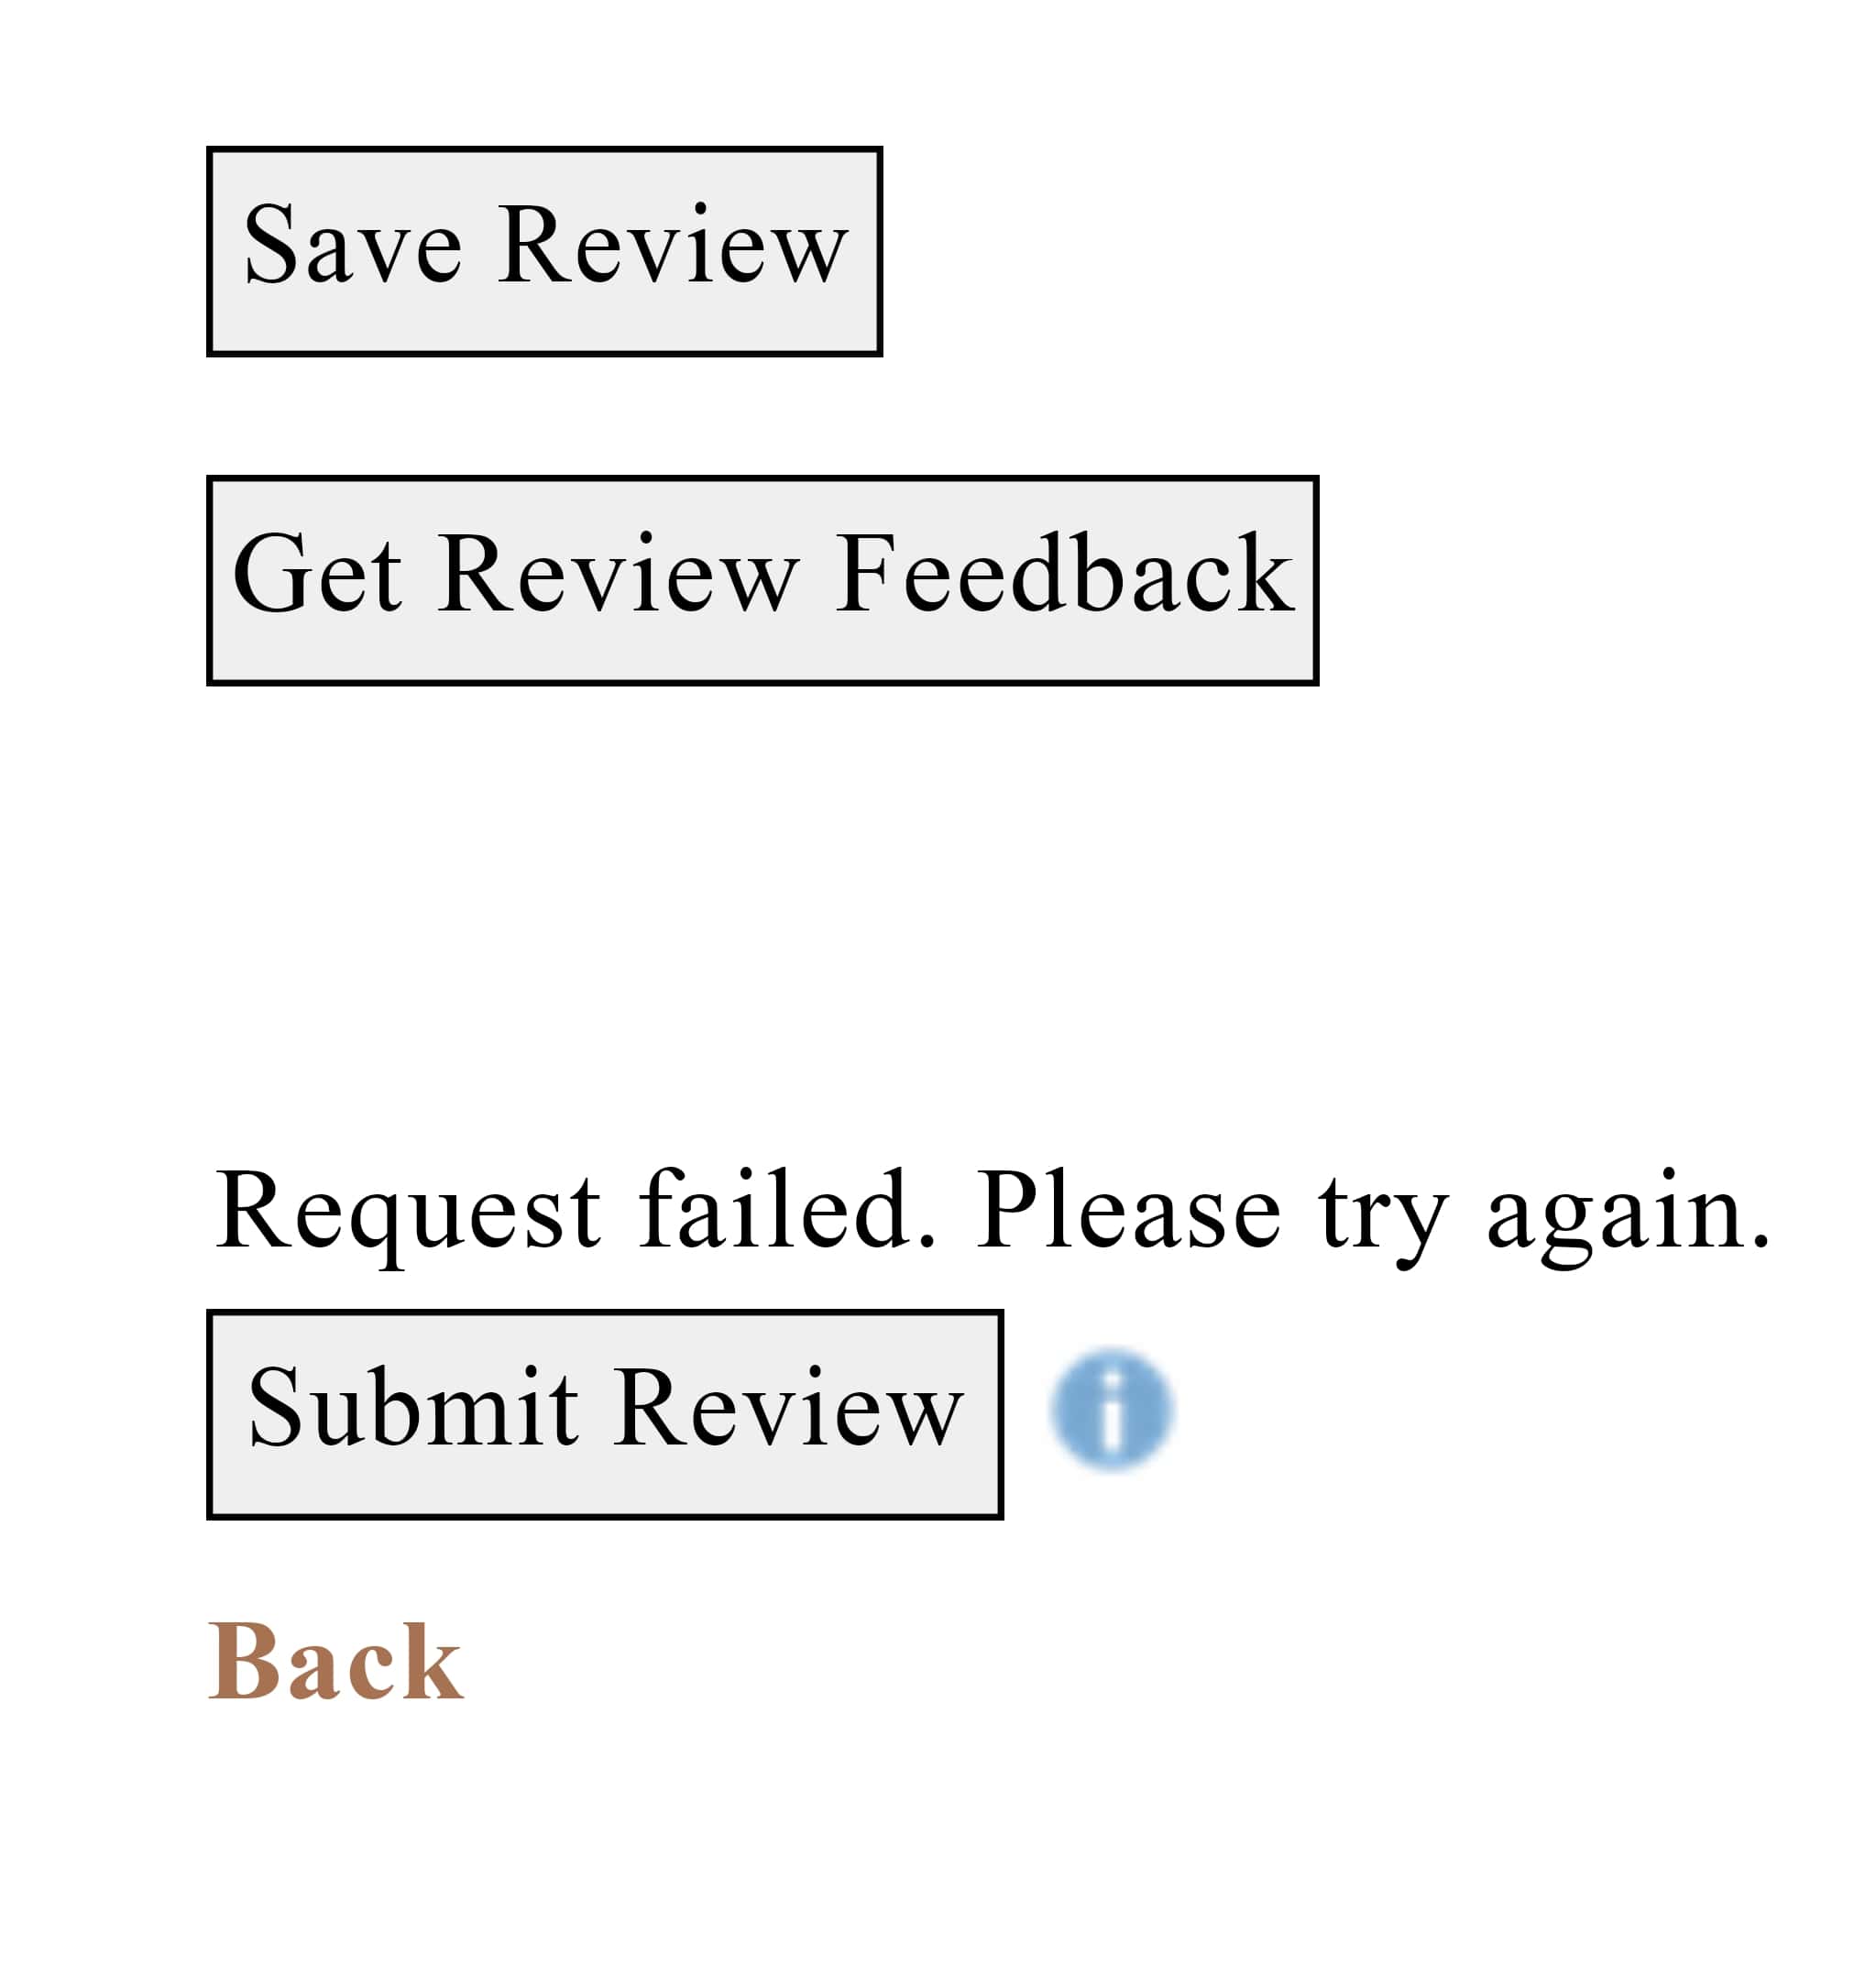
Previous Control Flow

Proposed UI Plan
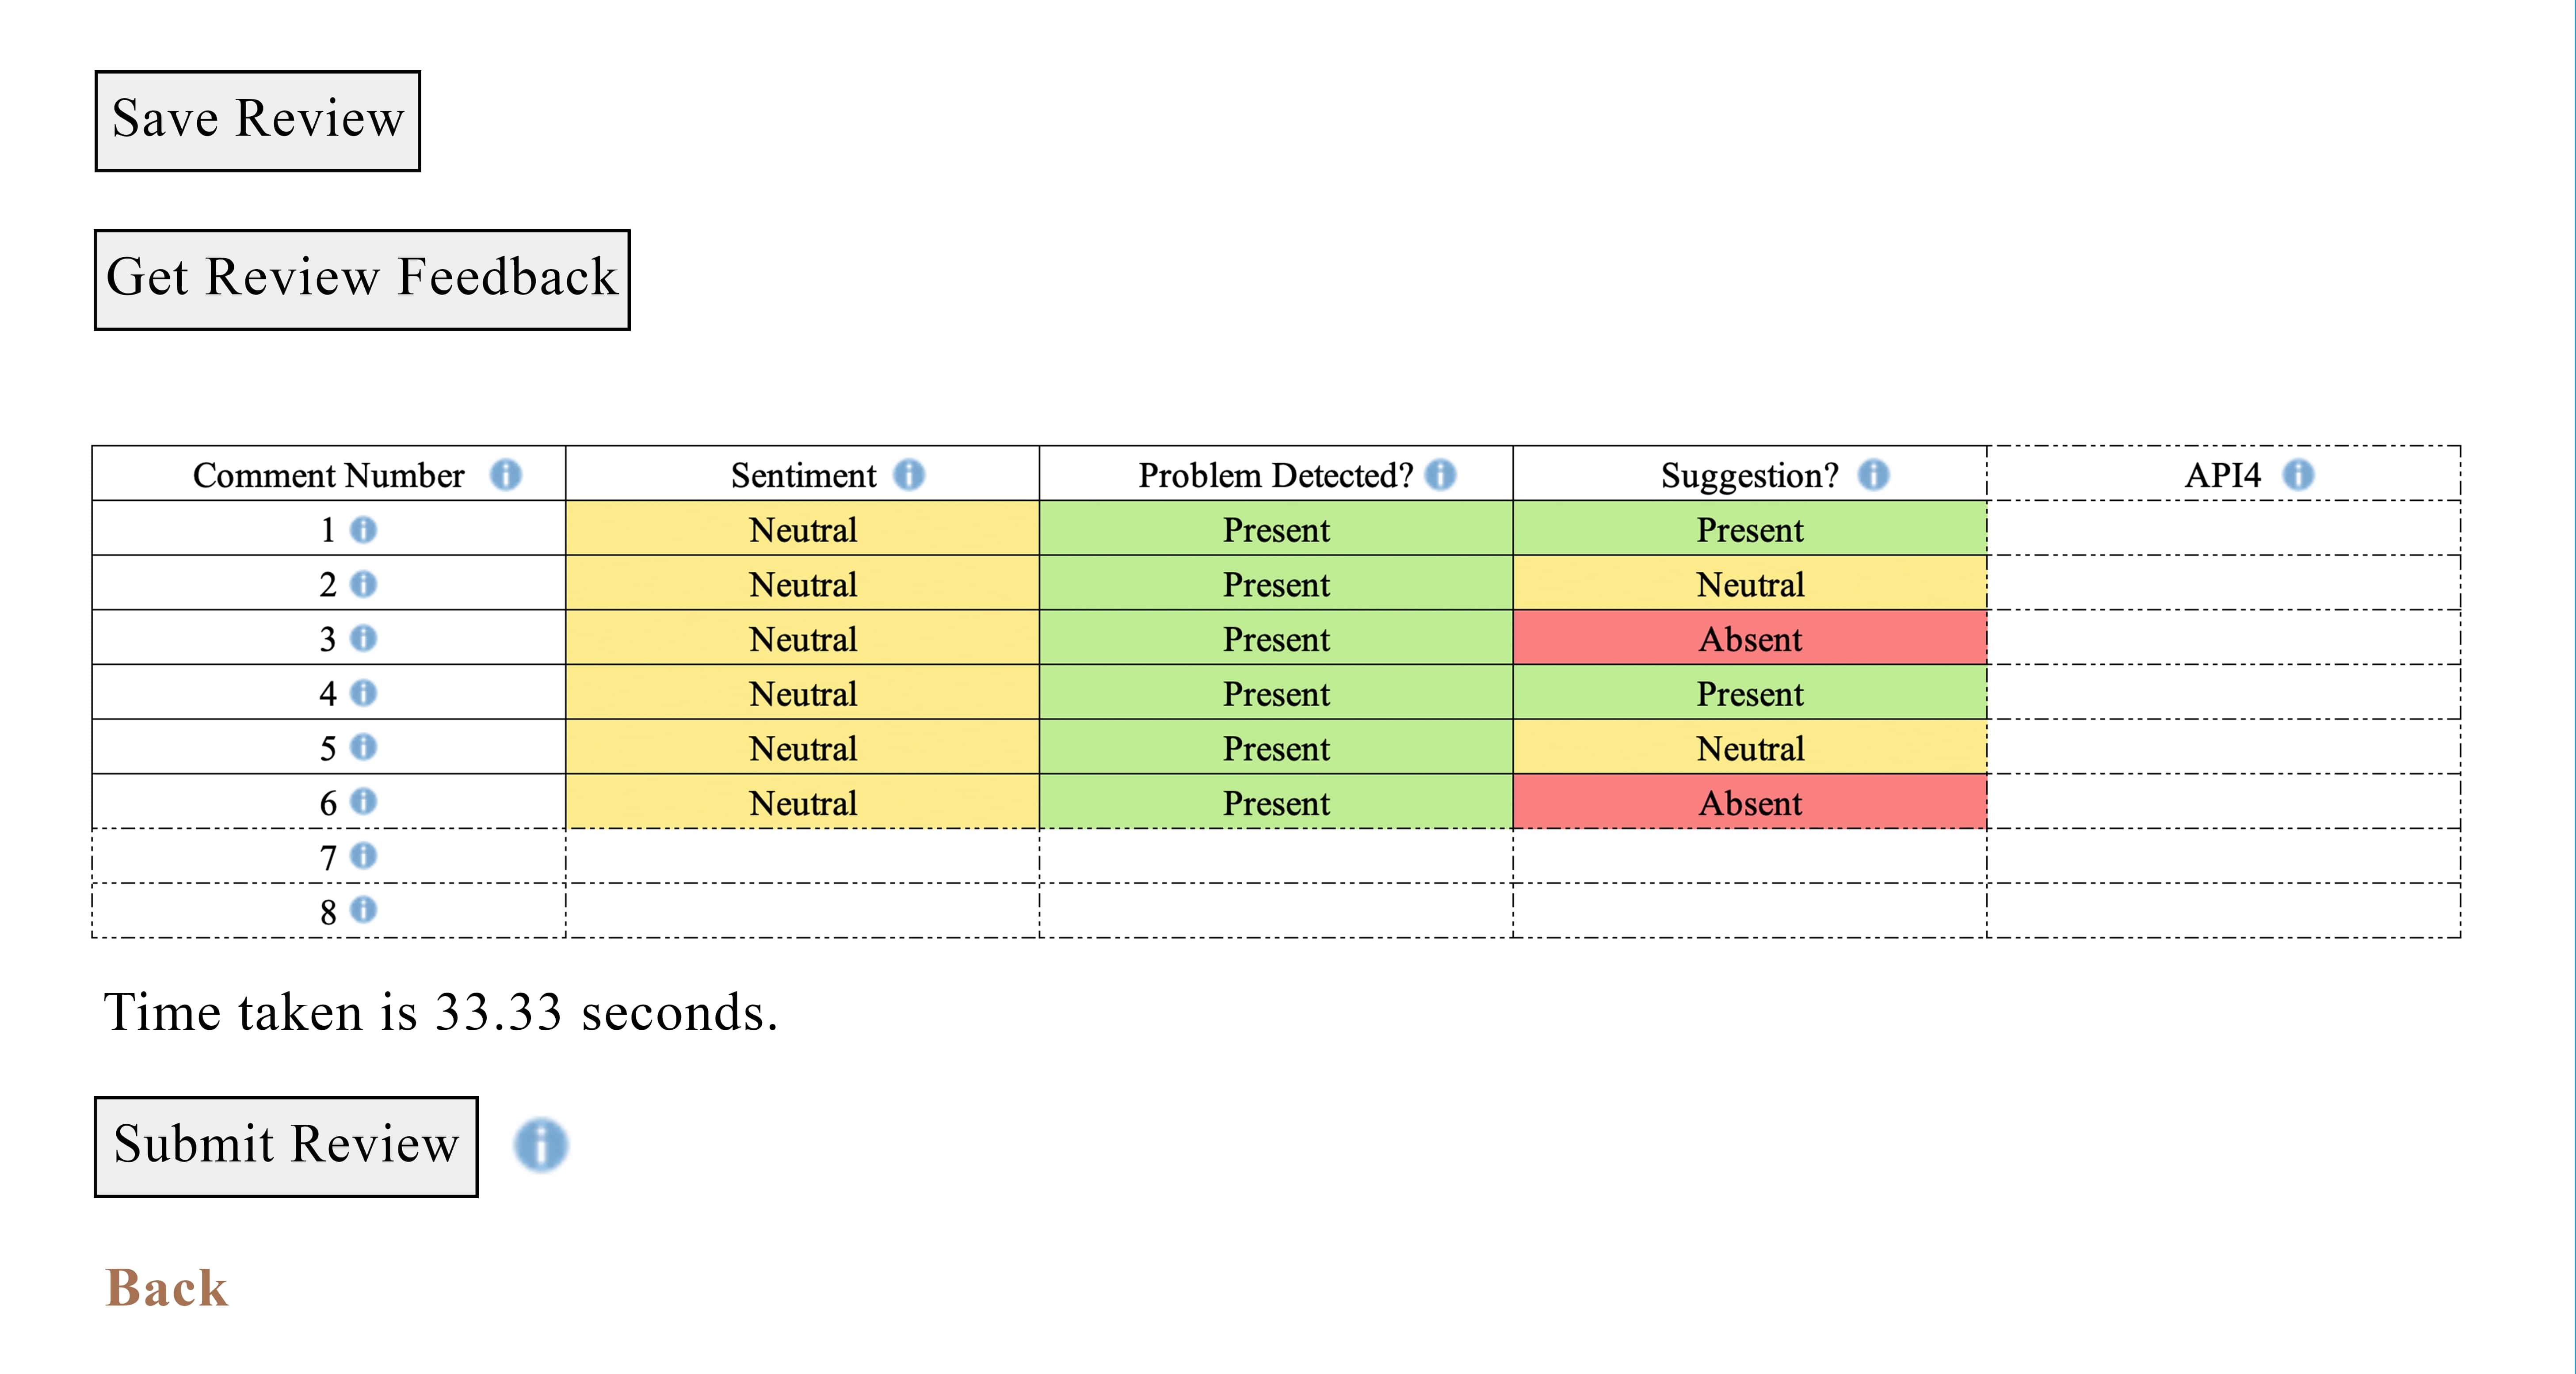
Because we are making the solution scalable, we intend to add the table in such a way that if new API calls are added, the table's columns will be extended correspondingly, making the UI scalable as well as dynamic. We are adhering to the previous design implementation so that, if there are many rubric items, users can easily check the feedback for each comment given to each rubric item. Each comment on hover displays the user's specific comment on the specific rubric review question, making the feedback easily accessible. Similarly to the previous implementation, when the get review feedback button is clicked, we loop through the dynamically created review question form and save the mapping of questions and the reviewer's corresponding comments, which are displayed as a popup when hovered over.
Implementation Plan
There are three major goals that we hope to accomplish in our project:
- Ensure that the UI code is scalable for future additions of metrics to the system.
- Ensure that the UI for comment feedback displays comments in the appropriate order for how the student filled in their response.
- Ensure that non-text rubric items are not passed to API calls that will not know how to handle this input form.
Goal 1: Scalable Metrics
Of these three goals, the first is the one that will require the most reworking of the previous implementations to accomplish. Future iterations on the expertiza project may require the integration of further metrics to collect and display data on student responses. When future programmers need to perform these tasks, it will be important that new API calls for metrics can be easily integrated into our system such that they get automatically triggered on all student responses and their results will be added into the table view shown above.
In order to create a scalable implementation, our team plans to extend the existing implementation of API calls through JavaScript. In the present implementation, metrics are added into the review_metrics_api_urls.yml file. Each metric is listed with a Tool Tip Text and URL to use when performing the API call. After each API is called, it has to have its data formatted into an appropriate form through a single function in the _response_analysis.html.erb file. Our proposed solution would change this such that each metric is associated with its own custom class. These classes would inherit from a generic Metric class that will provide standard operations to call the associated API and format the returned data before passing it along to be included in the process of generating a table. In order to scale this to further metrics in the future, a programmer would then only need to create a custom subclass of the Metric class that implements these pieces of functionality.
Goal 2: UI Comment Ordering
In the previous implementation of this project, there is an issue in which metric feedback for comments is not properly ordered in the generated table, creating confusion for the student as to which metrics apply to which of their comments. In order to solve this issue, we will have to conduct further testing of the output to see what is causing this improper ordering to occur. Upon our team’s initial inspection of the prior implementation, we suspect that this may be caused by the use of JavaScript dictionaries to store the response information. Dictionaries have no implicit ordering, so it could be difficult to define whether the output would be in the proper order when rendering to a table. Due to the lack of depth in testing from the previous implementation, we will have to further investigate this to figure out the true cause once we begin coding for the project.
Goal 3: Non Text Rubric Items
There are several instances in which student responses will be in a non-text format, such as in the instance of selecting a checkbox for a true or false response. Passing this type of information along to the various API calls desired does not make sense for most cases, such as detecting sentiment from the comments. From the previous implementation, it is unclear whether or not these types of questions were being passed along to the API, although our initial inspection of the code base leads our team to believe that they are not. This feature will be something that is prioritized during testing to ensure that we cover this scenario and do not have to worry about undefined behavior in the final implementation in the expertiza project.
Sample API Input/Output
At the present moment, there are three metrics that need to be implemented in our system. They will be retrieved from the following API calls:
- Sentiment: https://peerlogic.csc.ncsu.edu/sentiment/analyze_reviews_bulk
- Presence of Problems: http://152.7.99.200:5000/problem
- Presence of Suggestions: http://152.7.99.200:5000/suggestions
Each of these API calls uses the following JSON input format:
 {
     "text": "This is an excellent project. Keep up the great work"
 }
Each API call returns a response in a JSON format. Here is a sample expected JSON return format for the Sentiment metric:
 {
     "sentiment_score": 0.9,
     "sentiment_tone": "Positive",
     "suggestions": "absent",
     "suggestions_chances": 10.17,
     "text": "This is an excellent project. Keep up the great work",
     "total_volume": 10,
     "volume_without_stopwords": 6
  }
Implementation
Our team was able to successfully refactor the existing functionality from the previous team's work into a base JavaScript class that could be easily extended. This base class can be found in:
app/assets/javascripts/review_metrics
We were also able to refactor the response_analysis code written by the previous team. We moved the entire script code from
app/views/response/_response_analysis.html.erb
to
app/assets/javascripts/response_analysis.js
. Since there was a lot of code written in the script tag in html we decided to move code to a javascript file which will help keep the javascript separate from html. In the response_analysis, we also refactored the naming conventions.
This folder also contains each of the three associated classes for problem detection, suggestion detection, and sentiment analysis. The system is set up such that if future API metrics need to be added to the system, the developer will only need to extend the base JavaScript Metric class, implement format_response() in the new class, and add configuration to review_metrics_api_urls.yml.
Creating a new Metric Class
The newly created class will be very simple, and needs only to simply override the format_response() function from the base Metric class. This function should format the data that was returned from the API call in the desired method for the table output. For instance, for the sentiment metric, the data is formatted to return the value of "Positive", "Neutral", or "Negative" as appropriate for the sentiment detected.
The Base metric.js has two methods which take care of calling the API and making a XML Http request. The current metric class will be extended by the individual metrics and there should be a separate class for each metric which will contain format_response which a user will have to update according to the output which comes out of API. This will help the configuration of API easier.
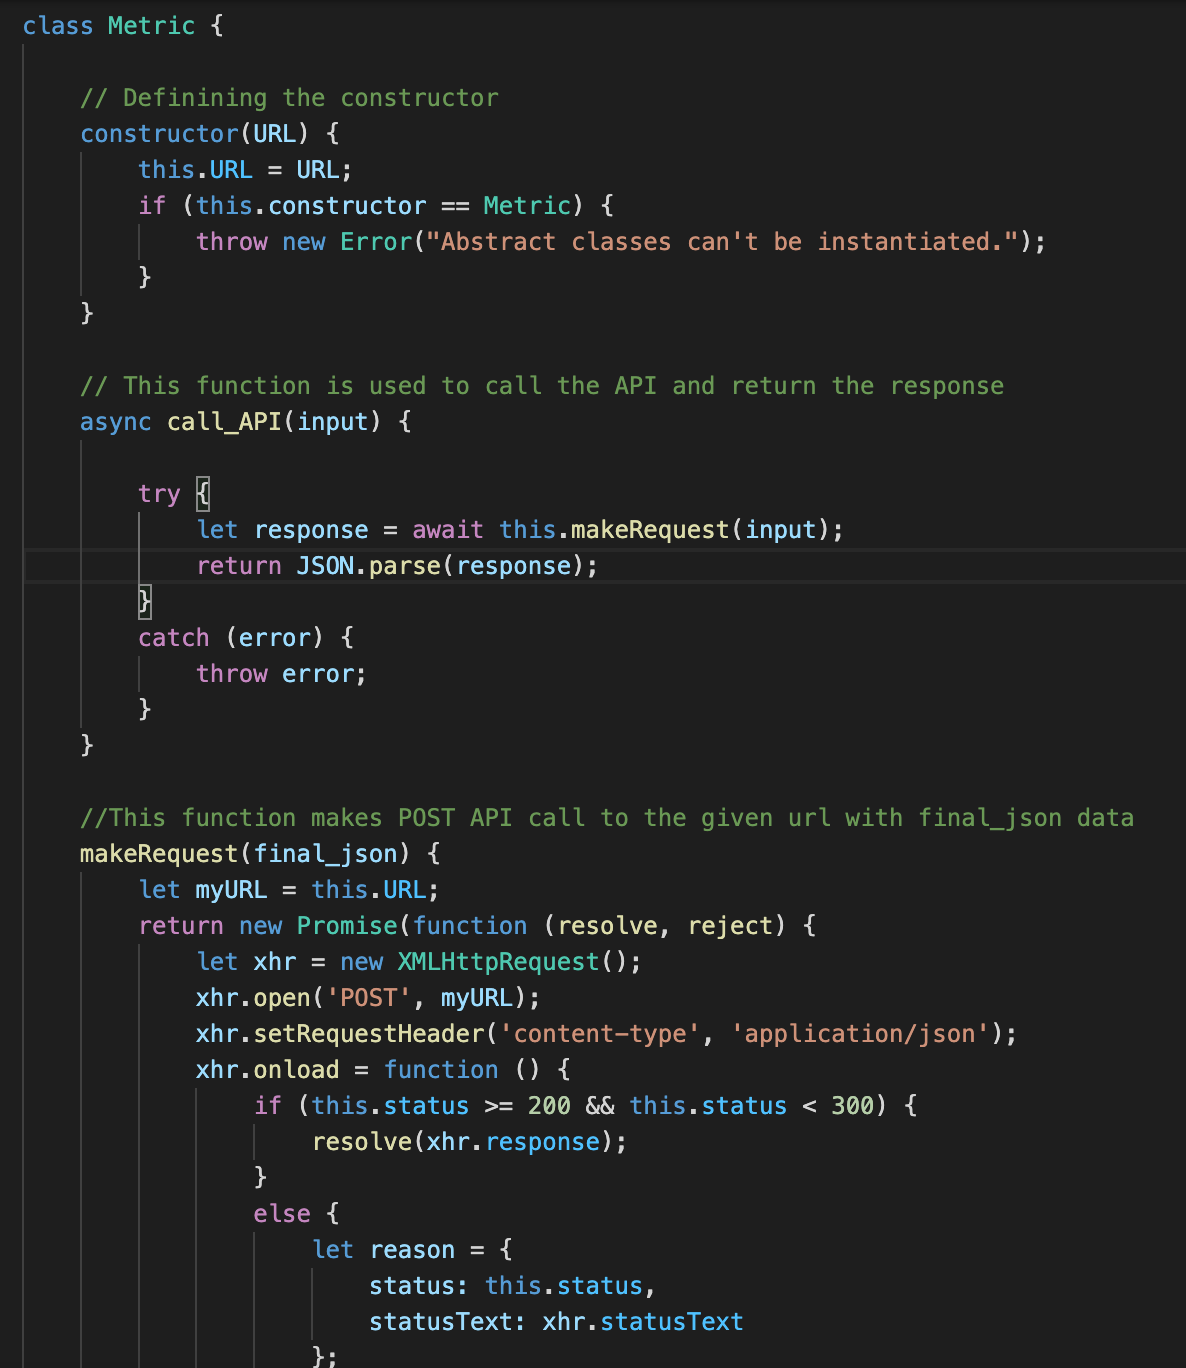
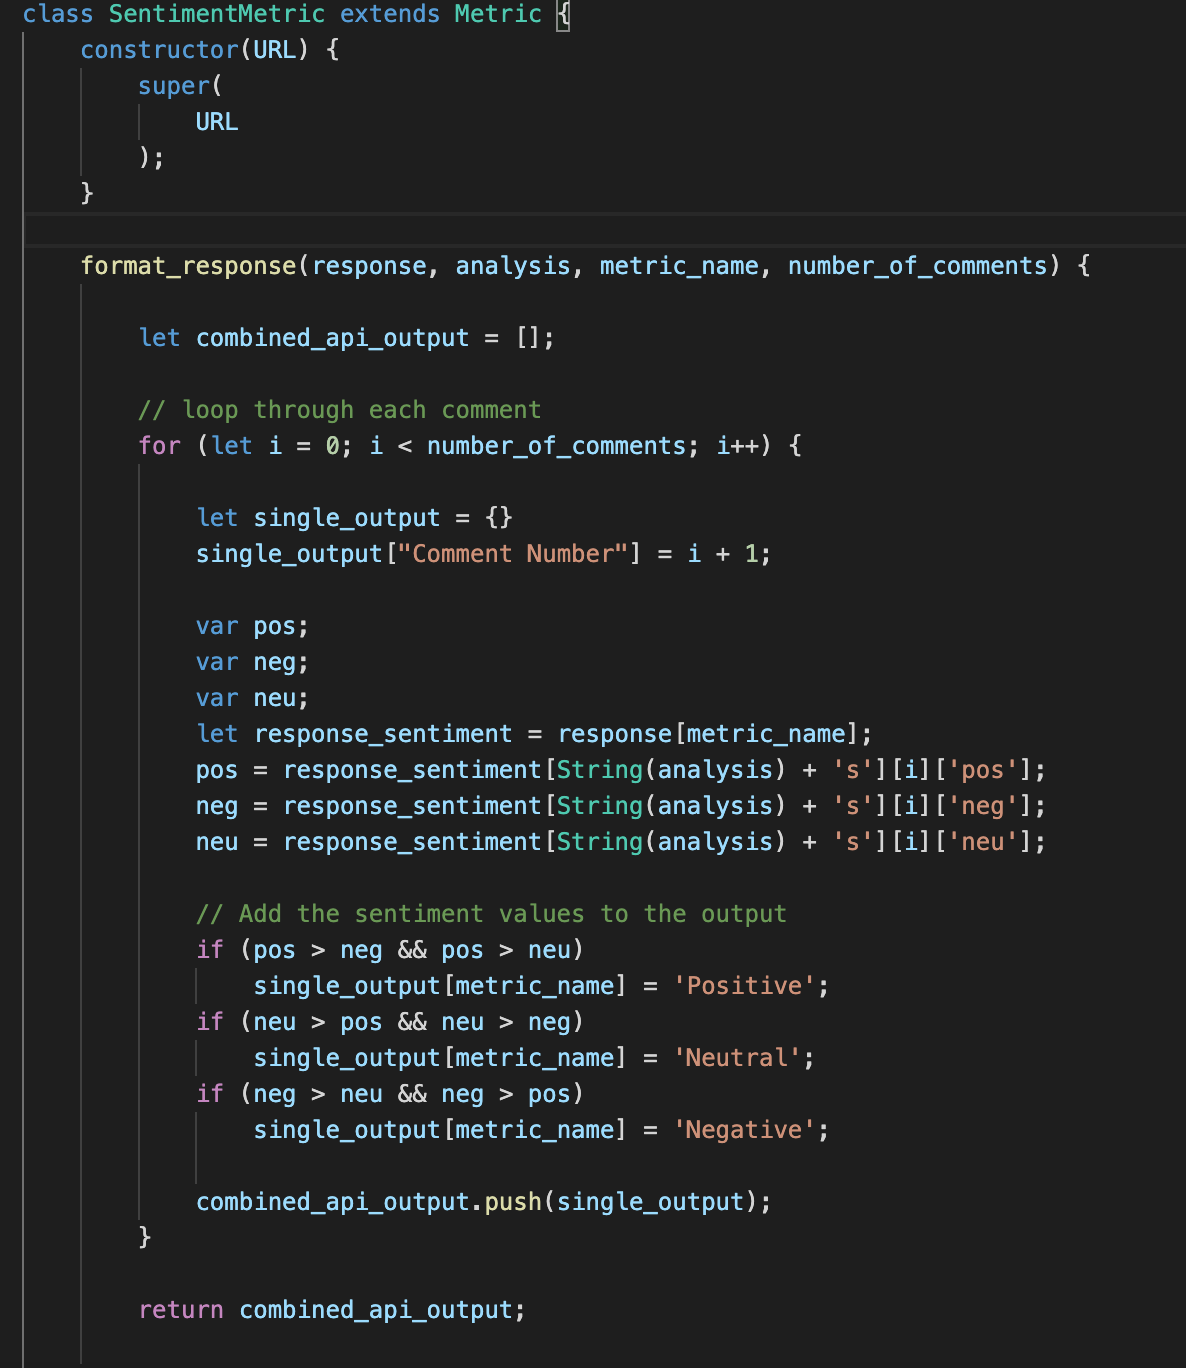
After creating a new Metric class and configuring it in the proper ways in the YML files, the new metric should automatically be called on each rubric response and have its data displayed to the user in the same table as existing metrics. When writing the format response method, the user will have to keep the output the same as the following dictionary of dictionaries which collects the response which should be written on the frontend. An example of output is:

After this output, the generation of table and also getting the output in the required format to generate the table is taken care of by the response_analysis.js file and the whole process is generic.
This was all part of our implementation for scaling and making the code to be generic so that a new API can be called and the table is generated by adding a new class and proper configuration of yml files.
YML Configuration
For configuring the new class, the user will have to update two yml files. The first yml file is the review_metrics.yml file. This file has a metrics array which has one word description about what response API gives. For instance, if a new API is being integrated and it gives a response about the tone, the “sentiments” should be written inside the metric. Also include a key for the same name "sentiments" , setting it to true if you want to get feedback about the sentiment of the comment.
The second file which the user will have to change is review_metrics_api_urls.yml. This file contains information about the metrics and also the API URLs. We updated this file to include the class name as well. When a new metric is added, the user will add a new javascript file containing a class, which will extend the base class. The name of the class will have to be included in this yml file under the key className. Also include the URL for API in the yml file. The user will have to add all that for the development, test and production of all the three of them.
UI Comment Ordering
In the previous implementation of this project, there is an issue in which metric feedback for comments is not properly ordered in the generated table, creating confusion for the student as to which metrics apply to which of their comments.
Issues with Previous Implementation
In the previous solution, the team attempted to increase a variable (review count) and retrieve the review metric with the element id "responses_" + review count + "_comments." This implementation was causing the team two major issues.
- The team was only allowed to read the review metric in the order of the incremental variable, which messed up the order of the rubric items. Because they were completely dependent on the incremental variable, the order was getting messed up, resulting in the incorrect order of the rubric elements in the output table.
- During testing, another issue was discovered due to the absence of a specific rubric item number from the page. For example, if the rubric elements were listed in the following order: (respones 0 comments, respones_1_comments, respones_2_comments, respones_4_comments, respones_5_comments, respones_6_comments). The prior solution would have terminated after only reading the first three rubric items, namely (respones_0_comments, respones_1_comments, respones_2_comments). This was also causing you not to read all of the rubric elements on the preceding page.

Bug Fixes and Issue Resolution
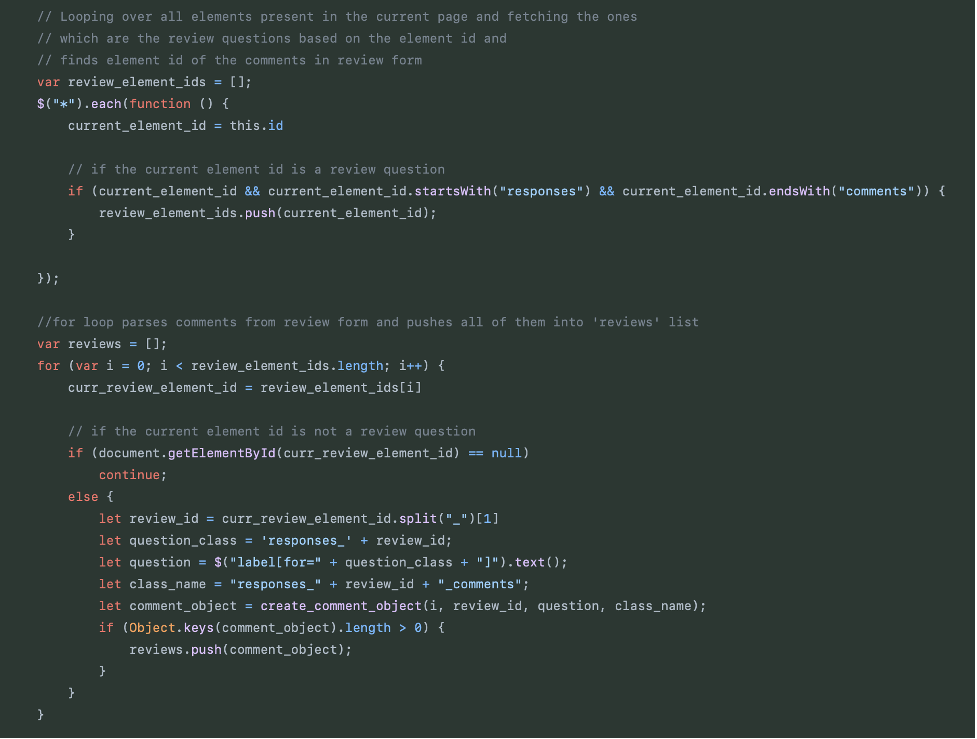
Both concerns from the previous implementation were resolved by utilizing a simple loop and iterating over all of the elements on the page, fetching and saving just the ones that are rubric items and storing the same in a list or an array. The same array is then used to retrieve the review text and generate the final json object that is required to be supplied to the API calls in order to retrieve the response from the API calls. The following concerns were resolved and quickly discussed from the prior implementation:
- Since the element ids are now fetched in the order they are shown on the page, the screwed up order has been rectified, and the fetching of the rubric items has been made independent of any internal variable, making the order independent of any internal factor. Getting the rubric elements in the order they appear on the page.
- The second issue was handled since the prior method used an incremental variable, thus by removing this reliance, we are now able to fetch all of the rubric items rather than stopping after a limited number of questions, as was the case with the previous approach. This results in the retrieval of all rubric items on the screen, as opposed to the previous method, which was frequently missing a few questions.
Non Text Rubric Items
There are various times where student responses appear in a non-text format, such as when selecting a checkbox for a yes or false response. These non-test format items appear on the page with the element id "respones_<number>_checkbox" or something else. Since while building the fetch loop in app/assets/javascripts/response analysis.js. Because passing this type of information along to the various API calls desired does not make sense in most cases, such as detecting sentiment from comments, we ensured that these non-rubric items are not fetched and, as a result, are not stored in the returning JSON object and, as a result, are not passed to any API calls. The same is being validated while testing the changes, and future implementations do not have to worry about undefined behavior in the expertiza project's final implementation.
Files edited
- app/assets/javascripts/response_analysis.js
- app/assets/javascripts/review_metrics/metric.js
- app/assets/javascripts/review_metrics/problem.js
- app/assets/javascripts/review_metrics/sentiment.js
- app/assets/javascripts/review_metrics/suggestion.js
- app/controllers/response_controller.rb
- app/views/response/_response_analysis.html.erb
- app/views/response/response.html.erb
- config/initializers/load_config.rb
- config/review_metrics.yml
- config/review_metrics_api_urls.yml
Testing
Testing Methodology:
We decided to proceed with mostly manual testing for this project. This is due to the fact that most of the functionality is written in JavaScript which is not able to be tested through the use of rspec as most other tests in the project are written. In addition, much of the functionality regarding these types of tests relies on outside API calls which can change values if the API functionality is changed. For these reasons, we thought it would be best to create a defined method of manually testing this project that can be used in the future without issues.
Preconditions for Every Test:
1. Create a new assignment:
 a. In the navigation bar, click “Manage → Assignments”
 b. Click the blue “+” button in the top right of the page
 c. Use the following field values in the “General” Tab:
   i. Name: “Basic Assignment”
   ii. Course: “CSC 216, Fall 2009”
   iii. Has Teams?: True
 d. Click “Create”
 e. Click on the “Due dates” tab and select the following options:
   i. For “Round 1: Submission”, set the Date & Time to be approximately 10 minutes ahead of the current time (You will need to complete the other setup in this time in order to test the review functionality, so choose accordingly).
   ii. For “Round 1: Review”, set the Date & Time to be approximately 1 week from today (give yourself plenty of time to complete the test).
 f. Click “Save”
 NOTE: the assignment should default to have a Review rubric.  For our testing, this default value was “rubric1,” which had all the coverage we needed for both text and non-text (checkbox) based questions.  If this does not default to the same rubric, select a different rubric or create your own.
2. Add Students to the assignment:
 a. In the navigation bar, click “Manage → Assignments”
 b. Find the newly created assignment “Basic Assignment” and click the button to “Add participants”
 c. Add the following two test users:
   i. “student7144”
   ii. “student7126”
3. Submit the assignment as one user
 a. In the navigation bar, click “Manage → Impersonate User”
 b. Enter “student7126”
 c. Click “Impersonate”
 d. Open the newly created assignment.
 e. Add yourself to a new team under the “Your Team” tab.
 f. Add a submission under the “Your Work” tab.
   i. This can be simple, such as including the URL “www.google.com”
4. Review the assignment as the other user
 a. In the navigation bar, click “Revert” to stop impersonating user “student7126”
 b. Click “Manage → Impersonate User”
 c. Enter “student7144”
 d. Click “Impersonate”
 e. Open the newly created assignment.
 f. Add yourself to a new team under the “Your Team” tab.
 g. Wait for the submission deadline to pass.  This is the same deadline as what you set in step 1e.
 h. Click “Others’ work”
 i. Click “Request” to get access to review the previous student’s work.
 j. Fill out the review rubric.  Include comments in each of the text boxes where appropriate.
 k. Click “Get Review Feedback” to submit your reviews to the various API Metric calls.
Table of Tests/Results
| What are we Testing? | Description | Expected Results | Actual Results |
|---|---|---|---|
| “Get Review Feedback” Button | Students should see the “Get Review Feedback” button near the bottom of the page. Click on the “Get Review Feedback” button. | When the button is clicked, there may be a message that appears saying “Loading…” before a table appears containing metrics on the responses given by the student. The metrics at the current moment should be Sentiment, Problem Detection, and Suggestion Detection. | As expected, when students click the button after completing their review comments, they see a table with API metrics for each of their comments. There are metrics for Sentiment, Problem Detection, and Suggestion Detection. |
| Time Taken | Students should click the “Get Review Feedback” button. The page will show the message “Loading…” until the API calls are completed, then display the time that was taken to complete the operation. | The time should be displayed on the page in seconds underneath the table of metric responses. The time should be within the range of 10-60 seconds depending on the machine that expertiza is running on and the metrics being requested. | For our tests running expertiza on the VCL, the time was properly displayed and tended to be around 25 seconds. |
| Order of The Comments | Students should write comments on each question in the rubric. These should be seen in the metric table in the same order as they appear for completing the rubric. | In the table, comments should be ordered the same as they were in the rubric for the student to fill out. This can be verified by hovering over the information tooltip for each question, which shows the question associated with that row and the answer that the student gave. | The feedback in the table is in the proper ordering for each of the questions and responses. |
| Tooltip Values | In the table, the user should be able to hover over the information icon for each of the questions and get more information about the question that the metric values are associated with. | When hovering over each question, the user should see a tooltip including the question and the response that they provided in the following format: “Q) <Question>, A) <Answer>” | The tooltip text appropriately displays the question and associated answers for all questions. |
| Handling Non-Text Questions | The rubric used for testing must include at least one non-text (checkbox) question and several other text-based questions. These non-text questions should not impact the appearance of the metric table at all and they will not be processed by the metric APIs. | The results table shows up with rows for each of the text-based questions, but not for the non-text based question. The ordering of the text-based question feedback still aligns with the order that they were completed in the rubric. | The results table contains only the appropriate values for text based questions, and is in the proper order. |
For current submission testing, we have created an assignment 'Assignment 2230' and added three students to that assignment. We have uploaded a dummy submission and reviewed it with normal comments. For running the get review feedback, please login using instructor6 as username and the password: password. Go to manage and impersonate user. Impersonate student2231. Now you can see another impersonate tab in navigation bar. Impersonate student2235 and click on Assignment2230. Now click on other's work and then click edit button. You will see Get Feedback Review at last. You can click the button and you can see the output in form of table. Running the API's will take 20-30 seconds. For running please use Google Chrome and add CORS unblock as an extension.
Important Links
- Previous Ducumentation: https://expertiza.csc.ncsu.edu/index.php/CSC/ECE_517_Fall_2021_-_E2150._Integrate_suggestion_detection_algorithm#UI_Changes
- Project Description: https://docs.google.com/document/d/1H0BjzMBz5it7Wckhegq4LXhMi8RVctTwVzP2x9gnFCo
- Sentiment Analysis Peer Logic: https://peerlogic.csc.ncsu.edu/sentiment/developer
- Video Link: https://www.youtube.com/watch?v=fD-ikdqvh-E
- Pull Request: https://github.com/expertiza/expertiza/pull/2397
- Project Link: http://152.7.99.57:8080/
Team
- Dev Gaurangbhai Mehta (dmehta3)
- Matthew Martin (mkmarti5)
- Muhammet Mustafa Olmez (molmez)
- Priyam Garg (pgarg6)