M1852 Implement missing WebAudio node support: Difference between revisions
(→Build) |
|||
| Line 253: | Line 253: | ||
'''Testing Approach''' | '''Testing Approach''' | ||
As we have implemented the processing algorithm for oscillator different oscillator types, after running the rust file the user will be able to hear the different generated waveforms based on its type. (Sine, Square, Sawtooth, Triangle) | |||
| Line 261: | Line 260: | ||
Please read and perform the actions on the Build and Verification sections properly before testing. | Please read and perform the actions on the Build and Verification sections properly before testing. | ||
1) | 1) Make sure you are in this directory: <big><code>target/debug</code></big> | ||
2) | 2) Run the command <big><code>./oscillator</code></big> | ||
3) Different sounds based on the type of oscillator (waveform) must be generated after definite interval of time. | |||
[[Media:triangle.ogg]] | |||
==='''Pull Request'''=== | ==='''Pull Request'''=== | ||
Revision as of 05:06, 9 November 2018
Introduction
Servo
Servo is a modern, high-performance browser engine designed for both application and embedded use and written in the Rust programming language. It is currently developed on 64bit OS X, 64bit Linux, and Android.
More information about Servo is available here
Rust
Rust is a systems programming language focuses on memory safety and concurrency. It is similar to C++ but ensures memory safety and high performance.
More information about Rust can be found here
Web Audio API
The Web Audio API involves handling audio operations inside an audio context, and has been designed to allow modular routing. Basic audio operations are performed with audio nodes, which are linked together to form an audio routing graph. Several sources — with different types of channel layout — are supported even within a single context. This modular design provides the flexibility to create complex audio functions with dynamic effects.
Audio nodes are linked into chains and simple webs by their inputs and outputs. They typically start with one or more sources. Sources provide arrays of sound intensities (samples) at very small timeslices, often tens of thousands of them per second. These could be either computed mathematically (such as OscillatorNode), or they can be recordings from sound/video files (like AudioBufferSourceNode and MediaElementAudioSourceNode) and audio streams (MediaStreamAudioSourceNode). In fact, sound files are just recordings of sound intensities themselves, which come in from microphones or electric instruments, and get mixed down into a single, complicated wave.
Outputs of these nodes could be linked to inputs of others, which mix or modify these streams of sound samples into different streams. A common modification is multiplying the samples by a value to make them louder or quieter (as is the case with GainNode). Once the sound has been sufficiently processed for the intended effect, it can be linked to the input of a destination (AudioContext.destination), which sends the sound to the speakers or headphones. This last connection is only necessary if the user is supposed to hear the audio.
A simple, typical workflow for web audio would look something like this:
1. Create audio context
2. Inside the context, create sources — such as <audio>, oscillator, stream
3. Create effects nodes, such as reverb, biquad filter, panner, compressor
4. Choose final destination of audio, for example your system speakers
5. Connect the sources up to the effects, and the effects to the destination.
Scope
Major browsers support the WebAudio standard which can be used to create complex media playback applications from low-level building blocks. Servo is a new, experimental browser that supports some of these building blocks (called audio nodes); the goal of this project is to to improve compatibility with web content that relies on the WebAudio API by implementing missing pieces of incomplete node types (OscillatorNode) along with entire missing nodes (ConstantSourceNode, StereoPannerNode, IIRFilterNode).
Additional project information is available here
Implementation
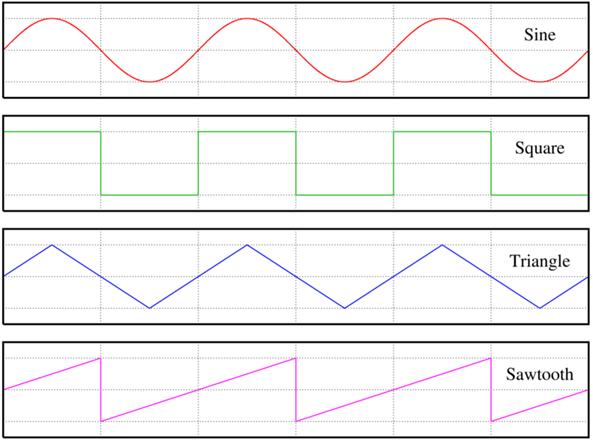
The implementation involved audio processing for Sine, Square, Sawtooth and Triangle waveforms. We created a oscillator.rs file which includes examples of the given waveforms. These waveforms can be visualized using the given image:

The "OscillatorType" variable is a string which has the name of the waveform associated with it. For each waveform, we calculate the value which is used by the OscilaterNode class to generate a wave. Each type of wave has a particular output. The output is a function of phase, with each waveform having its own function as follows:


Code Snippet
             // Convert all our parameters to the target type for calculations
             let vol: f32 = 1.0;
             let sample_rate = info.sample_rate as f64;
             let two_pi = 2.0 * PI;

             // We're carrying a phase with up to 2pi around instead of working
             // on the sample offset. High sample offsets cause too much inaccuracy when
             // converted to floating point numbers and then iterated over in 1-steps
             //
             // Also, if the frequency changes the phase should not
             let mut step = two_pi * self.frequency.value() as f64 / sample_rate;
             while let Some(mut frame) = iter.next() {
                 let tick = frame.tick();
                 if tick < start_at {
                     continue
                 } else if tick > stop_at {
                     break;
                 }

                 if self.update_parameters(info, tick) {
                     step = two_pi * self.frequency.value() as f64 / sample_rate;
                 }
                 let mut value = vol;

                 //Based on the type of wave, the value is calculated using the formulae for the respective waveform
                 match self.oscillator_type {
                     OscillatorType::Sine => {
                         value = vol * f32::sin(NumCast::from(self.phase).unwrap());
                     }

                     OscillatorType::Square => {
                         if self.phase >= PI && self.phase < two_pi {
                                     value = vol * 1.0;
                                 }
                                 else if self.phase > 0.0 && self.phase < PI {
                                     value = vol * (-1.0);
                                 }
                     }

                     OscillatorType::Sawtooth => {
                         value = vol * ((self.phase as f64) / (PI)) as f32;
                     }

                     OscillatorType::Triangle => {
                         if self.phase >= 0. && self.phase < PI/2.{
                             value = vol * 2.0 * ((self.phase as f64) / (PI)) as f32;
                         }
                         else if self.phase >= PI/2. && self.phase < PI {
                             value = vol * ( 1. - ( ( (self.phase as f64) - (PI/2.)) * (2./PI) ) as f32 );
                         }
                         else if self.phase >= PI && self.phase < (3.* PI/2.) {
                             value = vol * -1. * ( 1. - ( ( (self.phase as f64) - (PI/2.)) * (2./PI) ) as f32 );
                         }
                         else if self.phase >= 3.*PI/2. && self.phase < 2.*PI {
                             value = vol * (-2.0) * ((self.phase as f64) / (PI)) as f32;
                         }
                     }
After running the code, different sound patterns are created with respect to each waveform (Sine, Square, Sawtooth, Triangle)
The above implementation involves the completion of the following steps as part of the intial steps:
Initial steps:
Build
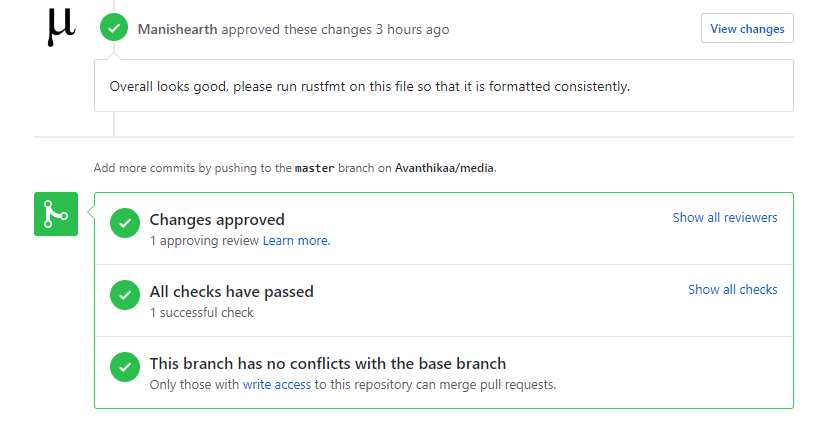
11/8- A Servo team member (@Manishearth) approved the pull request and advised us to make some minor formatting changes.
11/8- Submitted a pull request which contained the new oscillator.rs file having the examples of implementation of the different OscillatorType or waveforms
We have opened our pull request and are working on getting it merged based on the reviews received. Please use our forked repository till the pull request is merged.
Forked repository: https://github.com/servo/media
Clone command using git:
git clone https://github.com/servo/media.git
Once you have the forked repo, please follow steps here to do a build.
Note that build may take up to 45 minutes, based on your system configuration.
Installing dependencies
Installing Rust
The initial step is to install Rust. You can do so by installing Rustup, version 1.8.0 or more recent.
1. To install on Windows, download and run rustup-init.exe then follow the onscreen instructions.
2. To install on other systems, run:
curl https://sh.rustup.rs -sSf | sh
For other installation methds click here
Local build instructions for Debian-based Linuxes are given below:
1. Run ./mach bootstrap. If this fails, run the commands below:
   sudo apt install git curl autoconf libx11-dev \
   libfreetype6-dev libgl1-mesa-dri libglib2.0-dev xorg-dev \
   gperf g++ build-essential cmake virtualenv python-pip \
   libssl1.0-dev libbz2-dev libosmesa6-dev libxmu6 libxmu-dev \
   libglu1-mesa-dev libgles2-mesa-dev libegl1-mesa-dev libdbus-1-dev \
   libharfbuzz-dev ccache clang \
   libgstreamer1.0-dev libgstreamer-plugins-base1.0-dev libgstreamer-plugins-bad1.0-dev autoconf2.13
If you using a version prior to Ubuntu 17.04 or Debian Sid, replace libssl1.0-dev with libssl-dev. Additionally, you'll need a local copy of GStreamer with a version later than 12.0. You can place it in support/linux/gstreamer/gstreamer, or run ./mach bootstrap-gstreamer to set it up.
If you are using Ubuntu 16.04 run export HARFBUZZ_SYS_NO_PKG_CONFIG=1 before building to avoid an error with harfbuzz.
If you are on Ubuntu 14.04 and encountered errors on installing these dependencies involving libcheese, see #6158 for a workaround. You may also need to install gcc 4.9, clang 4.0, and cmake 3.2:
If virtualenv does not exist, try python-virtualenv.
Local build instructions for Windows environments are given below:
1. Install Python for Windows (https://www.python.org/downloads/release/python-2714/).
The Windows x86-64 MSI installer is fine. You should change the installation to install the "Add python.exe to Path" feature.
2. Install virtualenv.
In a normal Windows Shell (cmd.exe or "Command Prompt" from the start menu), do:
pip install virtualenv
If this does not work, you may need to reboot for the changed PATH settings (by the python installer) to take effect.
3. Install Git for Windows (https://git-scm.com/download/win). DO allow it to add git.exe to the PATH (default settings for the installer are fine).
4. Install Visual Studio Community 2017 (https://www.visualstudio.com/vs/community/).
You MUST add "Visual C++" to the list of installed components. It is not on by default. Visual Studio 2017 MUST installed to the default location or mach.bat will not find it.
If you encountered errors with the environment above, do the following for a workaround:
Download and install Build Tools for Visual Studio 2017
Install python2.7 x86-x64 and virtualenv
5. Run mach.bat build -d to build
If you have troubles with x64 type prompt as mach.bat set by default:
you may need to choose and launch the type manually, such as x86_x64 Cross Tools Command Prompt for VS 2017 in the Windows menu.)
cd to/the/path/servo
python mach build -d
Build instructions for all other environments are available here
Building locally
Once you complete the above steps to install dependencies, following are steps to build servo:
To build Servo in development mode. This is useful for development, but the resulting binary is very slow.
git clone https://github.com/servo/servo
cd servo
./mach build --dev
./mach run tests/html/about-mozilla.html
Or on Windows MSVC, in a normal Command Prompt (cmd.exe):
git clone https://github.com/servo/servo
cd servo
mach.bat build --dev
For benchmarking, performance testing, or real-world use, add the --release flag to create an optimized build:
./mach build --release
./mach run --release tests/html/about-mozilla.html
Note: mach build will build both servo and libsimpleservo. To make compilation a bit faster, it's possible to only compile the servo binary: ./mach build --dev -p servo.
Verifying a build
We can quickly verify if the servo build is working by running the command
'./mach run http://www.google.com'
This will open a browser instance rendering the Google homepage.
This should be straightforward on any environment that has rendering support - Linus, Windows, MacOS, Android
Test Plan
Testing Approach
As we have implemented the processing algorithm for oscillator different oscillator types, after running the rust file the user will be able to hear the different generated waveforms based on its type. (Sine, Square, Sawtooth, Triangle)
Testing Steps
Please read and perform the actions on the Build and Verification sections properly before testing.
1) Make sure you are in this directory: target/debug
2) Run the command ./oscillator
3) Different sounds based on the type of oscillator (waveform) must be generated after definite interval of time.
Pull Request
The pull request used to incorporate our changes upstream is available here
References
https://developer.mozilla.org/en-US/docs/Web/API/Web_Audio_API
https://webaudio.github.io/web-audio-api/
