CSC/ECE 517 Fall 2017/E1795 Single signon for Peerlogic web services (WS intergration)
Problem Statement
Description of the problem statement can be viewed on this link.
PeerLogic
To understand the problem statement, let us first understand the terms used in the problem statement:
1. Peerlogic: Peerlogic is a service provider for education peer review systems. The project exposes a number of microservices or web APIs that can be consumed by peer assessment systems. It provides services for reputation algorithms, metareview metrics, etc. To give an example, a peer review system like Expertiza leverages Peerlogic APIs to assess whether a given review was competent enough or not. There are a dozen of such systems that leverage Peerlogic’s APIs for a number of purposes. More details on Peerlogic can be viewed here.
2. Expertiza: Expertiza is a peer assessment system that is build to help students review each others work and provide feedback, facilitating learning. Expertiza uses Peerlogic’s services for various purposes.
3. Single Sign On Portal: Single sign on portal is the system that E1795 aims at building. This will serve as an authentication layer between Peerlogic and all other applications using its API.
The Problem
Currently Peerlogic’s services can be used by anyone calling them. There is no system to check if an application accessing the services is actually allowed to do so. It is essential to have a system in place to authorize applications to avoid a number of security breaches that could occur using these open-to-all services and prevent them from being hacked.
Proposed Solution
The proposed solution is to create a “Single Sign On Application” that will be responsible for providing authorization and authentication for the Peerlogic APIs. This application have two major modules:
1. User facing portal: The user facing portal will be a deployed application with an user interface that a user/admin can use to register himself, request an API key for his/her app (in case of user), approve API keys (in case of admin), manage keys, and other similar functions.
2. REST APIs for Peerlogic: There will be REST API created which Peerlogic can call to check whether a request received by Peerlogic is authorized and authenticated. This API is a core feature because it is responsible for actually putting the security system in place. If the API fails to return the correct result, an application not authorized to access Peerlogic may do so, leading to a security breach.
Solution Architecture
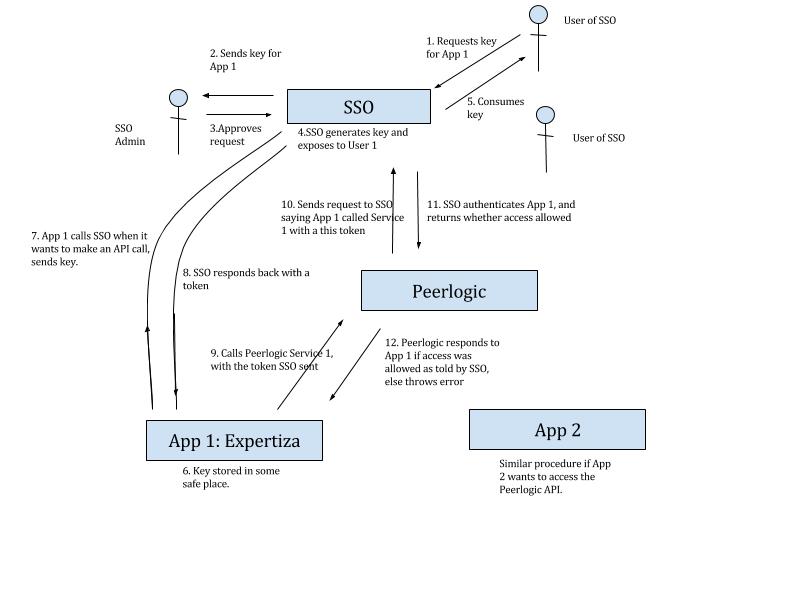
In order to understand how the whole system will work, have a look at the figure given below.

The system includes a SSO portal, Peerlogic and different apps trying to access Peerlogic services. The types of users are admin and generic user (who will be responsible for creating a client account with SSO.
Note: In the following description, client has been used interchangeably with app.
1. Once the client users registers himself/the client, and client account is created. He can now request a client ID and a client key to be used by his/her app. (Step 1)
2. SSO sends this request forward to the admin, who either approve/reject this request. The admin tells whether the request is to be approved or not and forwards this information back to peerlogic. (Steps 2 and 3)
3. If the admin, approves the request, SSO generates a client ID and a client token that will be used by the client to send requests to SSO. (Step 4)
4. This client ID and key is seen by the consumer and they add this to the client app. (Steps 5 and 6)
5. When the client app decides it wants to call Peerlogic web services, it communicates with SSO, sending a request for a token, this request includes the client id and client key in order to let know SSO know he is a valid requester for token. (Step 7)
6. SSO generates a unique, one time use token for the client and passes it back to him. (Step 8)
7. The client now calls the Peerlogic web service and adds this token in the request as a header. (Step 9)
8. Peerlogic, after receiving the client request, sends a request to SSO with the token, asking if the token is valid and is allowed access to the service that client is requesting. SSO, at this point, checks does authorization and authentication. If all okay, it returns so. (Steps 10 and 11)
9. If Peerlogic receives a positive response from SSO, it lets client use its API, else returns an unauthorized/unauthenticated access error. (Step 12)
Diving deeper into the SSO
Looking more deeply at the SSO, here are few key points that specify how we are going to implement the SSO:
1. We will use both google sign in and our own sign in to allow a user to create an account and log in.
2. We will use a random generator to generate the key for every client once the admin approves the request for the key. As a proposed solution we will use SecureRandom for this purpose, which is an algorithm to generate a random string. Although it is not optimized for uniqueness, if we are generating a 32 bit key, collision is very less likely to happen.
3. AES encryption algorithm, one of the safest encryption algorithms, will be used to generate the token for every client. This token will hold information including the client key, access rights and the time the token was generated.
4. When we decrypt the key, we will check whether we have such a client key in our database and whether they are allowed access to whatever it is that they are requesting. (This constitutes the authentication and the authorization portion)
5. We shall have a RoR application to handle all of this, and a database (whose model is discussed below).
Class diagram for database in SSO
The following diagram shows the database that will be in work for the SSO application.
- API will store information about the different APIs and has two attributes: API_id and and the API name.
- Clients will store information about the clients. It will store which client id has what key. Also the owner of the client will be stored in this table.
- Access Rights will store information about which client has access to what APIs. This table will be used when we are checking the authorization of a particular client.
- Users will store information about the users/ The term user here is used to represent the entity which will represent the client. So a user account is nothing but a client facing account.
- Keys will store the value of the keys used and generated for encryption. Since we are using AES encryption algorithm, we need two values IV and Key. This values will be stored here along with the timestamp when they were generated. Why we have incorporated timestamp is because in future we might like to implement a TTL (Time to live) concept in the generation of token, in which case we can also use different keys for different times.
Implementation
We have successfully implemented the following components from the solution architecture.
- SSO App
The user will login to the Single Signon App and can ask for keys and enable the APIs for using Peerlogic services. Similarly the admin can approve the keys requested by the user, can view the information of the users and add APIs.
Credentials for admin login:
email: admin@gmail.com
password: admin
Please do not change the password of the admin so that another user doesn't get blocked while testing.
- SSO REST APIs
Once the key is approved by the admin, the Apps which use the Peerlogic service will use this keys to communicate with the REST Endpoints. A token will be generated from this which will be used by Peerlogic to authenticate and authorize the app.
=> To get the token: (Called by the app)
URL : https://evening-refuge-64130.herokuapp.com/token/get?clientkey=y4E1irXZQfxVipxKo4llTnc5gdZtzP6OV3xfkS/ZP4U=

Method: GET

Response:
{
    "client_id": "someID",
    "token": "someToken",
    "message": "OK",
    "status": 200
}
=> To authenticate and authorize: (Called by Peerlogic)
URL : https://evening-refuge-64130.herokuapp.com/token/validate

Method: POST

Payload:
{
     "token": "someToken",
     "api": "Rainbow API"
}

Response:
{
    "status": 200,
    "message": "OK",
    "clientname": "App"
}
In cases where authentication fails, status will come as 401 with appropriate message giving the reason for failure.
- Demo App
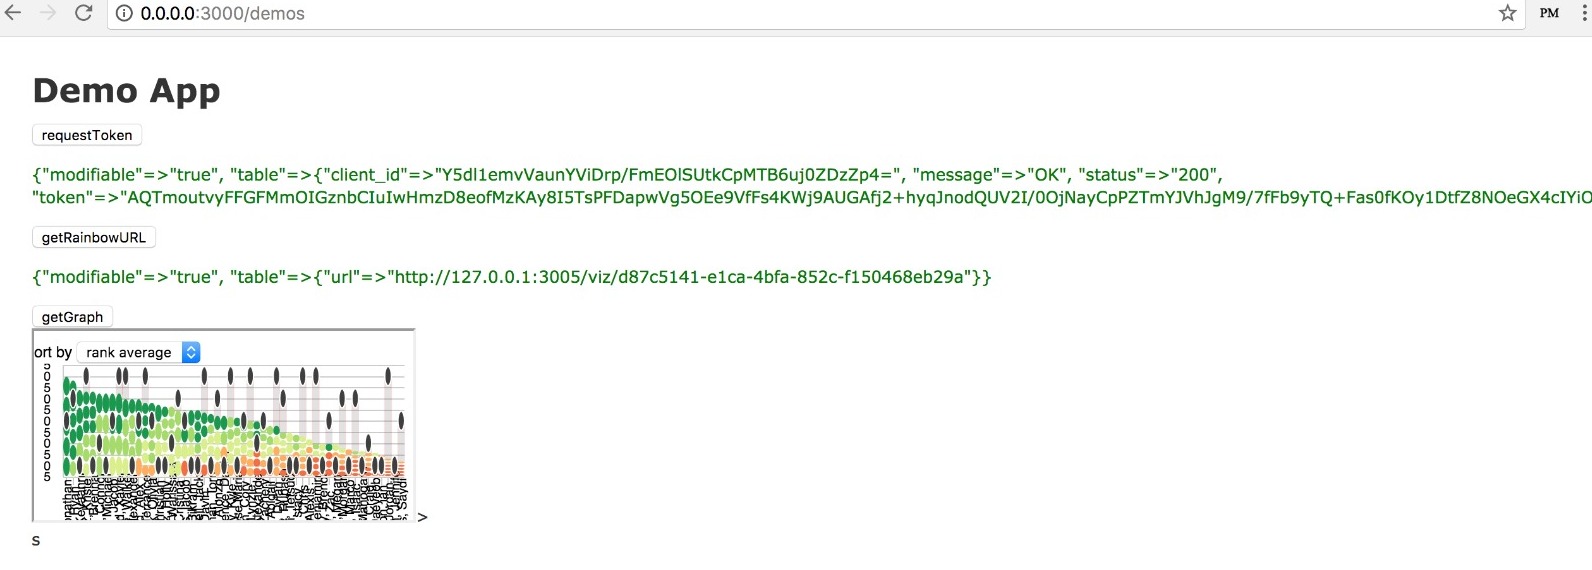
We have made a Demo App to show how the API calls to Peerlogic work and token validation.
- A token is generated when you click on the 'RequestToken'. This token will be sent in the header of the request to Peerlogic while making an API call.
- Peerlogic verifies this token with SSO.
- Clicking on 'GetRainbowURL' generates a URL for that service through which we can access it.
- 'getGraph' shows the visual graph of Rainbow Service.
- Changing anything in the token will make it an invalid one and the service wouldn't be accessible. An error output will be displayed.
Test plan
To test the app, follow the steps listed below:
1. Go to the single sign on app, login.
2. Create a new app, and request the client key for that.
3. Wait for admin approval.
4. If you have the admin credentials, login as admin, go to clients page, and approve the request you just generated.
5. Once the approval is done, copy the client key and keep it somewhere safe.
6. Now, to access the rainbow graph API, send a request to the SSO for token along with client key.
7. After the token is sent to you, you can use the token as Authorization header in the Rainbow graph API.
8. If the token is correct, you should be able to access the API, else an error will be thrown for unauthorized access.
Challenges
There are a couple of challenges we have identified:
1. Creating a client id and key and storing it: Given the rise of open source software, it is essential that the client id and key that is generated for an app is stored in a secure place, invisible to the world. We will be looking into ways how open source apps do this and good practices to do the same.
2. Making sure the database is secure: Since our database is going to store the encryption key and IV, it is of utmost importance that the database is secure and not prone to attacks.
Future Scope
In future we would like to use multiple keys for encryption rather than just one constant key for a lifetime. These multiple keys will have a time to live. This will make the system more secure as now they will be different keys used at different times, so in case a key is leaked or even if it isn't, it won't last for much time, and soon a new key will be in place, bringing the system back to its initial secured position.

