CSC/ECE 517 Fall 2016 E1687 Instructor account creation over the web
E1687. Instructor Account Creation Over the Web
This page gives a detail of the final project of creating an instructor account over the web in Expertiza.
Introduction
Expertiza is a Ruby on Rails based open source project. The main motive of this project is to make learning more effective through peer review. This website is a result of combined effort of both students and faculty at NC State, and is used not just by this university but also in many other universities. The website allows students to form teams and work on various projects listed by the instructor and also suggest new topics that seem interesting, though they can opt not to work on them. It also makes it easy for the instructor to add a new topic to an assignment/project, create a new project and add students to it. The time spent by TAs and instructor is greatly reduced. The key feature is peer review, where the students can review the work of others and provide feedback. This helps in improving the existing work and also provides a new way to learn. There isn’t any restriction on the format of submission as it accepts any form of submission varying from URL to wiki pages, which isn’t a common feature in other websites.
Problem Statement
In Expertiza, user and instructor accounts are currently created by existing super administrators, instructors or TAs. For new users to access the system and experiment the features offered by Expertiza, a “demo-like” feature needs to implemented. The following are the set of requirements that needs to be catered with this feature:
- Allow people to request instructor accounts over the web. This feature should also have security features such as Captchas to help avoid account creation by bots.
- When a user account is created over the web, the super-admin should get e-mail regarding the same and also the user should be notified upon approval/denial (if denied, then reason should be specified).
- Currently, Expertiza consists of a lot of entities that can be made publicly visible to all other users in the system. But, accounts created this way should not be able to see existing public features, until the super-admin manually gives them permission to view public courses, assignments, and questionnaires.
- A user who creates an account over the web should be pointed to an instruction page and/or video on how to create an assignment and register students for it, etc.
Implementation
The following solutions shall be addressing the problems discussed above.
Problem 1
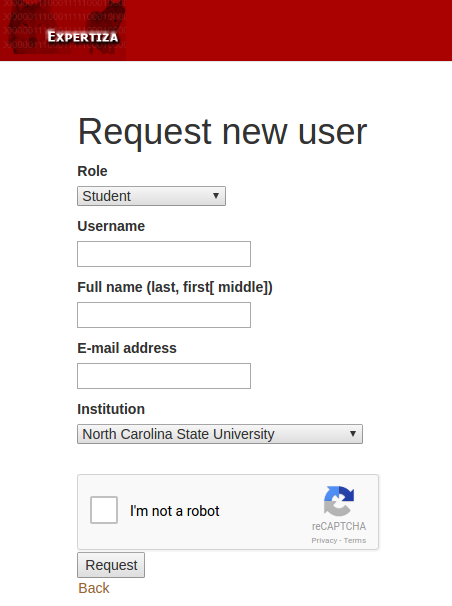
Once a user wants to register and try the features of Expertiza, upon opening the website, one can register by filling up the form and click the register button. There is a captcha that shall be shown below, to make sure that it isn't any bot that is accessing. It provides security to the application.
Problem 2
Once the user requests for an account creation, the super admin receives a mail informing about the request with the name of the requested user. The super admin shall then, look for the details of the user in the Review Requested Users tab and can either approve/decline the request. Once the super admin approves the user request, the user gets a mail notifying that they now have the permission to access the features of Expertiza. A temporary password in clear text is also sent in the mail for login. If the request is rejected, then the reason should be mentioned in the reason column of the form. But there is no mail sent to the user regarding that.
Problem 3
There shall be a flash message saying, “Login denied. Needs permission from super admin” that can be seen on the login page if an unregistered user tries to access the features of Expertiza. This helps in removing the access to few 'publicly visible features' as it denies access completely.
Problem 4
Once the user requests for an account, upon clicking the request sign up, he/she is automatically redirected to the instructions page with the video tutorials explaining various features of Expertiza and on how to access them.
Files changed
The following are the list of files that were created/edited throughout the project.
- views/auth/_login.html.erb
- views/users/request_new.html.erb
- views/users/review.html
- views/instructions/home.html.erb
- views/users/edit.html.erb
- views/mailer/request_user_message.html.erb
- views/users/new.html.erb
- views/users/_password.html.erb
- views/users/_user.html.erb
- users_controller.rb
- routes.rb
- models
- mailer_helper.rb
- mailer.rb
- models/requested_user.rb
- config/initializers/recaptcha.rb
Note that we have used the existing modules and developed these pages.
In _login.html.erb a new button called Request Sign Up was added for the new users to register. The register page will look as above. On clicking Request, a user will be redirected to a page like below:
User will have to fill up all the required details and request a signup.
When a super administrator logins to his account he can go to Manage/users/review requested users menu as shown below. We have put the review requested users in the menu, rather than a separate tab, making it more flexible to integrate some more features under the users option later.

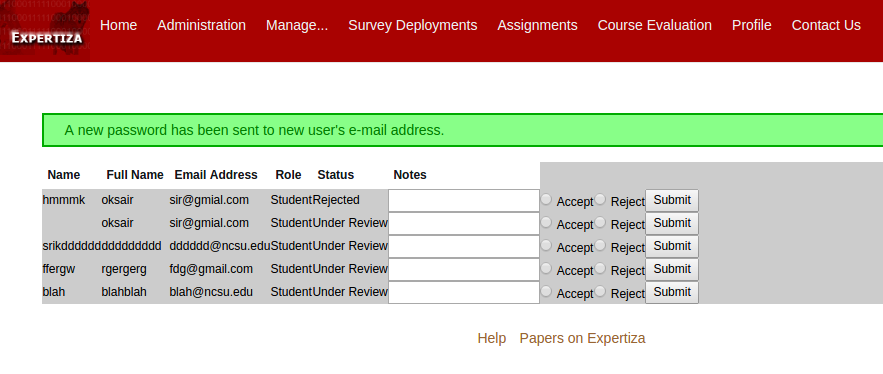
Super Admin can either approve/reject a user. The view for this page would be as shown below. This is an entirely new page wherein, the super admin can also mention the reason for a rejection of a request and view the entire list of requested users.

In addition to the above files a new file in instructions, named home.html.erb is created which will have all the videos explaining how Expertiza works.
In users_controller.rb we will be having two new methods.
- Method 1 - request_user_create. This is to the new user to request for an account in Expertiza and also mail all the super admins about the new user request. Upon the request, this method uses the user parameters (fields entered in the request sign-up form) and a status of 'Under review' is assigned by default. On verifying the captcha, the super admin(s) gets a mail regarding the request with the user name and the requested user is redirected to the instructions page.
- Method 2 - create_approved_user. This is for the super admin to either approve or reject the user request and send a mail to the requested user if his/her account is created. The mail also contains a password for the user to login.
The codes for each method are:
  def request_user_create
    @user = RequestedUser.new(user_params)
    @user.institution_id = params[:user][:institution_id]
    @user.status = 'Under Review'
    #The super admin receives a mail about a new user request with the user name
    if verify_recaptcha(model: @user) && @user.save
      @super_users = User.joins(:role).where('roles.name' =>'Super-Administrator');
      @super_users.each do |super_user|
        prepared_mail = MailerHelper.send_mail_to_all_super_users(super_user,@user, "New account Request")
        prepared_mail.deliver
      end
      flash[:success] = "User signup for \"#{@user.name}\" has been successfully requested. "
      redirect_to '/instructions/home'
    else
      flash[:error] = "Error requesting sign up "
      redirect_to :controller => 'users', :action => 'request_new', :role=>"Student"
    end
  end
  def create_approved_user
    @user = RequestedUser.find params[:id]
    @user.status=params[:status]
    @user.reason=params[:reason]
    if @user.status.nil?
      flash[:error] = "Please Approve or Reject before submitting"
    elsif @user.update_attributes(params[:user])
      flash[:success] = "The user \"#{@user.name}\" has been successfully updated."
    end
    if @user.status=="Approved"
      check = User.find_by_name(@user.name)
      @usernew = User.new()
      @usernew.name = @user.name
      @usernew.role_id = @user.role_id
      @usernew.institution_id = @user.institution_id
      @usernew.fullname = @user.fullname
      @usernew.email = @user.email
      # record the person who created this new user
      @usernew.parent_id = session[:user].id
      # set the user's timezone to its parent's
      @usernew.timezonepref = User.find(@usernew.parent_id).timezonepref

      if @usernew.save
        password = @usernew.reset_password # the password is reset
        # Mail is sent to the user with a new password
        prepared_mail = MailerHelper.send_mail_to_user(@usernew, "Your Expertiza account and password
                                                            have been created.", "user_welcome", password)
        prepared_mail.deliver
        flash[:success] = "A new password has been sent to new user's e-mail address."
        if @usernew.role.name == "Instructor" or @usernew.role.name == "Administrator"
          AssignmentQuestionnaire.create(user_id: @user.id)
        end
        undo_link("The user \"#{@user.name}\" has been successfully created. ")
      else
        foreign
      end
    else
      if @user.status=="Rejected"
        #If the user request has been rejected, a flash message is shown and redirected to review page
        if @user.update_columns(reason: params[:reason], status: params[:status])
          flash[:success] = "The user \"#{@user.name}\" has been Rejected."
          redirect_to action: 'review'
          return
        else
          flash[:error] = "Error processing request."
        end
      end

    end
    redirect_to action: 'review'
  end
Database Changes
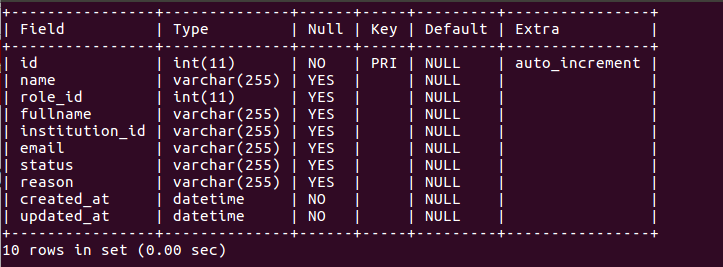
We have created a new table called requested_users with table description that is similar to users. The status column, which isn't present in the users tables indicates the approval/rejection of the request of the user. Though the description of this table is similar to the users table, we thought it was better to go with a new one, keeping in view of the following advantages:
- The users table had lot more entries which weren't needed for the requested user scenario and also vice-versa. The entries like status and reason of the requested_users table weren't necessary once the user request has been approved. This was lot more memory is saved.
- The users table was accessed at many places in Expertiza, so any change in that would have to be reflected at all places. It was comparatively easier to manage with a new table rather than using the existing one.
The description of the table is as follows:
Screencast
Screencast link to our demonstration
Test Plan
We did write the test cases and pushed those to the github link submitted, but since we couldn't test them we have commented them. We have written test cases for the following functionalities separately. We have written them to be tested in RSpec.
1. Test the model requested_user so that no invalid entries (blank email ID, blank name etc.) are accepted.
2. Test the mailer to verify if the body, subject, the mail id sent to/from are correctly functioning.
Note that we haven't tested for controller and views because, we were unable to run them. The controller and view tests might need lots of runs to finalize on the test.

