CSC/ECE 517 Fall 2016/E1693. Drag-and-drop interface for creating rubrics
Introduction to Expertiza
Expertiza is an online system that is used by students to view/submit assignments and review others' work. Expertiza also provides tools to visualize the scores and gauge the improvements made during the course semester. It also facilitates and monitors team projects. It is targeted at educational and non-profit organizations.
Expertiza is an open-source project with the source code available as a public repository on GitHub. It is developed using Ruby on Rails and is increasingly becoming robust thanks to the innumerable bugs being fixed by the community. The project has a micro-blog on SourceForge where the developer community report bugs and document updates.
Problem Statement
The existing interface for defining rubric is not very user friendly. The instructors or TAs are required to define the type of the field, the dimension of the fields (length, height), and possibly the content of the widget e.g., available options for a combo box. Unfortunately, after they are done with the design phase, to see the final result of the rubric that is going to be presented to the students, they have to impersonate students, create a fake submissions, move the due dates etc. The existing rubrics creation page is shown in the Figure below.
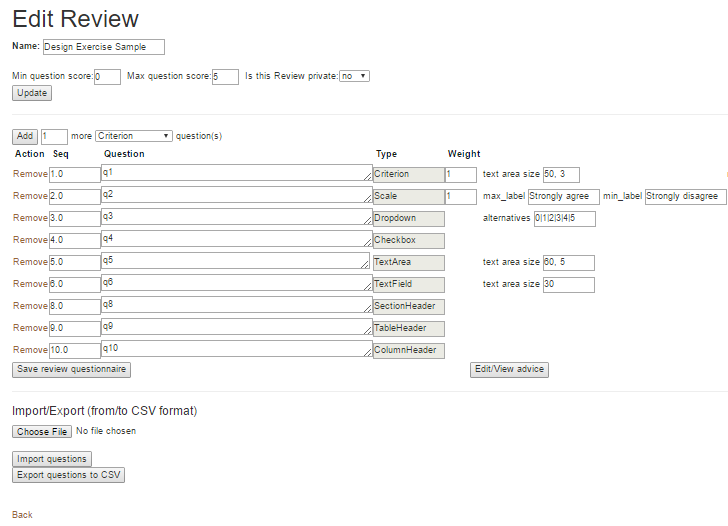
As mentioned before, the above shown page is not very intuitive. Also the instructor has no idea how the page would appear to a student unless he logs in as a student, create submissions, etc. which is very time consuming. Hence a better design would be to create a rubrics page that would appear the same to the instructors and the students.
We need to implement a WYSIWYG (What You See Is What You Get) UI for the rubric page to create rubrics which supports the following expertiza's question types:
- Criterion
- Checkbox
- TextField
- Dropdown
- TextArea
- UploadFile
- SectionHeader
- TableHeader
- ColumnHeader
- Scale
Design
To create the drag-and-drop interface, we can use the jQuery formBuilder plugin. The 'jquery-rails' gem is already present in the Gemfile, so we only need to initialize the formBuilder plugin.
The advantages of using this plugin are:
- 100% client-side plugin that gives users the power to create forms using an intuitive drag and drop interface.
- Customization - enable only the fields you need, use your own notifications append or prepend content and more.
- Bootstrap ready but not dependent
A mockup for an example form is given below:
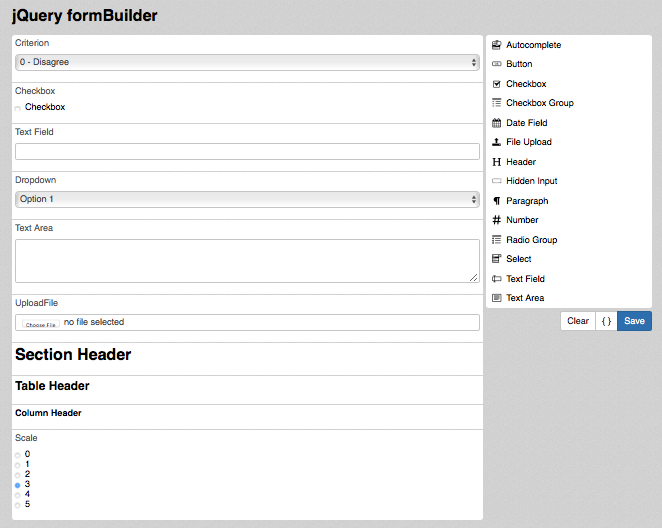
The above screenshot consists of two sections: main area to the left and the control section to the right. The control section consists of the various form fields which can be dragged and dropped to the main area. In the main area, the parameters to the fields can be configured including field length, options, values, etc. Hence the drag and drop interface will provide a very intuitive way for the instructor/TA to create rubrics and also view how the page would appear to a student. Moreover it provides the option to edit the field information when we create the individual fields. For example, in case of dropdown we can specify the options of the dropdown. A sample screenshot of text area creation is shown below.
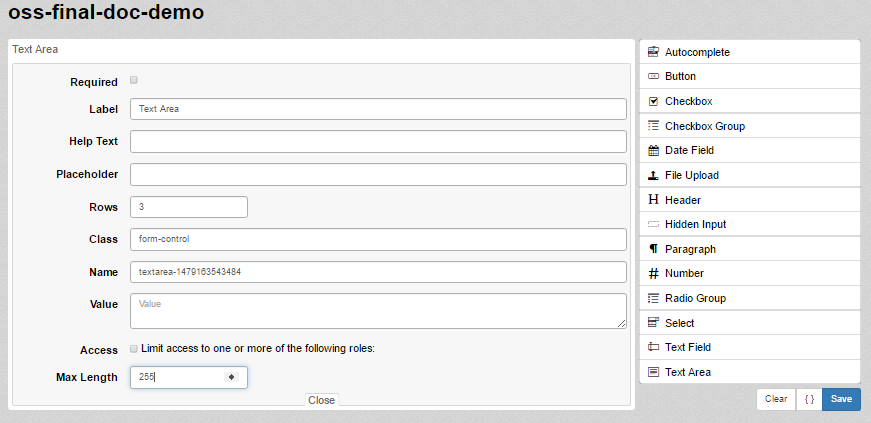
In the above screenshot, we can see that we are creating a text area. There is an edit option at the top right corner of the field, clicking on which we get a form through which the options can be given. In the above case of creating a text area, we can specify the label, value, number of rows, the maximum length of the characters, placeholder, help text, etc. We can also specify if the field is mandatory by checking the required checkbox given at the top of the form. In a similar way configuration options are available to all the form fields that can be created.
File to be modified
This project only involves modifying the UI for instructors to create new rubrics. The rubric configurations stored in the database and the views from the student side will remain the same. Hence, no modifications need to be made to the questionnaire model or controller.
All types of rubrics (Review, Metareview, Author Feedback, Teammate review, Survey, Course Evaluation etc.) are created and modified using the same views. These views exist in views/questionnaires folder. Hence the files to be modified to incorporate the new UI design will be:
- views/questionnaires/_questionnaire.html.erb
The modifications made to the above files will be significant since the new rubric creation interface will be entirely different form the existing one. A lot of the code will have to be written from scratch.
New files
The plugin source code is included in the project since the developer's gem that is available right now has some bugs which was preventing us from installing the plugin directly as a gem. The developers' github can be viewed here [1]. The minified javascript source files are as follows:
- vendor/assets/javascripts/form-builder.min.js
- vendor/assets/javascripts/form-render.min.js
- vendor/assets/javascripts/vendor.min.js
The source files are used in the file given below to initialize the plugin and to create the drag and drop interface in the rubrics' creation page.
- app/assets/javascripts/form-init.js
The logic used in the form-init.js file to implement the various rubric items, how the form builder widgets are used to implement the various rubric items,
Implementation
The implementation of the drag and drop interface for rubrics creation consists of the initialization, provide features for the user to drag and drop the widgets, modify the parameters and save the final rubrics.
Initialization
The jQuery formBuilder plugin is initialization code is written in the file "form-init.js". It consists of the initialization options which provides a lot of features like the ability to open the editing options soon as the user drops the fields, disable some of the fields that are not required, perform some functions when the user drops the fields, etc. The detailed description of each option can be found in the plugin documentation[2]. The code for this is as follows :
 fbOptions = {
 	    dataType: 'json',
 	    sortableControls: false,
 	    editOnAdd: false,
 	    stickyControls: true,
 	    sortableControls: false,
 	    disableFields: ['autocomplete', 'button','paragraph', 'number', 'checkbox-group', 'date', 'file', 'hidden', 'header'],
 	    editOnAdd: false,
 	    showActionButtons: true,
 		defaultFields: defaultFields, // edit will load the fields from db
 		fieldRemoveWarn: true,
 	    typeUserEvents: {
 			'checkbox': onAddHandler,
 			'header': onAddHandler,
 			'radio-group': onAddHandler,
 			'select': onAddHandler,
 			'text': onAddHandler,
 			'textarea': onAddHandler
 	    }
 	};
   var formBuilder = $(buildWrap).formBuilder(fbOptions).data('formBuilder');
Adding widgets
The old interface provides the users the option to select the widget type, say Criterion and "Add" it to the list of widgets with the help of an "Add" button. As soon as the users adds the widget, the type of the widget is stored in the database in the questions table.
Hence in the new interface, when the user drags and drops the widgets they type of the widget that was dropped by the user is identified and the same widget type is chosen in the old interface field which are hidden and the "Add" button click is triggered. This will automatically save the dropped field in the database.
The event when the user drops the widget is captured by the plugin option "typeUserEvents" which has a "onadd" function for each widget that would get fired when the widget is dropped. The function that handles the onadd event is "onAddHandler". It is found in the file form-init.js and is shown below:
 var onAddHandler = {
 	  	     onadd: function(fld)
                     {
                        disableFormEditorFields(fld);
                        var userDrop = false;
                        if($(fld).attr('id').split('-')[3] > defaultFields.length){
                            // user drops
                            userDrop = true;
                        }
                        // user drags and drops the elements
                        if(userDrop){
                                 $("#question_type").val(fieldReverseMap[$(fld).attr('type')]);
                                 $("#addQuestionBtn").trigger('click');
                         }
                     }
  };
Editing widgets
The old interface adds a row of parameters to a form when the user adds a new widget. The user then fills in the various parameters in the form and clicks on "Save Questionnaire". Now the questions get updated with their parameters in the questions table and at the same time the widgets' ID are stored in the questionnaire table. Hence whenever a questionnaire is edited, the widgets associated with it are displayed in the rubrics' page for the user to edit.
In the new implementation, we wanted to preserve the database calls to save the questions and the questionnaire. Hence when the user edits the parameters of the widgets by clicking the edit icon on the widget, the values are updated to the hidden fields of the old rubric by the function "updateHiddenFields". In this way the values will be automatically saved in the database. The code for updating textfield is shown below. Similarly the values entered by the user while editing is updated to the hidden fields for all the rubric types.
 function updateHiddenFields(li, type, tr){
 	var _form = $(li).find('.frm-holder');
 	switch(type){
 		case "text":{
 			var _question = $(_form).find('.label-wrap').find('input[type="text"]').val();
 			var _maxlen = $(_form).find('.maxlength-wrap').find('input[type="number"]').val();
 			var _q = $(tr).find('td')[2];
 			var _m = $(tr).find('td')[5];
 			$(_q).find('textarea').val(_question);
 			$(_m).find('input[type="text"]').val(_maxlen);
 			break;
 		         }
             // other cases for other widget types
                   }
       }
We tried to implement the new user interface without leveraging the old interface (which is hidden right now but the actual data is still saved through the old interface) but the plugin provides the data in the form of JSON and if we use that we would need to modify the format in which the data is stored in the database. As the scope of the project was limited to the UI, we focussed mainly on implementing the drag and drop interface.
Updating widgets
The "onUpdate" function is triggered when the users closes the editing box in each widget. The function calls the "updateHiddenFields" function which was discussed in the previous section. We set a data attribute called "editing" which is set to false when the user opens the editing box. When the user clicks it for the second time, the box will be closed and the user would have edited the parameters of the widgets.
 var onUpdate = function(fld) {
 		var _li = $(fld).parent('div').parent('li');
 		var order = $(_li).attr('id').split('-')[3];
 		var type = $(_li).attr('type');
 		var _tr = $('#questions_table').find('tr')[order];
 		// update tr fields with the data in _li
 		updateHiddenFields(_li, type, _tr);
 	};
Hence updating the widget parameters each time the user edits them is very important to persist the changes the user makes.
Drag and drop interface
After implementation of the above code, the final UI for rubric creations looks like :
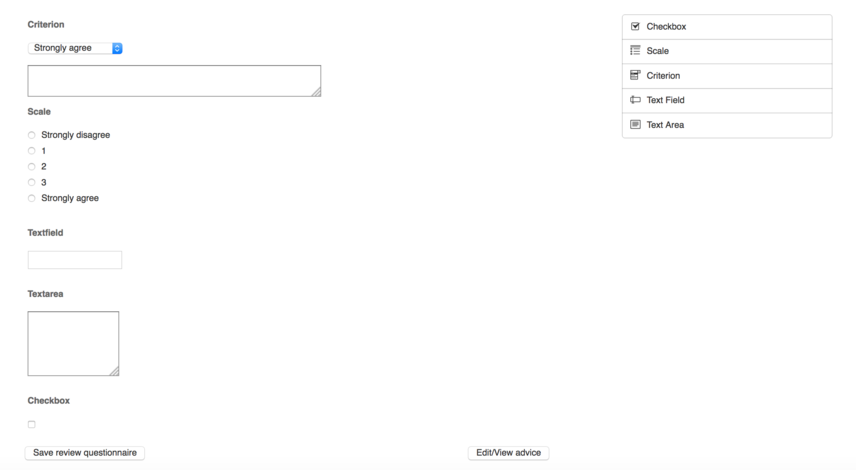
Instructors can select field type on the right and drop it into the container. Then select different options for each field type such as labels, values, length etc.
Implementation of widgets
At present, the drag and drop interface support five types of widgets namely criterion, checkbox, scale, textfield and textarea. The ways in which the form builder widgets are used to create the rubric items are discussed as follows:
Criterion
The form builder provides a dropdown which has been used to create the criterion widget by appending a textarea to it. The parameters of the criterion include question, first and the last value of the dropdown and the size of the textarea. The parameters provided by the form builder for the dropdown field are modified to suit the parameters of the criterion to provide the edit option. The label is converted to the question field, the options are restricted to two just to get the two extreme values of the dropdown and the className field is used to get the size of the textarea.
Checkbox
The form builder provides a checkbox which has been used directly to create the checkbox widget. The parameters of the checkbox include only the question which leverages the label field from the form builder widget.
Scale
The form builder provides a radio-group widget which has been used to create the scale widget. The parameters of the scale widget include question and first and the last values of the radio buttons of the scale. The parameters provided by the form builder for the radio-group field are modified to suit the parameters of the scale to provide the edit option. The label is converted to the question field and the options are restricted to two just to get the two extreme values of the scale.
TextField
The form builder provides a textfield which has been used directly to create the textfield widget. The parameters of the textfield include the question and the length of the field. The label is converted to the question field and the length field already exists in the form builder widget.
TextArea
The form builder provides a textarea which has been used directly to create the textarea widget. The parameters of the textarea include the question and the size (rows and columns) of the textarea. These parameters are already found in the plugin widget.
Database Implementation
We need to make sure that data entered into the new interface is stored into the existing database in the same format as the current one.
To implement this, the fields of Drag and Drop interface are mapped to fields of current existing interface. Hence, the data entered into a particular field in 'Drag and Drop' interface is mapped to its corresponding field in existing interface. This data is then stored into the database as it is implemented in the current existing Expertiza project.
Creating and Editing Questionnaire
The code changes to handle the creation and the editing of the questionnaire is shown below:
Creating Rubrics
When a new questionnaire is created, the user will be presented with the drag and drop interface and the droppable area would be empty. The user then drags and drops the widgets of his choice, edits and saves them.
Editing Rubrics
When an existing questionnaire is modified, the _questionnaire.html.erb will have the data from the database which corresponds to the widgets belonging to the particular questionnaire. The data will be in the form of ruby hash and in order for the form builder plugin to successfully leverage the data we extract only the needed information and store it in JSON format in the data attribute of a div. It can be seen in the form whose action is "save_all_questions". The code that creates the array of hash and places it in the data attribute is shown below:
    <% jsonData = Array.new %>
    <% for @question in questions %>
        <% jsonObj = Hash.new %>
        <% jsonObj["type"] = @question.type %>
        <% jsonObj["weight"] = @question.weight %>
        <% jsonObj["size"] = @question.size %>
        <% jsonObj["txt"] = @question.txt %>
        <% jsonObj["questionnaire_id"] = @question.questionnaire_id %>
        <% jsonObj["seq"] = @question.seq %>
        <% jsonObj["alternatives"] = @question.alternatives %>
        <% jsonObj["max_label"] = @question.max_label %>
        <% jsonObj["min_label"] = @question.min_label %>
        <% jsonObj["break_before"] = @question.break_before %>
        <% jsonData.push(jsonObj) %>
    <% end %>
    <%= content_tag :div, class: "questions_class", data: {questions: jsonData} do %>
    <% end %>
Now the rubrics creation page takes the JSON from the data attribute and pre populates the fields for edit option. The "getFieldsForEdit" function in form-init.js creates the structure for different widget types and loads it into the droppable interface with the option "defaultFields".
Testing Plan
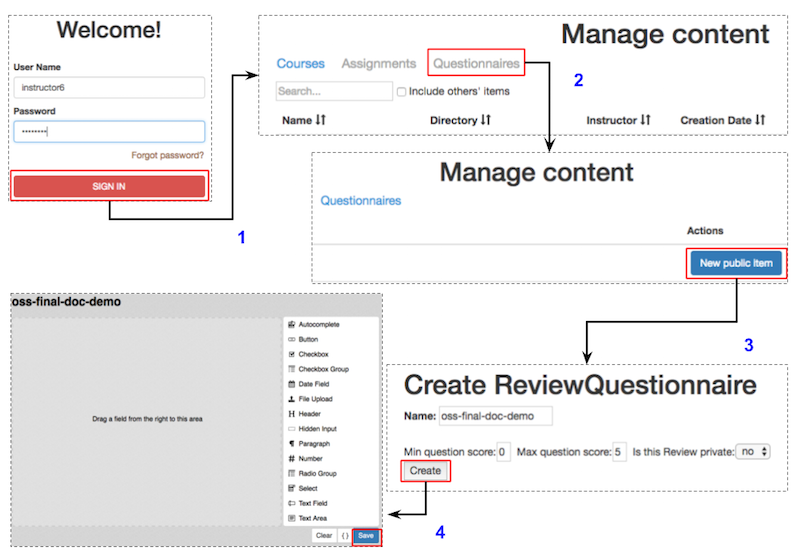
- Login as instructor (username: instructor6, password:password).
- Click on 'Questionnaires' tab present in the Manage section.
- Click on 'New public item' to go to the 'Create ReviewQuestionnaire" page.
- Click on 'Create' icon which will forward you to "form Builder" page.
- Now you can create a sample rubrics by dragging and dropping the form fields and configuring the field parameters.
Future work
Using Gem
Once the gem file for formBuilder plugin will be ready by next release, then we can remove the following three source files -
- vendor/assets/javascripts/form-builder.min.js
- vendor/assets/javascripts/form-render.min.js
- vendor/assets/javascripts/vendor.min.js
We would only need the following file(included in our project):
- app/assets/javascripts/form-init.js
This file is used to initialize the plugin in our project.
Implementing Ordering
The ordering of the widgets can be implemented by placing an extra field in the editing section and load the widgets in the order. The task can be made simpler by ordering the widgets within the JSON before setting it up in defaultFields.