CSC/ECE 517 Spring 2023 - E2343. Questionnaire UI
Project Overview and Justification
The major crux of the reimplementation of Expertiza is the splitting of Expertiza into a React Front-End with a Ruby Back-End. This split should yield a simplification of the code base, and make it easier for developers to make changes if the Expertiza environment isn’t as tightly coupled as before the split. The two ends should interact in terms of the RESTful endpoints, thus separating the implementation of the back-end from the front-end makes both ends more flexible.
Later, when the reimplemented Ruby Back-End is production-ready, it will be connected to the React Front-End.
React is sound choice for the Expertiza front-end to be reimplemented with because it is flexible, allows reusing components, and is easy for multiple developers to work on at once which boosts the speed of development. Additionally, React was designed with high performance in mind leveraging a framework that allows complex applications run incredibly fast. Due to these benefits, and the bonus that it is easy to learn, a strong interface can be developed quickly for the back-end to integrate with.
The goal of this project is to re-implement the front-end for Questionnaires in React for it to later be connected to the back-end questionnaires_controller and questionnaire model when these back-end reimplementations are production-ready.
Important note: This project does not have any back-end functionality whatsoever. There are no controllers or methods implemented. This is a reimplementation of the questionnaire user interface intended for the back-end questionnaire reimplementation that other project teams are working on to eventually connect to. Since there is no back-end with a database, this UI implementation will update dummy JSON objects to replicate the behavior of a back-end server.
UI Flow
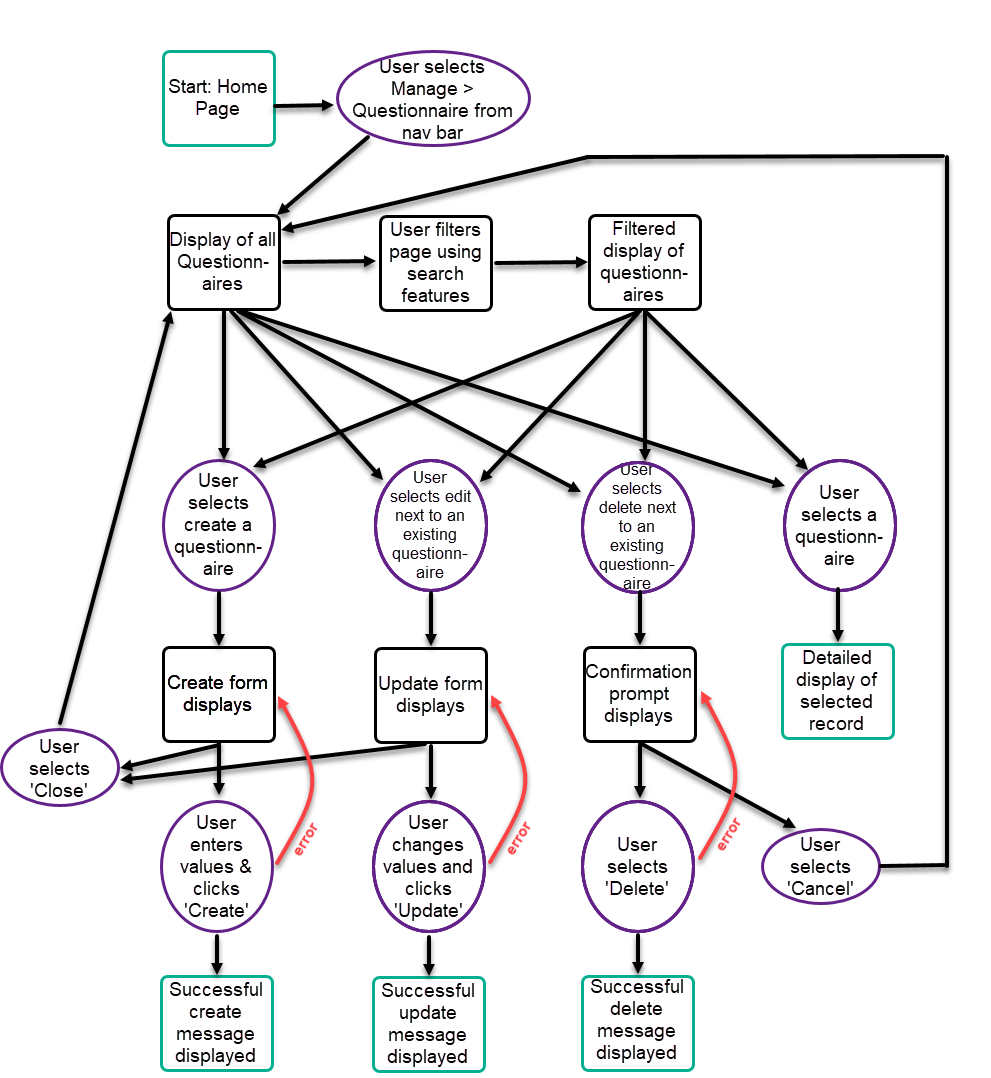
The below diagram shows how users will interact and move through the questionnaire user interface:
RESTful Endpoints
The Questionnaire user interface built with React will respond to following HTTP methods and RESTful endpoints. In each section, you will see that the already re-implemented 'Users' UI is used as the mock-up plan for our design. Since Users has already been reimplemented to create the base UI, we will work off of this and continue this design in our implementation to ensure consistency and ease of use of the application as a whole.
GET /questionnaires
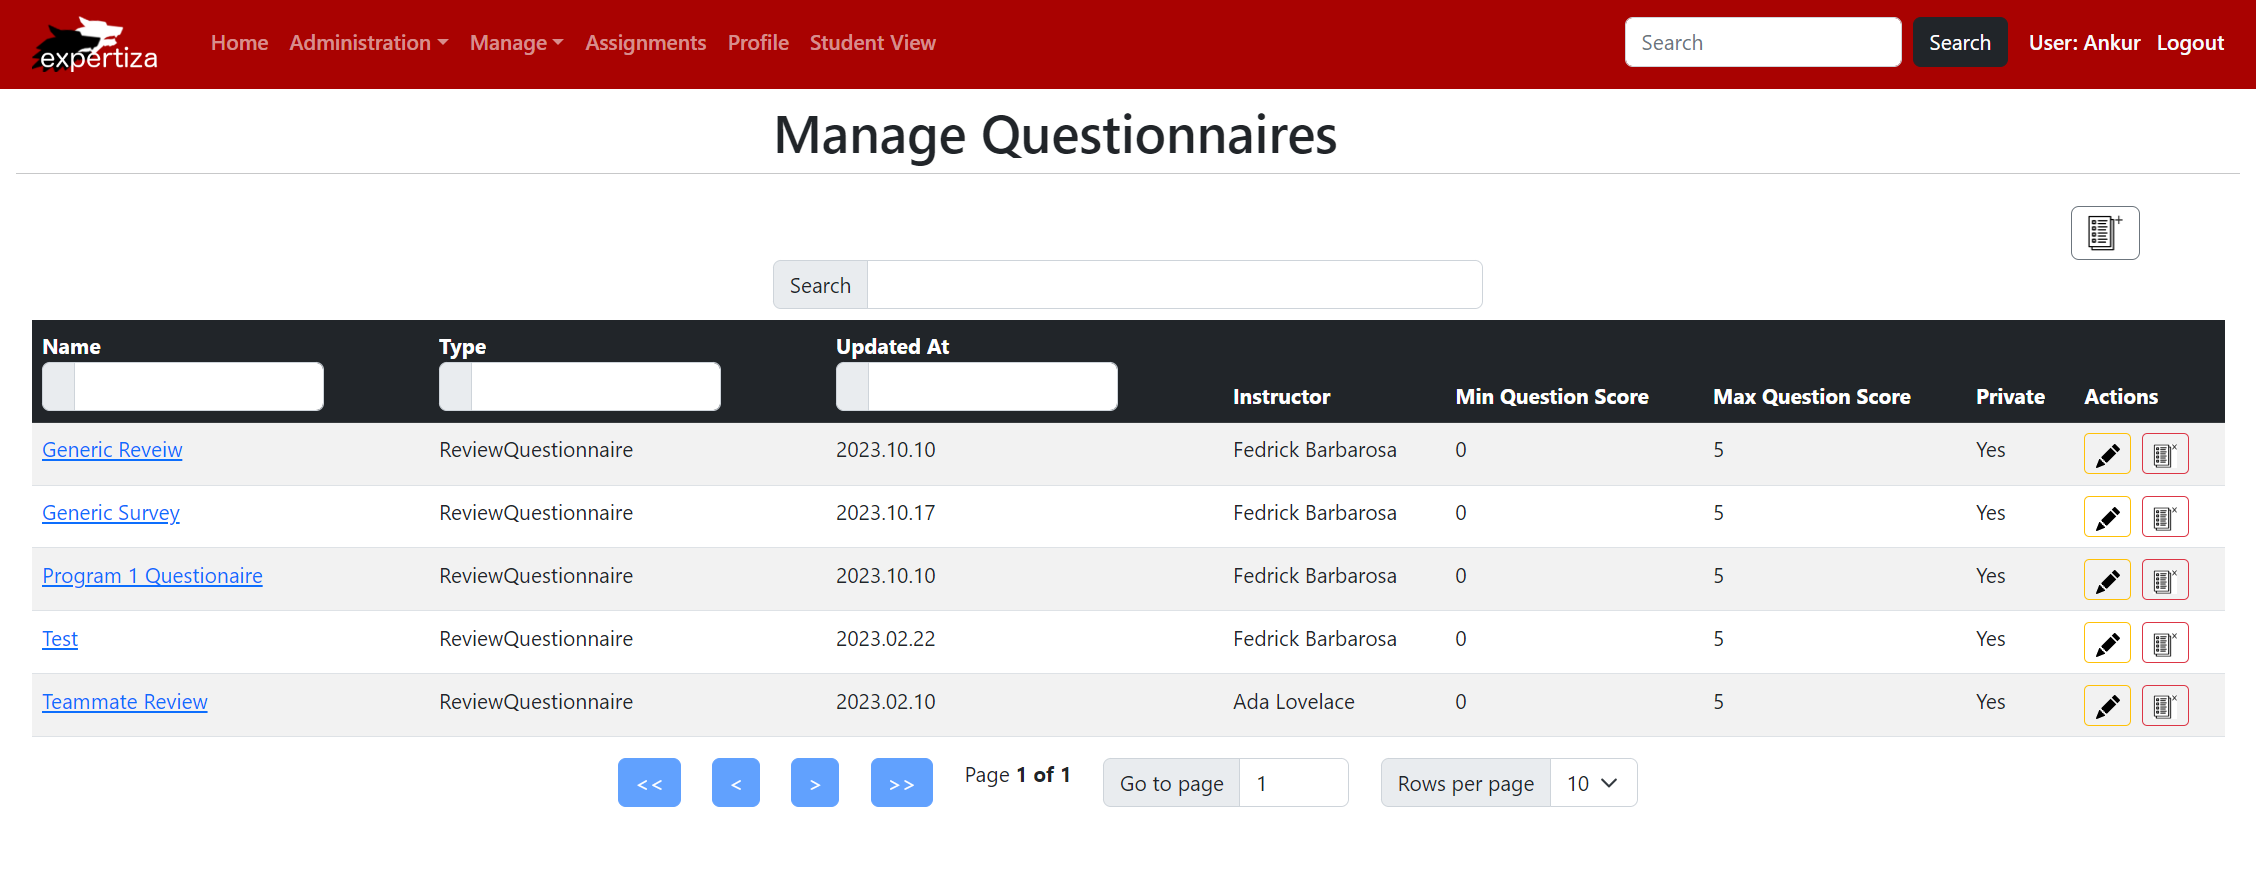
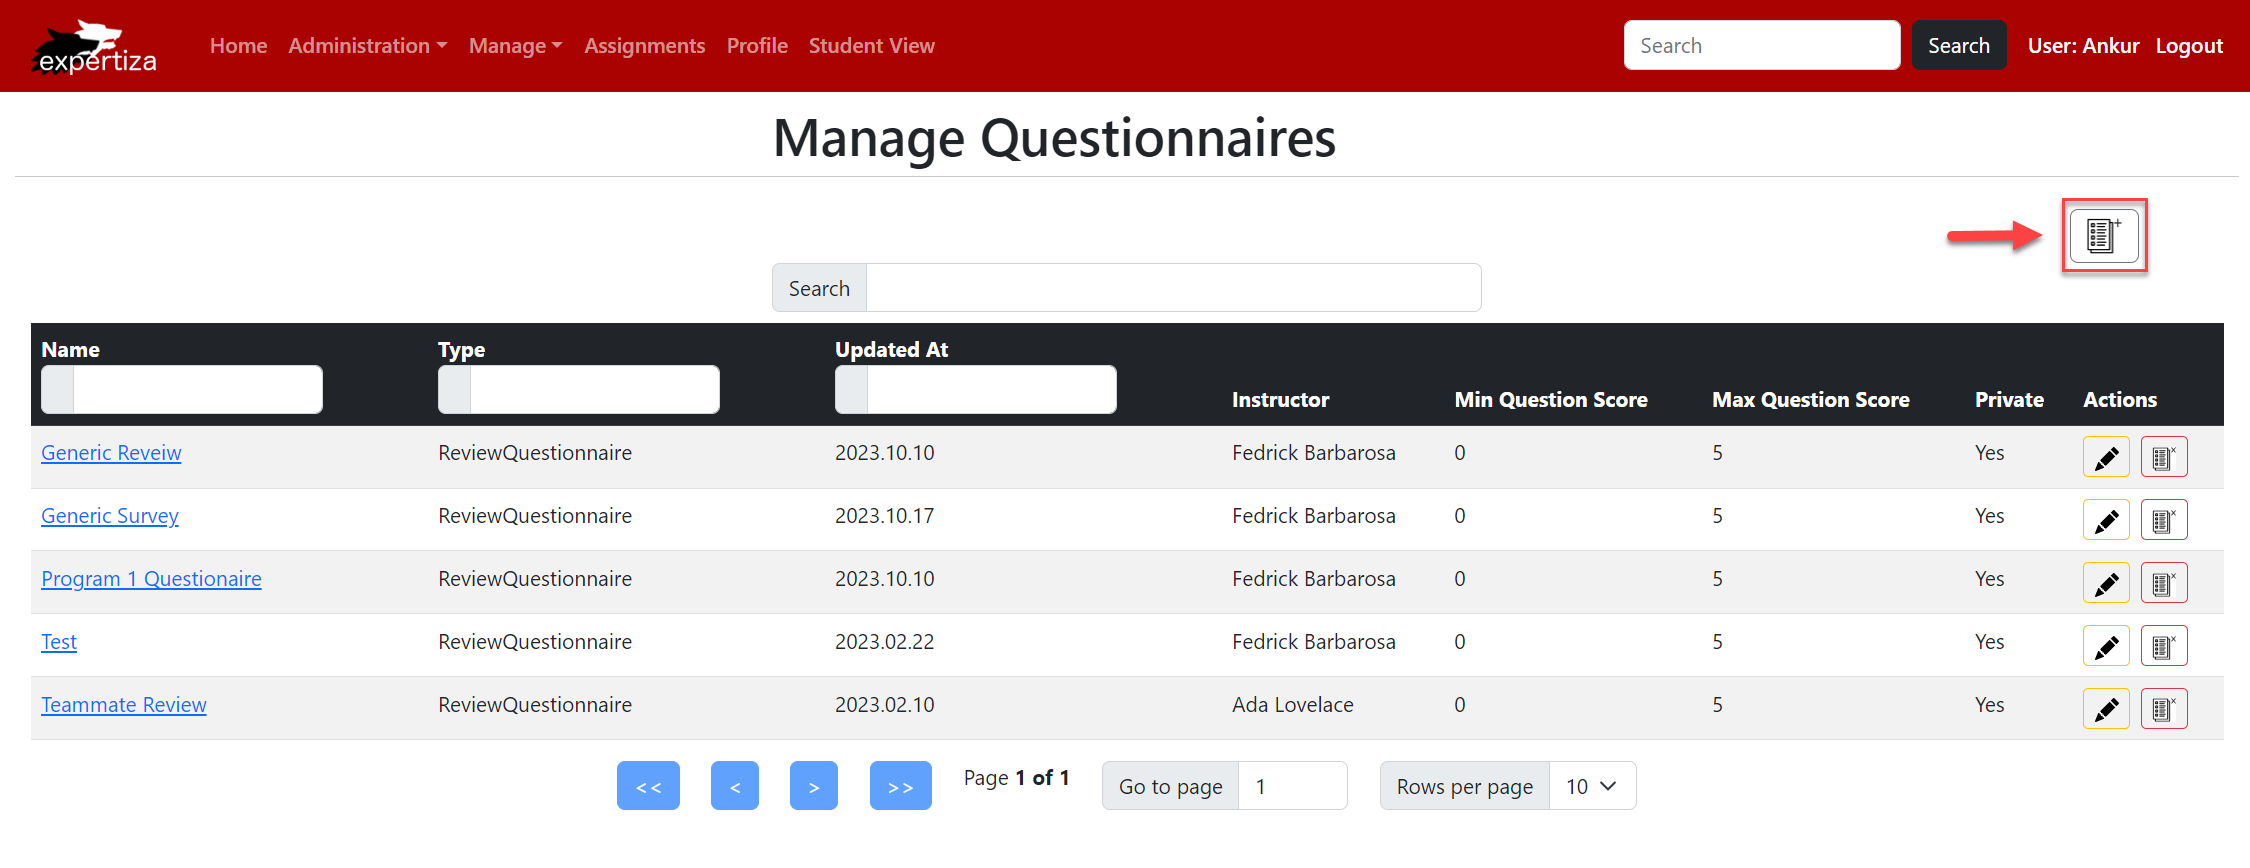
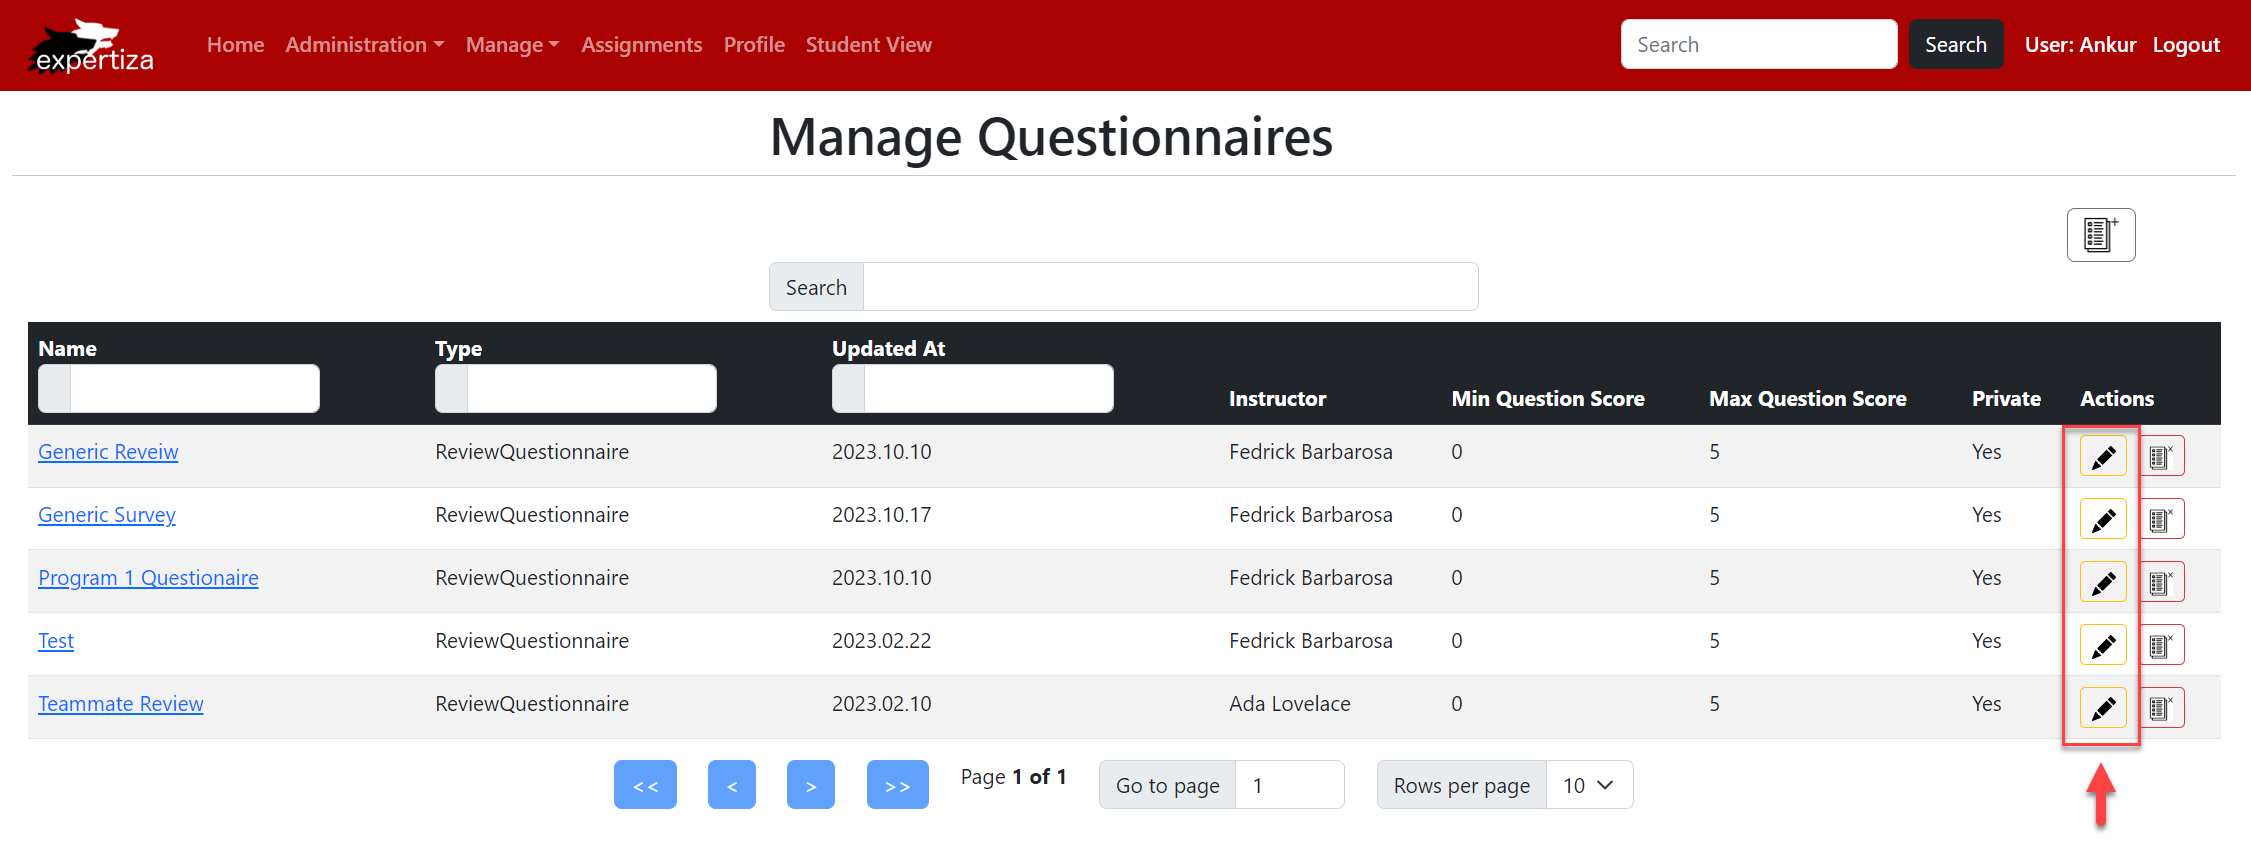
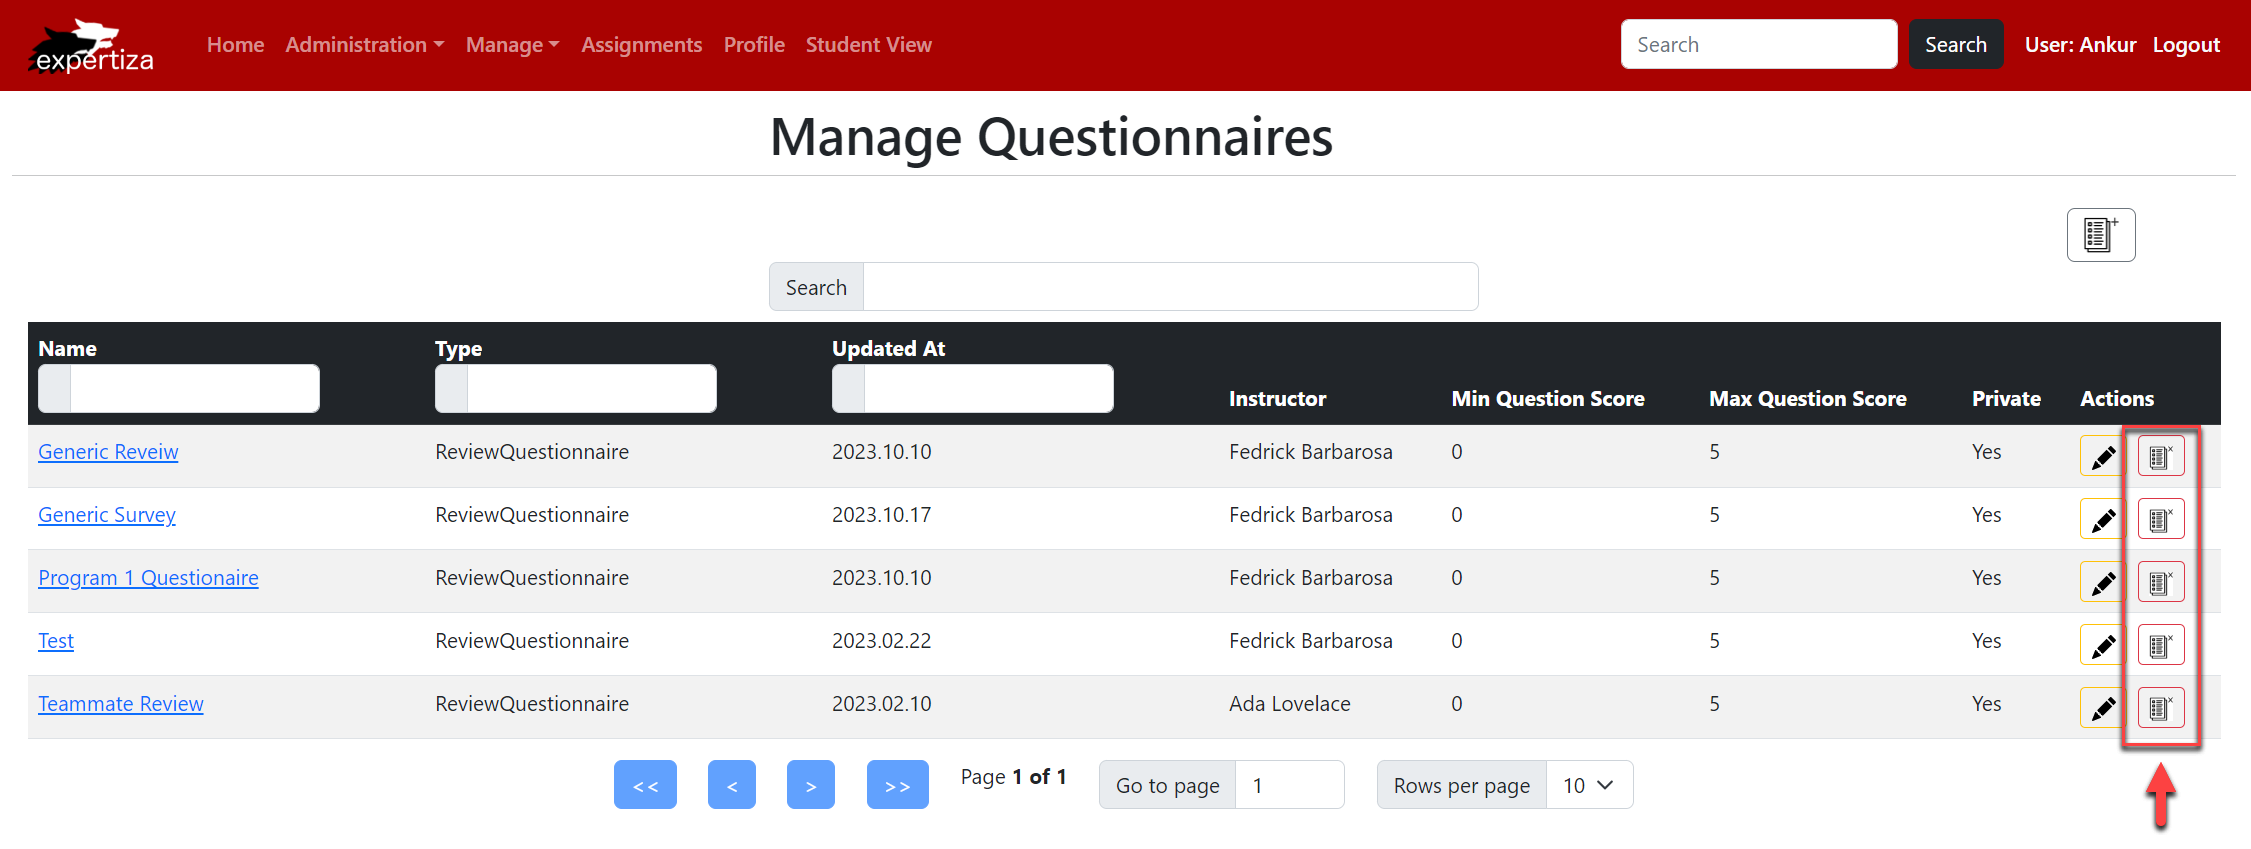
GET /questionnaires will return all questionnaires in the system. The user interface built by React will mimic the existing Expertiza UI to list these returned questionnaires in a table. Table columns will display values for the following Questionnaire attributes: Name, Type, Updated At, Instructor Id, Min Question Score, Max Question Score, and Private.
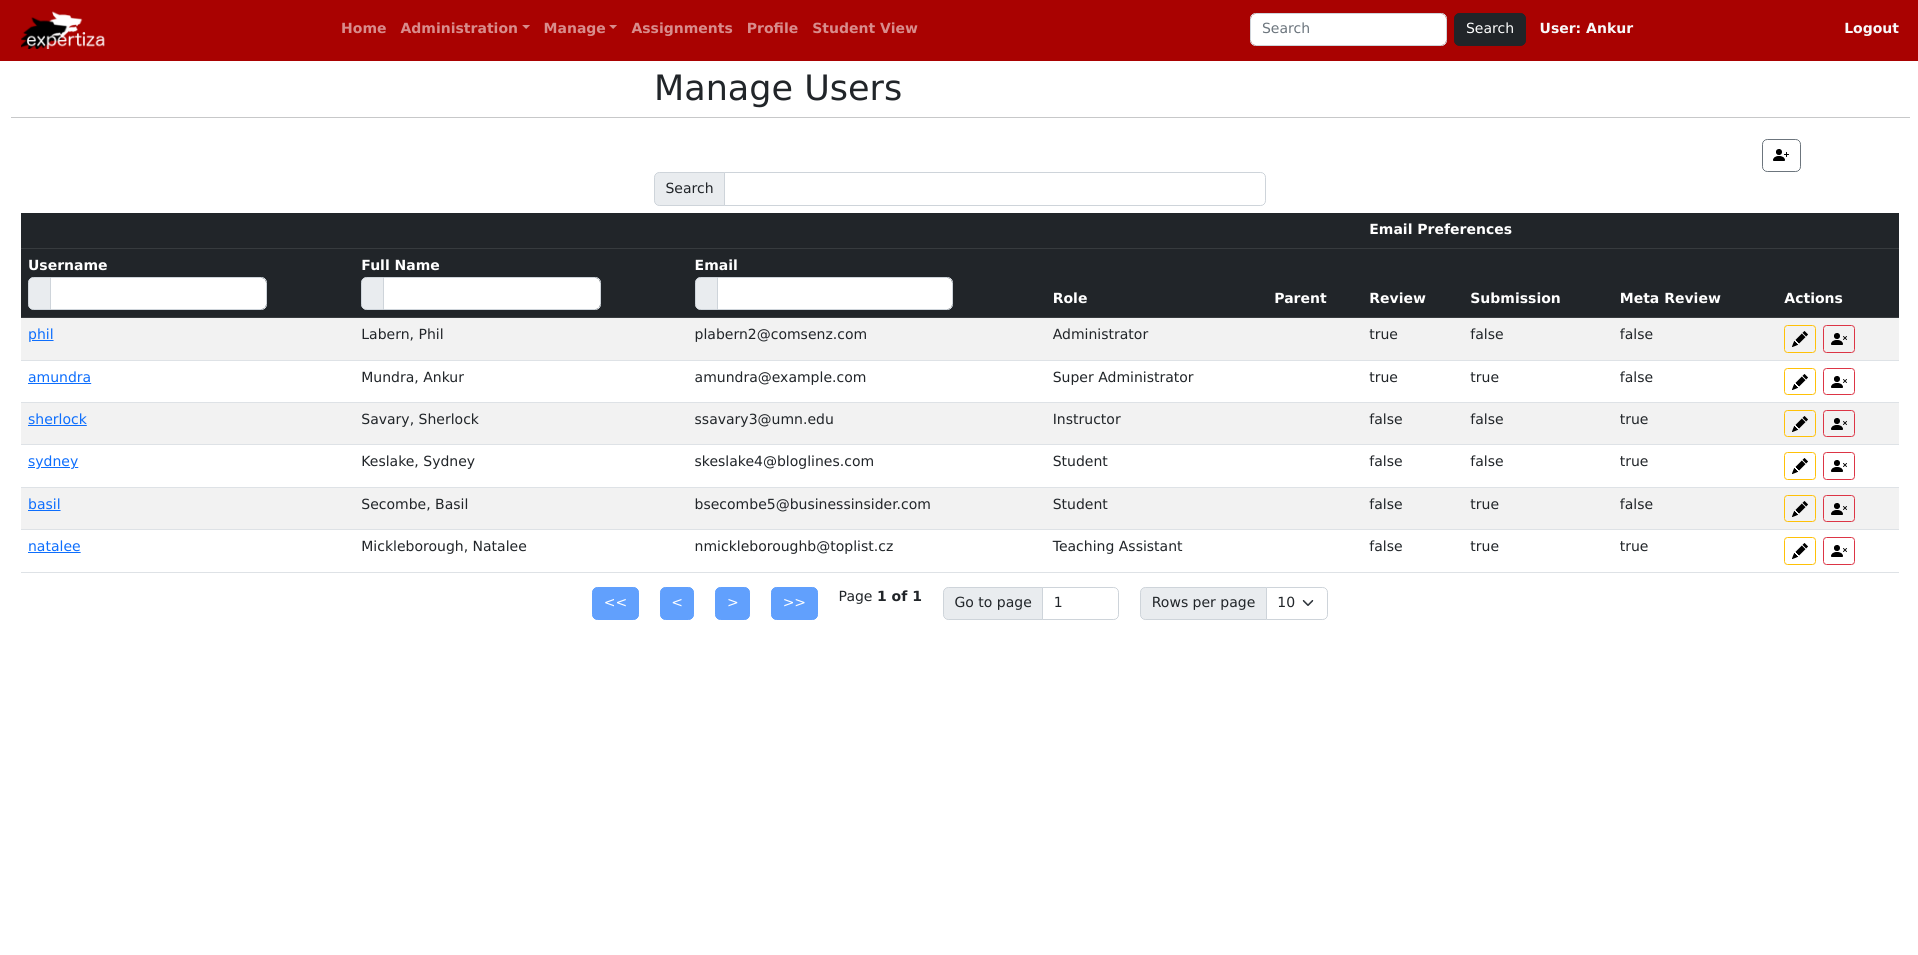
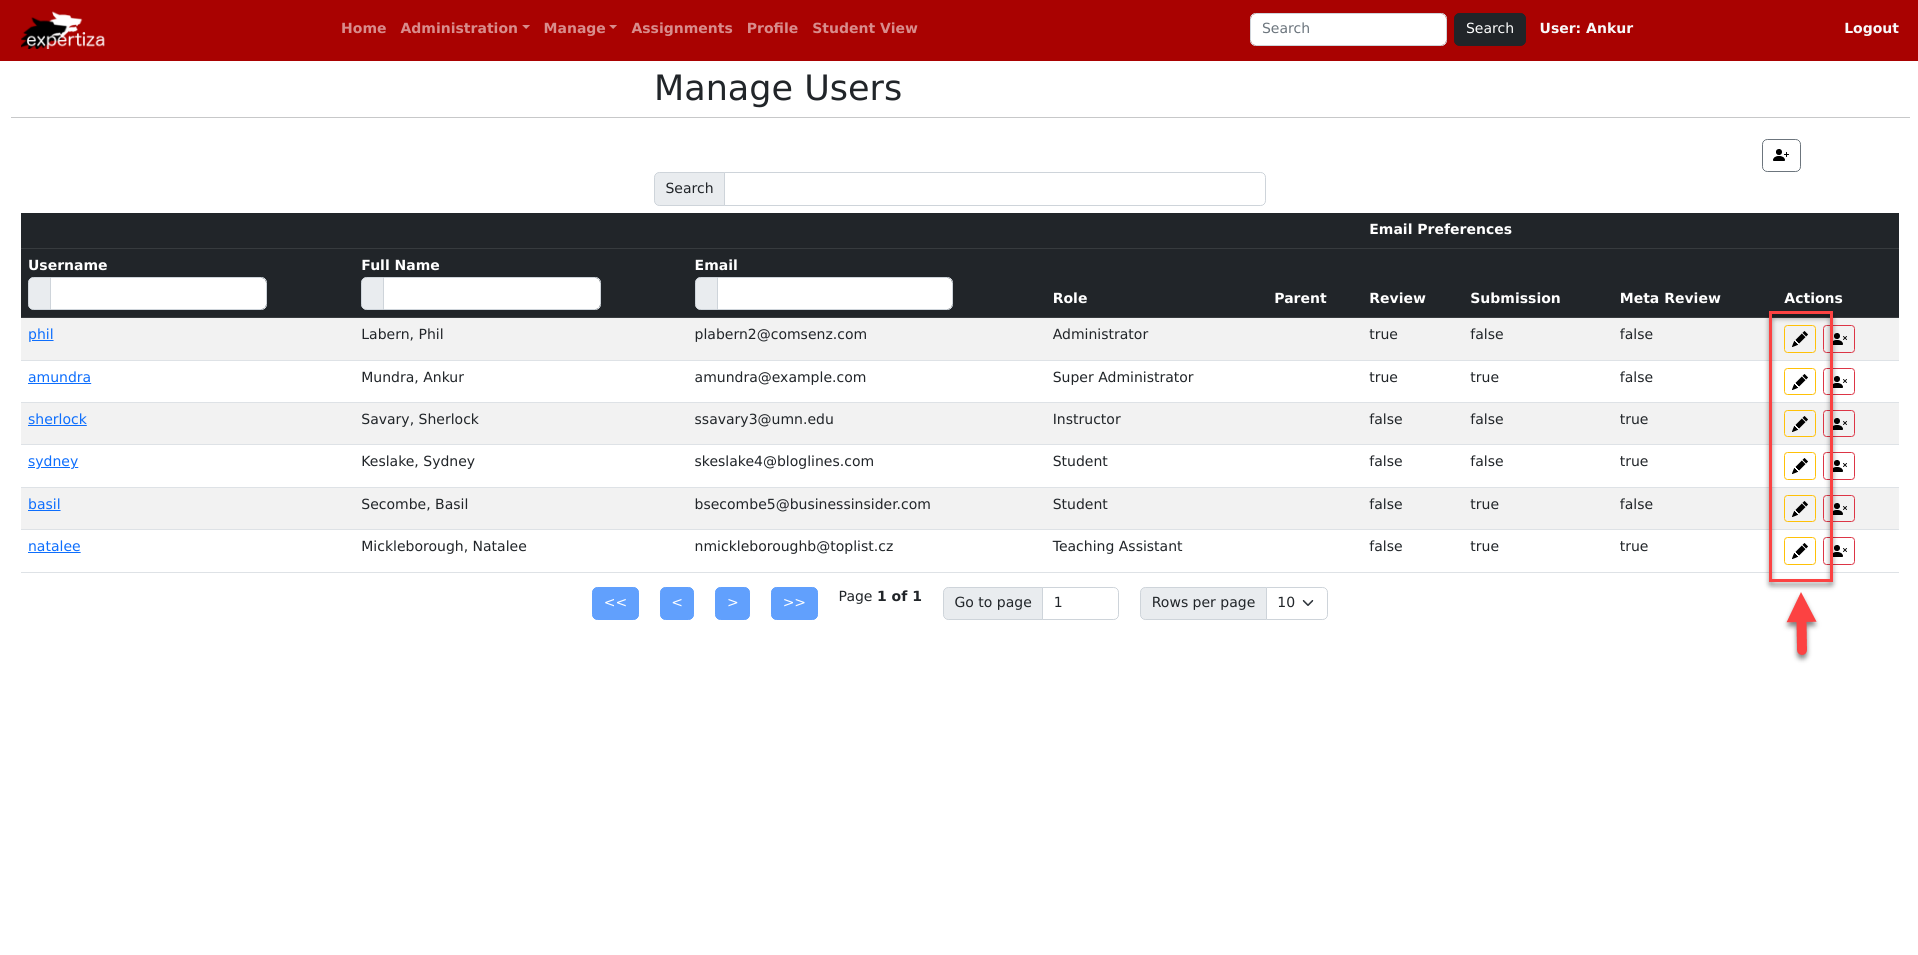
This will look similar in design to the GET /users page which has already been reimplemented using React shown below:
Columns 'Name,' 'Type', and 'Updated At' will be searchable and sortable like the first three columns in the image above.
Implementation
This has now been implemented according to plan, as shown below, with dummy JSON objects to populate the table:
GET /questionnaires/{id}
GET /questionnaires/{id} returns details of a particular questionnaire found by its id. From the /questionnaires page described in the previous section, users will have the option to view a specific questionnaire, which will give a more detailed view of that single record. This page will include the following Questionnaire attributes: Name, Type, Updated At, Instructor, Min Question Score, Max Question Score, and Private. This page will also display a list of question records related to the questionnaire selected.
Implementation
In the scope of this project, since there is no back-end, the API response to GET /questionnaires/{id} does not return successfully. Once the back-end is implemented to join the front-end, the API will be able to properly render the questionnaire record.
POST /questionnaires
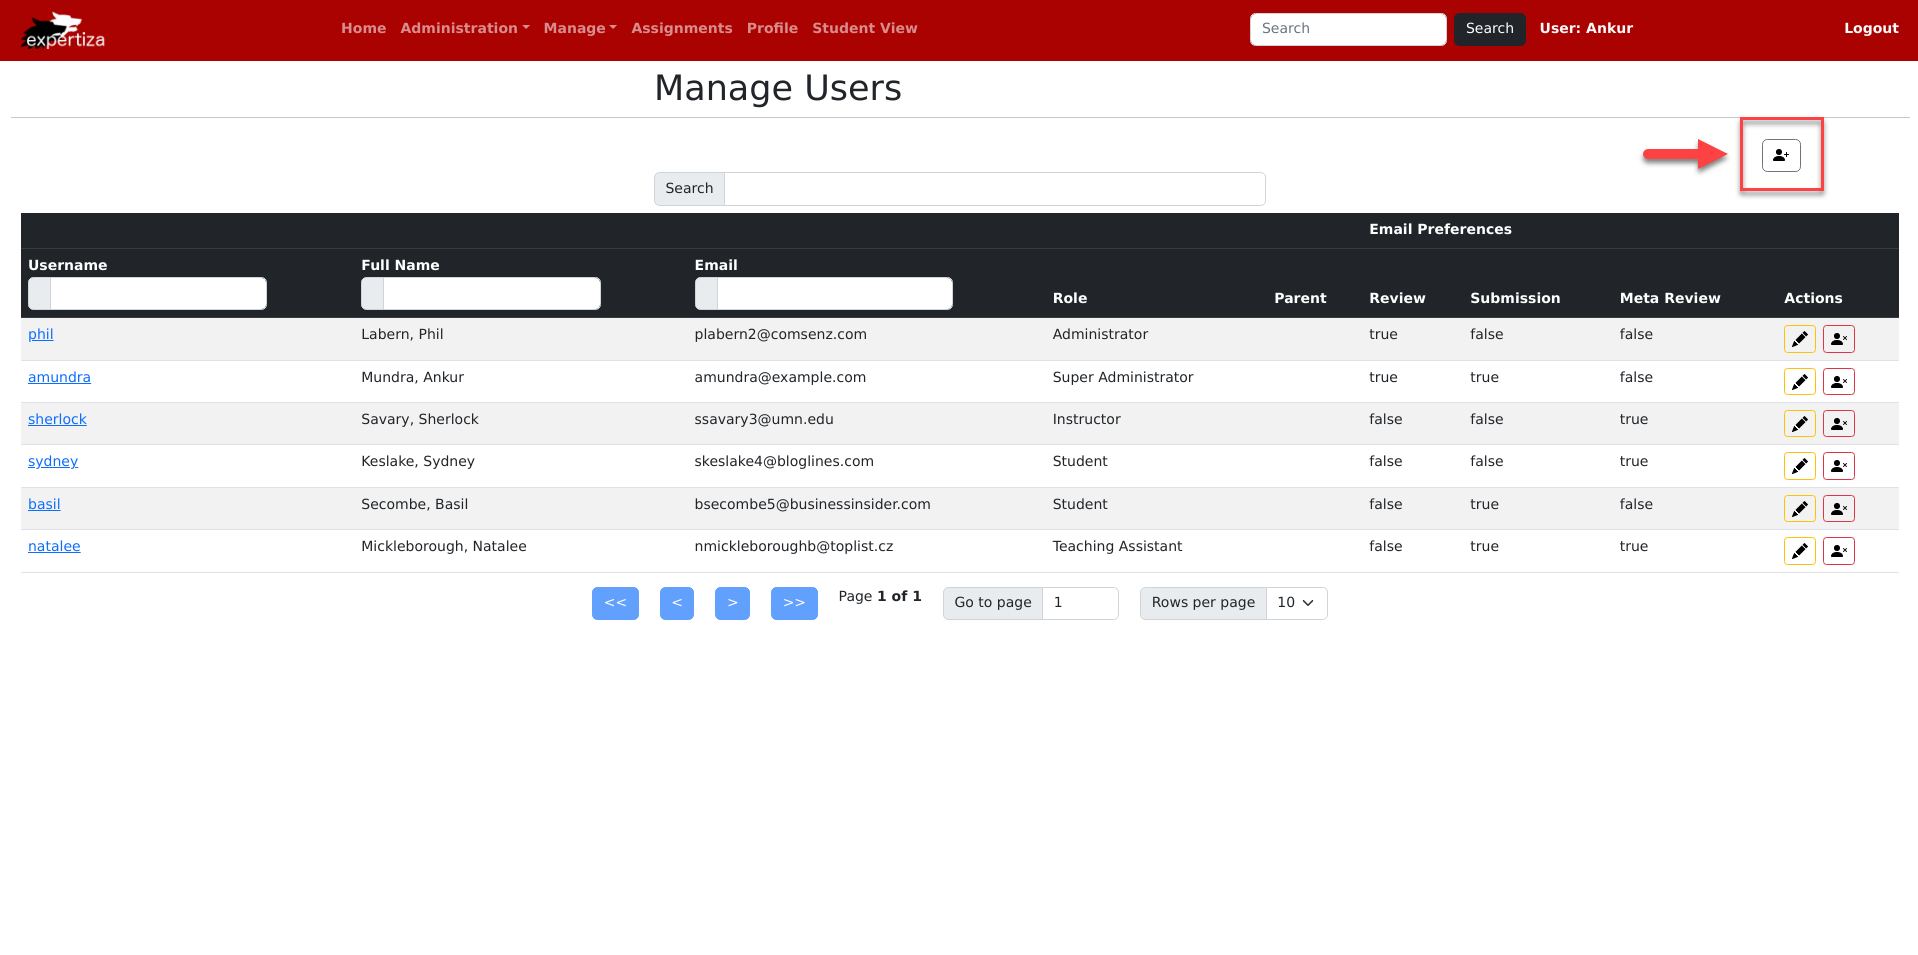
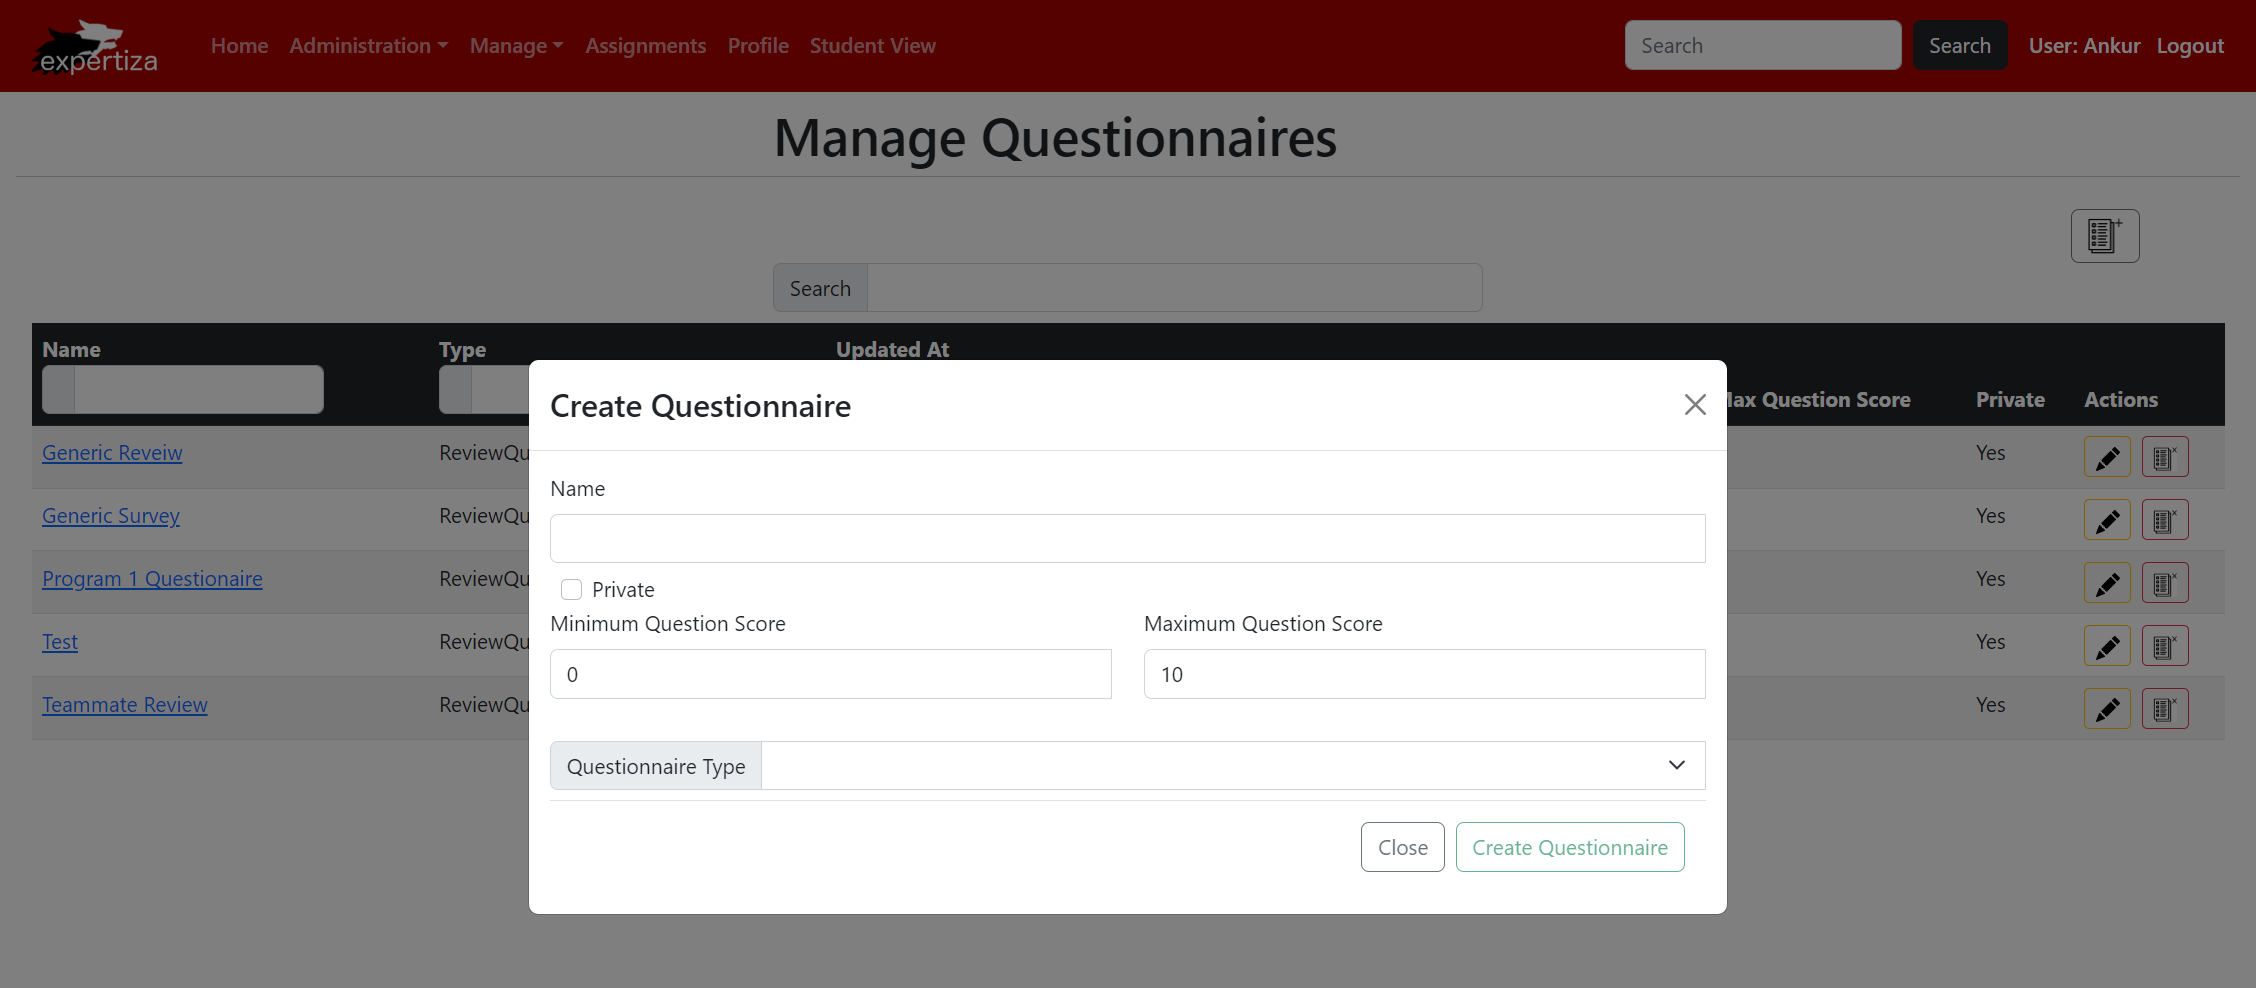
From the /questionnaires page described in an earlier section, users will have the option to create a new questionnaire. In order to create a questionnaire, a pop-up will display to capture values for the following fields: Name, Type, Min Question Score, Max Question Score, and Private.
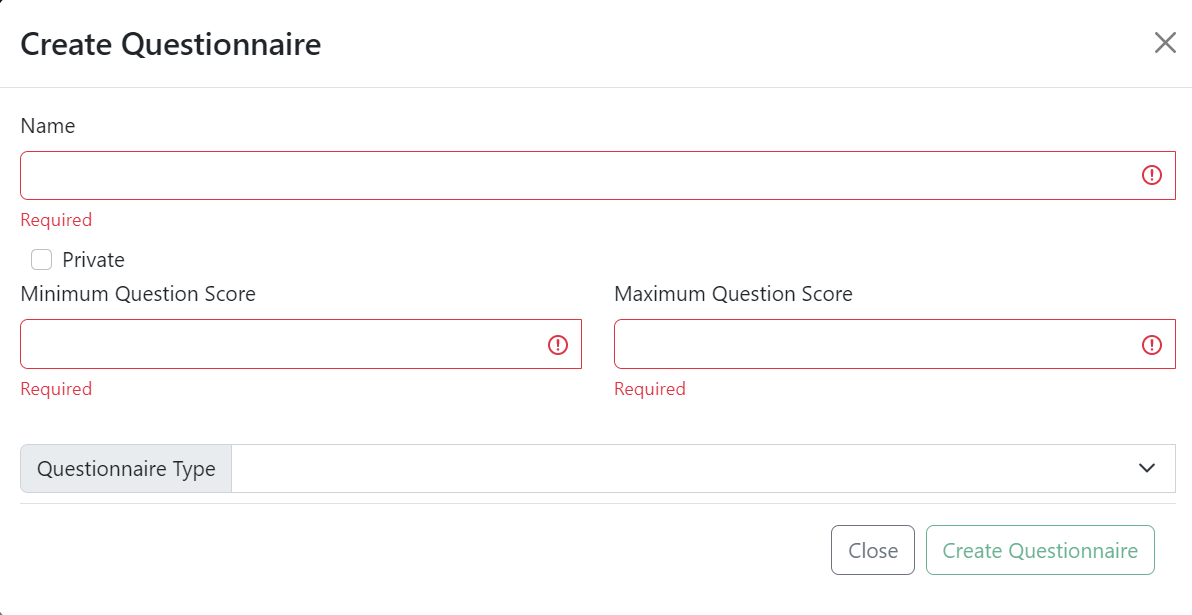
Validations will display upon inputting values into the form. Once valid values are entered, users will click the 'Create Questionnaire' button found on the form to call the POST HTTP method. Once the back-end is connected, messages will then display to indicate a successful or unsuccessful creation.
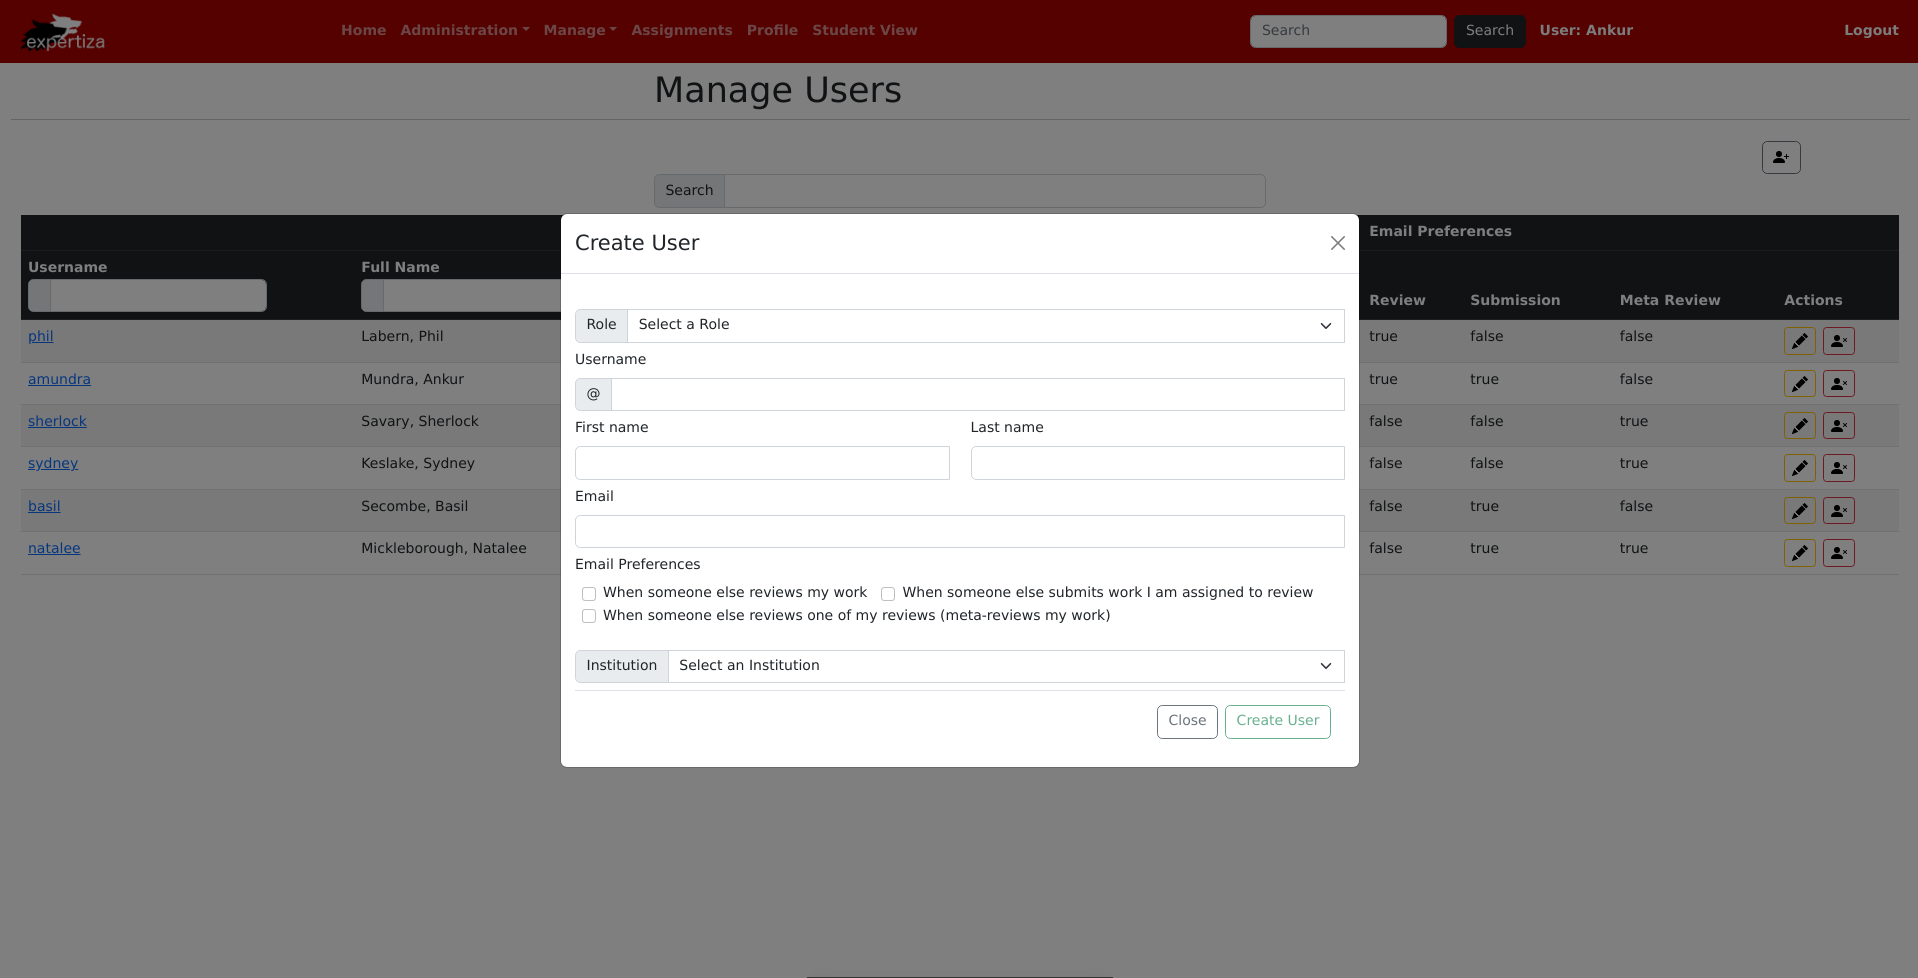
This will look similar in design to the POST /users page which has already been reimplemented using React shown below:
Implementation
This has now been implemented according to plan, as shown below:
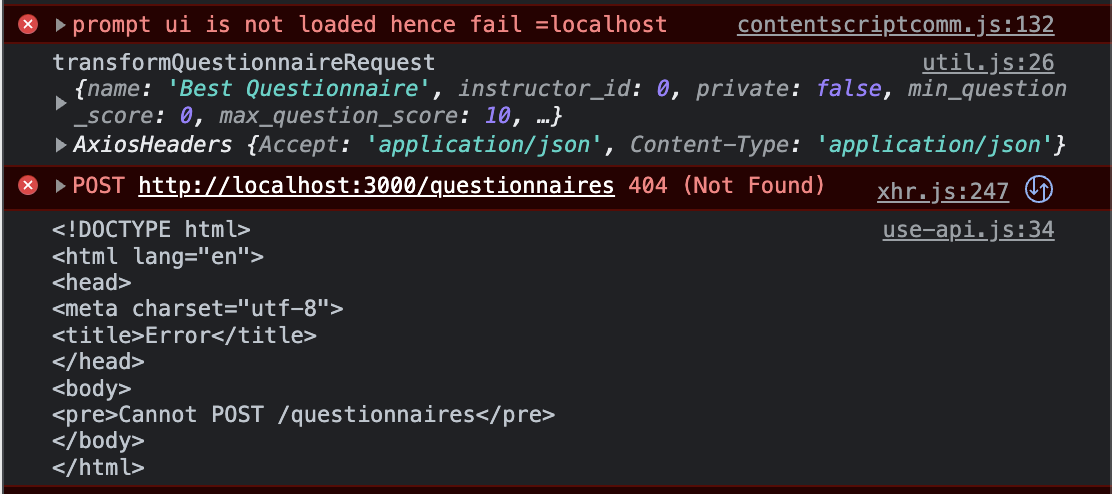
Additionally, the API makes the proper call when the 'Create Questionnaire' button is clicked. This currently returns with a '404 (Not Found)' error due to the lack of a back-end:
Once the back-end is implemented to connect with the front-end, the API will be able to return successfully since a database server will be found in the back-end.
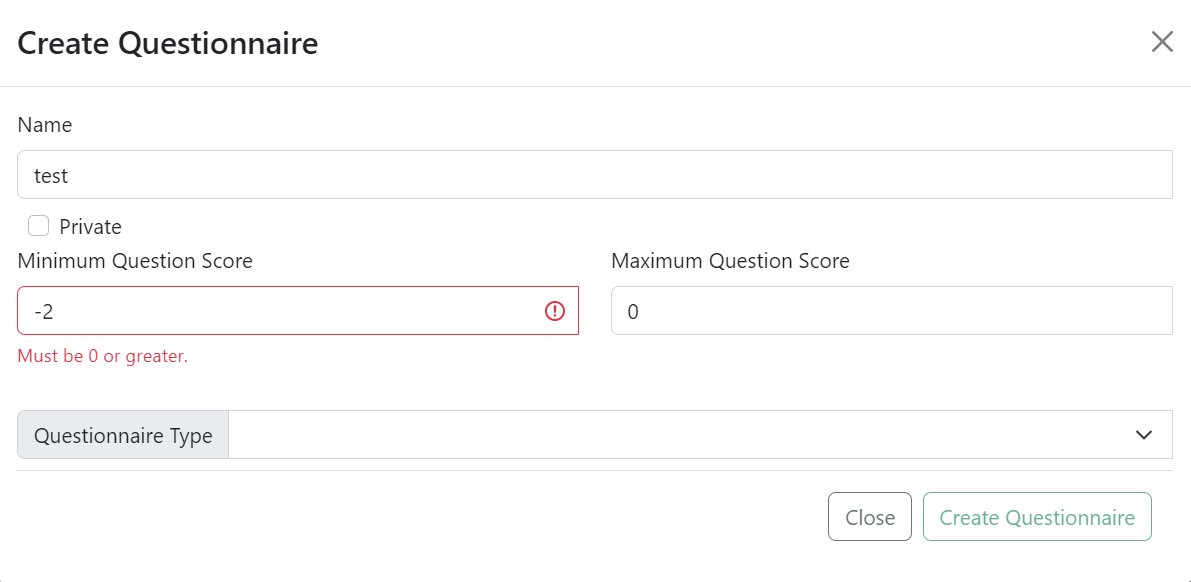
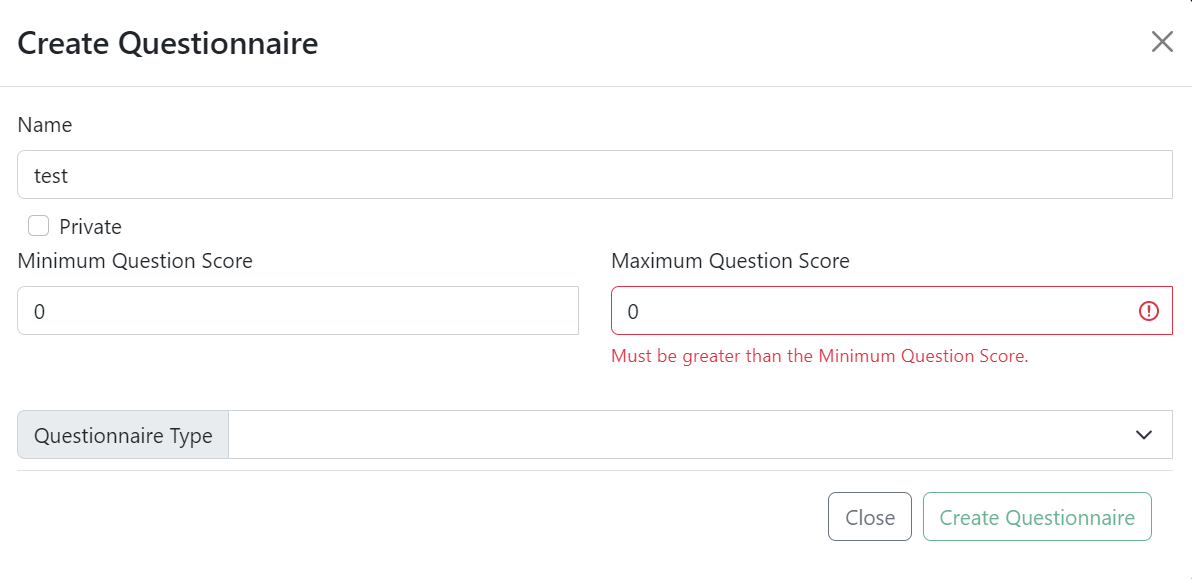
Validations implemented:
- Name, Minimum Question Score, and Maximum Question Score are required.
- Minimum Question Score must be 0 or greater.
- Maximum Question Score must be greater than the Minimum Question Score.
These validations are the same on the Update Questionnaire form.
PUT /questionnaires/{id}
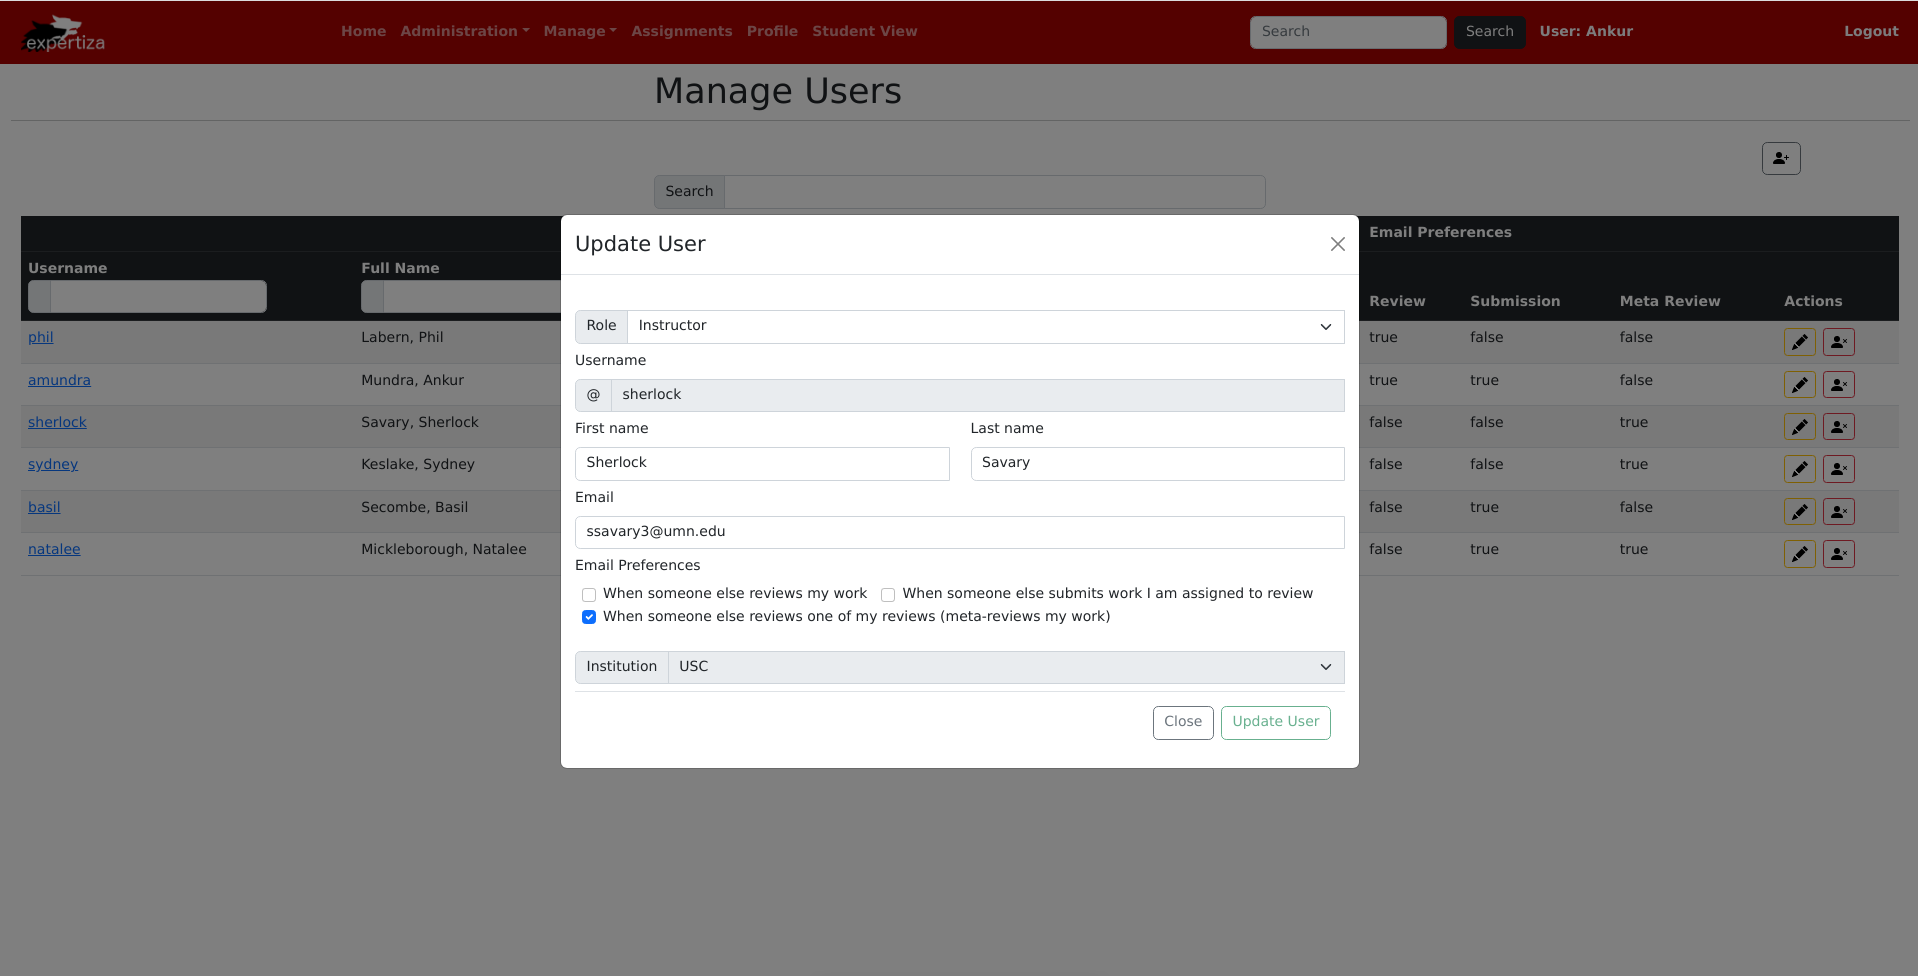
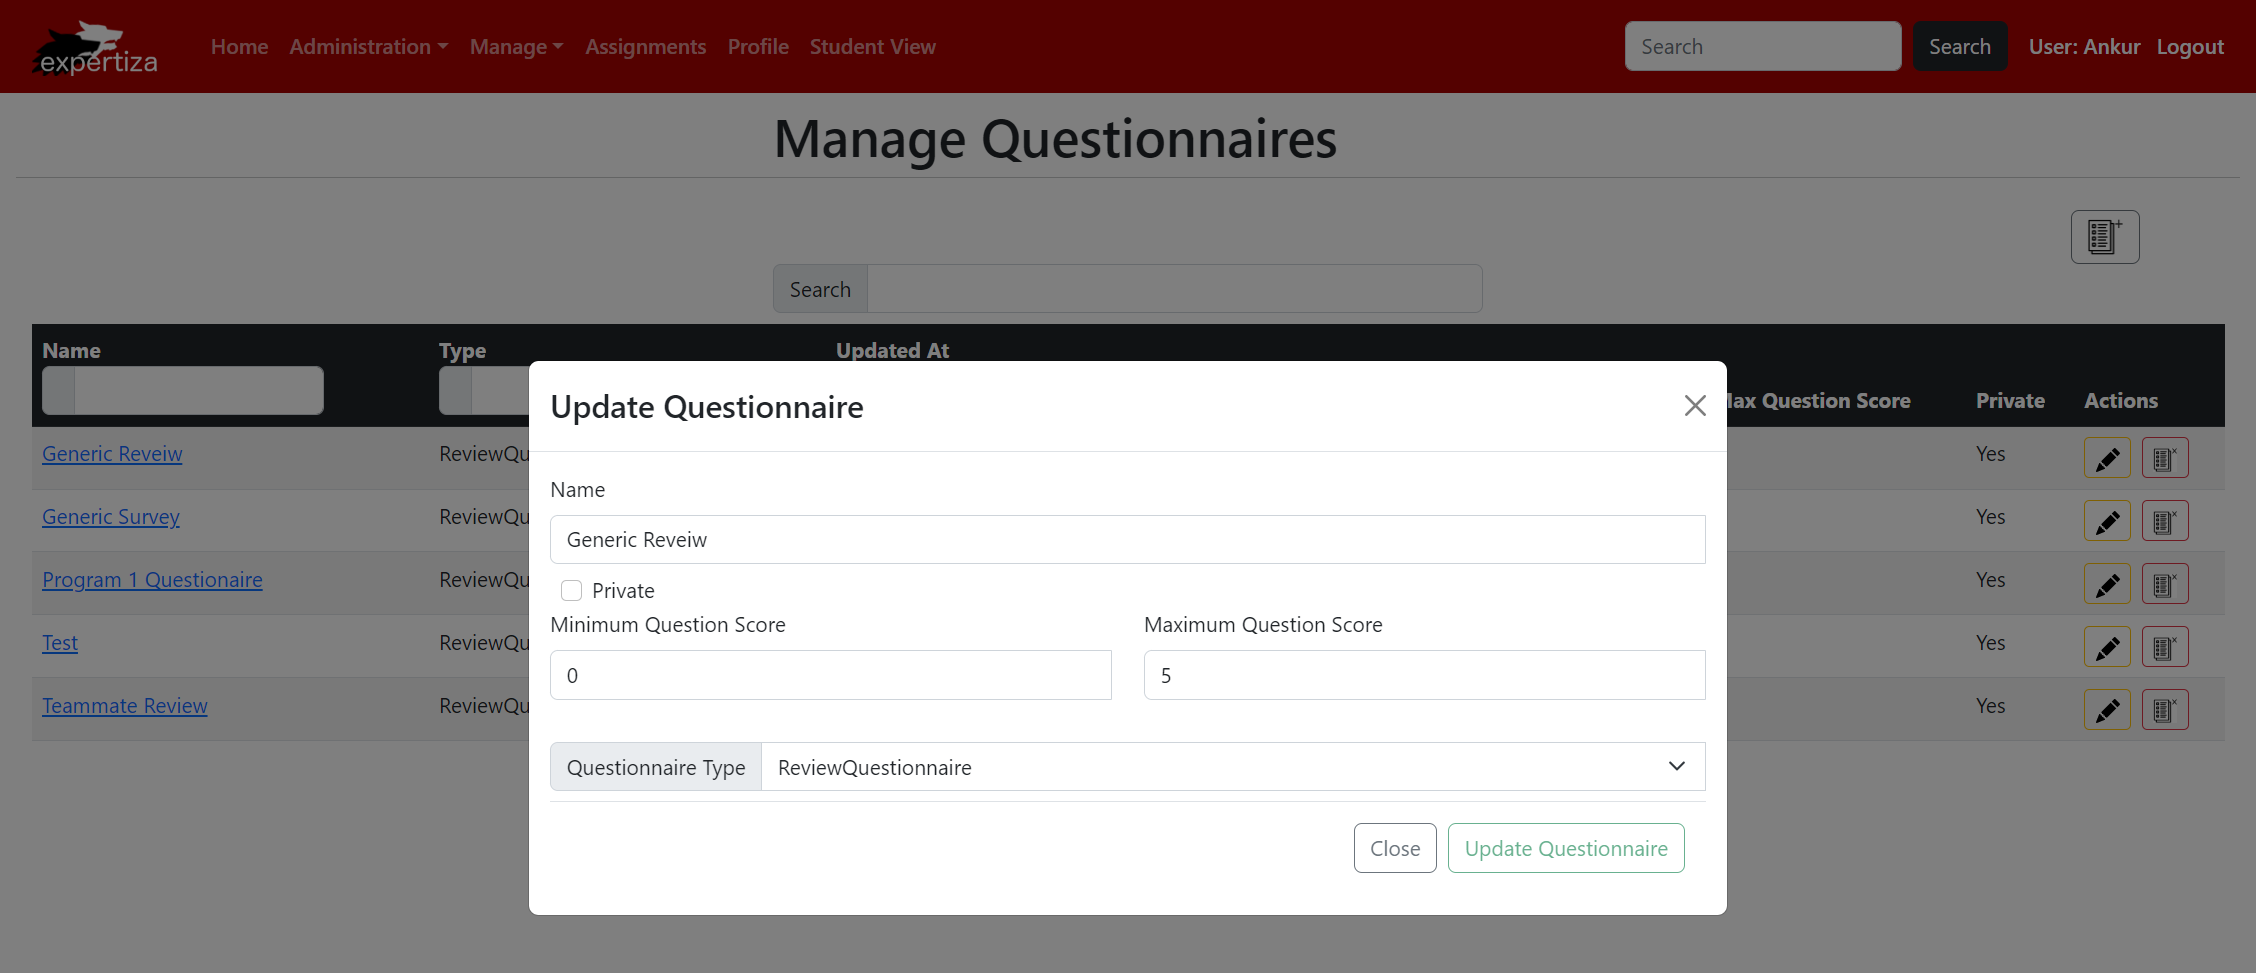
From the /questionnaires page described in an earlier section, users will have the option to update an existing questionnaire. In order to edit a questionnaire, a pop-up will display to capture changed values for the following fields: Name, Type, Min Question Score, Max Question Score, and Private.
Validations will display upon inputting values into the form. Once desired values are changed, users will click the 'Update Questionnaire' button found on the form to call the PUT /questionnaires/{id} REST endpoint. Once the back-end is connected, messages will then display to indicate a successful or unsuccessful creation.
This will look similar in design to the PUT /users/{id} page which has already been reimplemented using React shown below:
Implementation
This has now been implemented according to plan, as shown below:
Additionally, the API makes the proper call when the 'Update Questionnaire' button is clicked. This currently returns with a '404 (Not Found)' error due to the lack of a back-end:
Once the back-end is implemented to connect with the front-end, the API will be able to return successfully since a database server will be found in the back-end.
Validations implemented:
See "Validations implemented" section under POST /questionnaires.
DELETE /questionnaires/{id}
From the /questionnaires and /questionnaires/{id} pages described in earlier sections, users will have the option to delete an existing record.
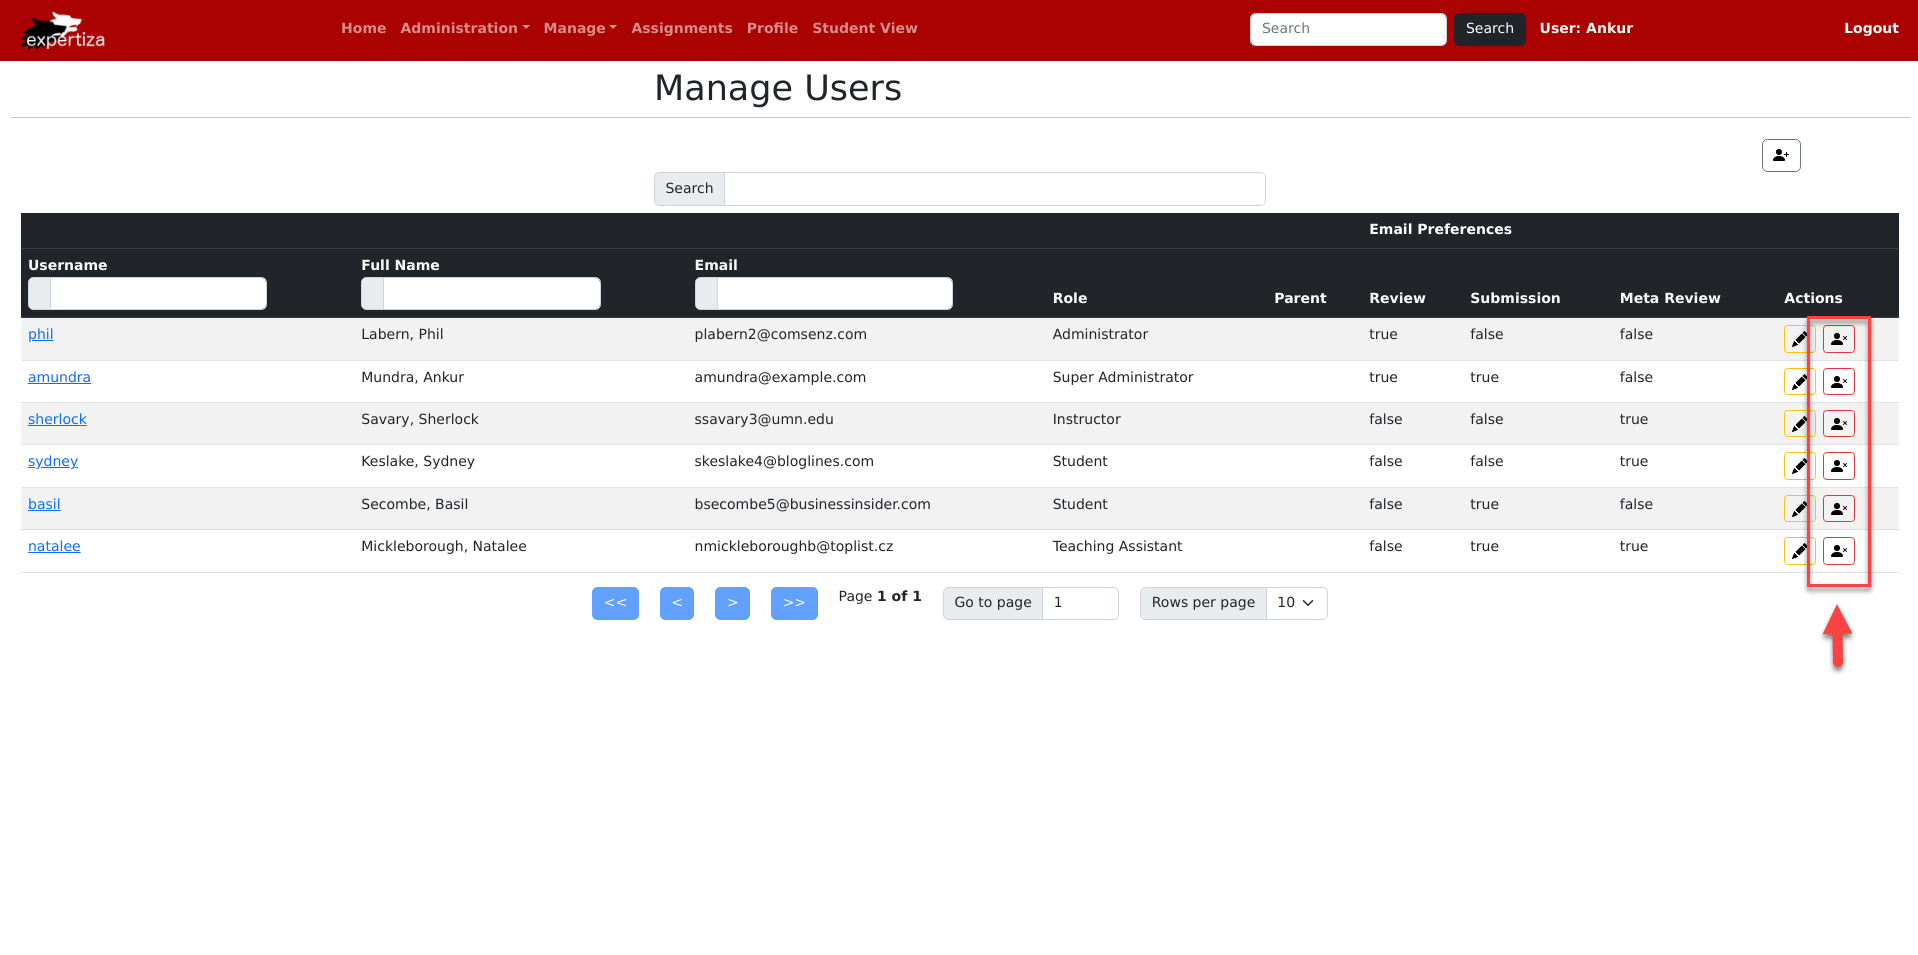
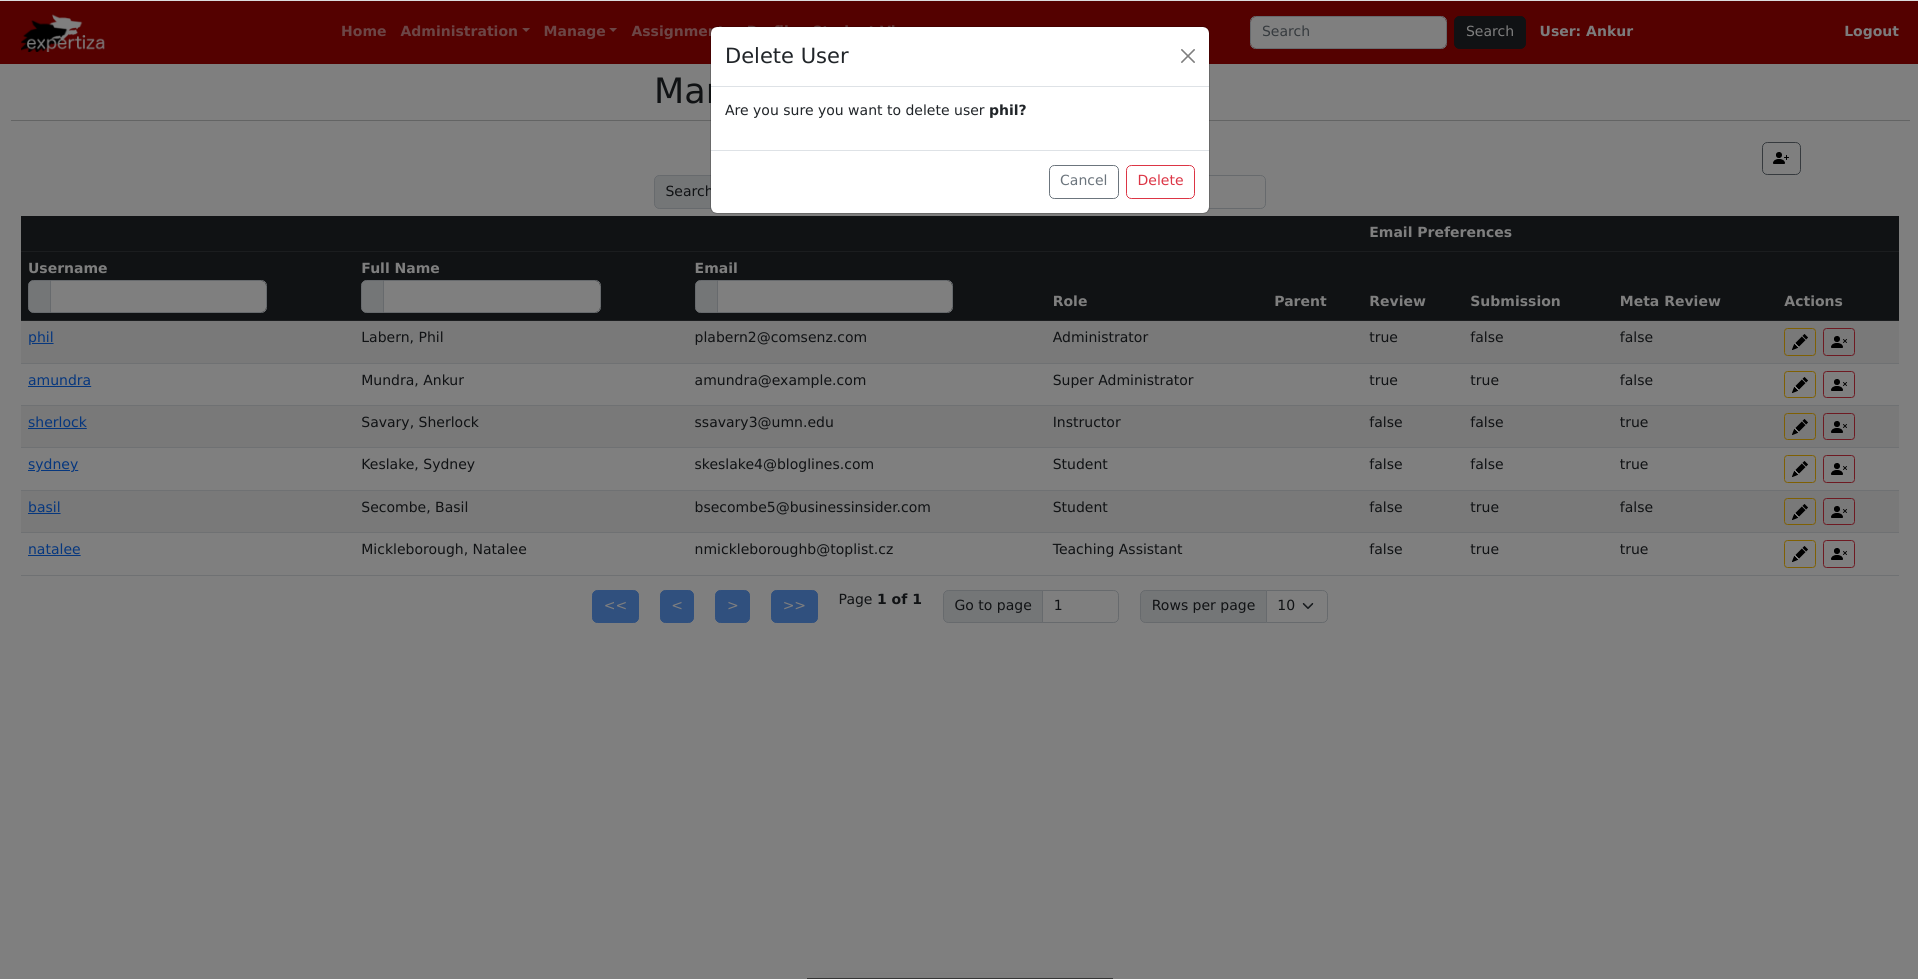
When a user chooses this option, they will be presented with a pop-up to confirm that the user wants to delete the record to prevent any accidental deletions. If the user is certain they would like to delete the record, they will then click the 'Delete' button found on this confirmation pop-up. Once the back-end is connected, messages will then display to indicate a successful or unsuccessful deletion.
This will look similar in design to DELETE /users/{id} which has already been reimplemented using React shown below:
Implementation
This has now been implemented according to plan, as shown below:
Additionally, the API makes the proper call when the 'Delete' button is clicked. This currently returns with a '404 (Not Found)' error due to the lack of a back-end:
Once the back-end is implemented to connect with the front-end, the API will be able to return successfully since a database server will be found in the back-end.
React Components
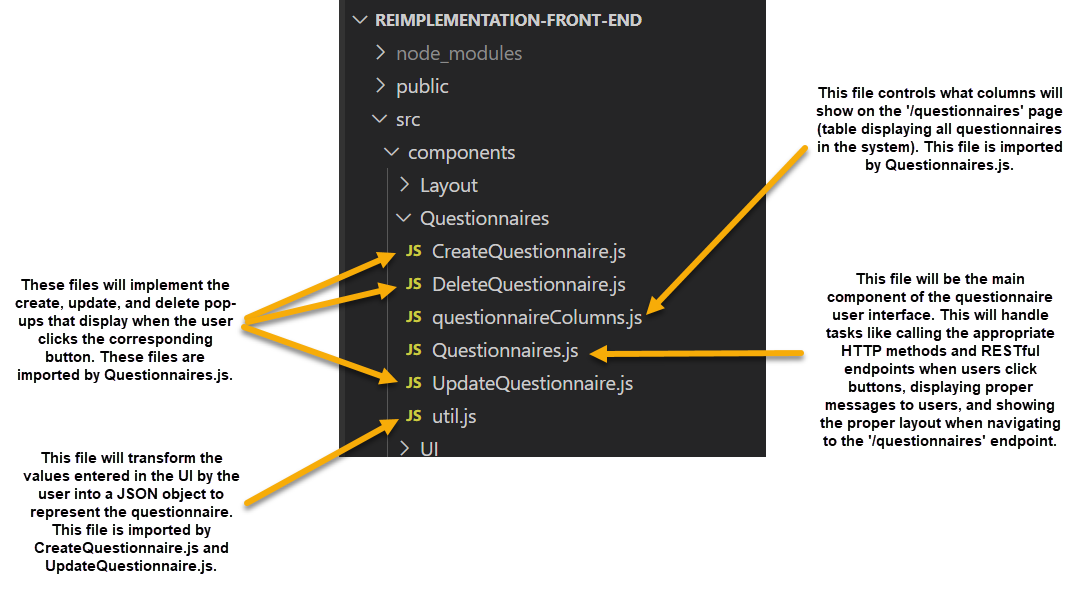
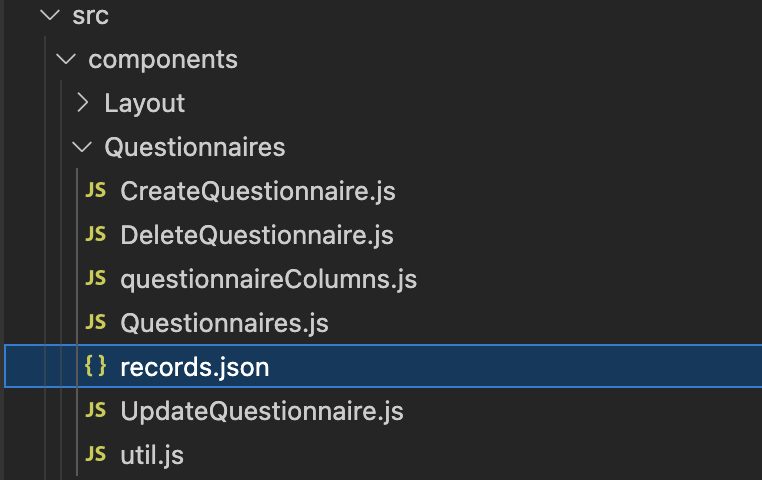
The following image shows how the files will be organized to create the necessary components of the Questionnaire UI:
Our main focus will be to ensure that the different tasks in Questionnaires.js are clearly defined since this will be the main component file. Here is a snippet of how the create action will be implemented as an example for how we plan to ensure single responsibility and prevent design smells:
const onCreateQuestionnaireHandler = useCallback(
   (questionnaire) => {
     if (questionnaire && questionnaire.name) {
       console.log(questionnaire);
       setQuestionnaireData((prevData) => [...prevData, questionnaire]);
       dispatch(alertActions.showAlert({
         variant: "success",
         message: `Questionnaire ${questionnaire.name} created successfully!`
       }));
     }
     setShowCreate(false);
   },
   [setQuestionnaireData, dispatch]
 );
Testing & Test Plan
Testing of these functions with the actual API cannot be done as the back-end is not yet implemented. The request promises never receive acknowledgment from the back-end, so we test the request by logging the objects in the console to check that the objects being sent are in the correct format.
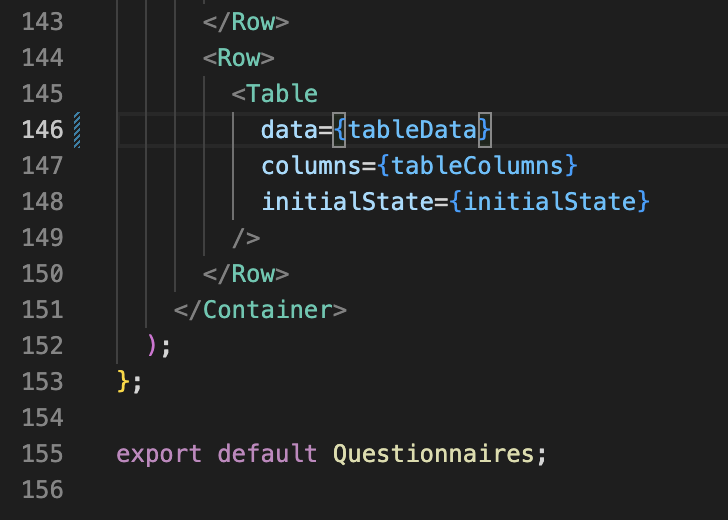
To display and test the edit and delete functions, a json filled with test data is used to mimic the initial get request to the back-end. To display this json change line 146 from "data={tableData}" to "data={DATA}".
The data is imported from a local json file, called records.json, that can be used whenever testing independent of the backend is needed.
