CSC/ECE 517 Fall 2014/ch1a 4 wl: Difference between revisions
Jump to navigation
Jump to search
No edit summary |
No edit summary |
||
| Line 3: | Line 3: | ||
== Lift Web Framework == | == Lift Web Framework == | ||
[[File:LiftArchDiagram.jpg]] | <div class="center"> [[File:LiftArchDiagram.jpg]] </div> | ||
=== Components === | === Components === | ||
| Line 25: | Line 25: | ||
== Getting Started == | == Getting Started == | ||
=== Set Up on Eclipse | === Set Up on Eclipse === | ||
# Download “Scala IDE for Eclipse” : http://scala-ide.org/ | # Download “Scala IDE for Eclipse” : http://scala-ide.org/ | ||
Revision as of 17:47, 16 September 2014
WEB DEVELOPMENT USING LIFT
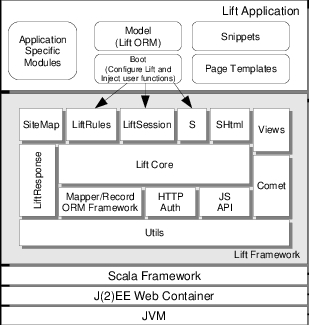
Lift Web Framework
Components
- LiftCore: This is the web processor of the framework which handles the following functions.
- Request/Response
- Rendering Pipeline
- Invoking User Functions
- LiftRules : Lift Configuration
- LiftSession: Inherent Session State.
- S: stateful context for request/response lifecycle.
- SiteMap: contains web pages for the lift application.
- SHtml: helper functions for XHtml.
- Views: Views as XML content. Allows composing views from not only html files but other contexts too.
- LiftResponse: Abstraction of response sent to the client.
- Comet: allows sending asynchronous content to browser.
- ORM: A specialized library.
- HTTP Auth: provides control over authentication model.
- JS API: JavaScript abstraction layer.
Getting Started
Set Up on Eclipse
- Download “Scala IDE for Eclipse” : http://scala-ide.org/
- Install plugin in Eclipse from this update site : http://download.scala-ide.org/sdk/helium/e38/scala211/stable/site
- Once the plugin is installed restart Eclipse
- Install sbteclipse by adding the following to projects/plugins.sbt in your Lift Project:
addSbtPlugin("com.typesafe.sbteclipse" % "sbteclipse-plugin" % "2.5.0") - You can then create Eclipse project files (.project and .classpath) by entering the following into the SBT prompt:
eclipse
Basic Web Application Structure
Step 1: Making a SiteMap entry
Every page on the site needs a SiteMap entry.
def sitemap(): SiteMap = SiteMap(
  Menu("Home") / "index",
  Menu("Second Page") / "second"
)
Step 2: Creating the view
Create an HTML file that corresponds to the sitemap entry.
<meta content="text/html; charset=UTF-8" http-equiv="content-type">
    <title>Home</title>


    <div id="main" class="lift:surround?with=default&at=content">
      <div>
        Hi, I'm a page that contains the time:
        <span class="lift:TimeNow">??? some time</span>.
      </div>

      <div>
        And a button: <button class="lift:ClickMe">Click Me</button>.
      </div>
    </div>
Step 3 : Creating the Snippet
A snippet can be thought of as a controller which has rules for transforming the section of your template.
package code
package snippet

import net.liftweb._
import util._
import Helpers._

object TimeNow {
  def render = "* *" #> now.toString
}
Advantages
- Built on Scala which is a powerful functional language.
- Multiple Component support : Divides the controls into snippets which can be used together on a single page thereby not coupling a page with a controller.
- CSS Binding : allows to navigate the HTML Dom tree.
- Native Javascript/Ajax Support
- Out-of-box Security.
- Lazy Loading & Parallel Page rendering : Lift shows automatic spinners on area still being loaded, components are able to load over multiple thread at the same time.
Disadvantages
- Lots of state kept in session.
- Learning Curve as no more MVC.
