CSC/ECE 517 Fall 2010/ch1 S10 MM: Difference between revisions
| Line 30: | Line 30: | ||
[[Image:Rubytk-hello_world.png]] | [[Image:Rubytk-hello_world.png]] | ||
==== Hello World button ==== | |||
This short example replaces the label from above with a TkButton, and connects the button to the "printHello" function via the "command" argument. | |||
<pre> | |||
require 'tk' | |||
def printHello | |||
puts "Hello, world!" | |||
end | |||
root = TkRoot.new { title "Hello, World!" } | |||
helpButton = TkButton.new(root) do | |||
text "Hello, world!" | |||
command proc { printHello } | |||
pack { padx 15 ; pady 15; side 'left' } | |||
end | |||
Tk.mainloop | |||
</pre> | |||
=== Pros and Cons === | === Pros and Cons === | ||
Revision as of 03:15, 9 September 2010
Introduction
A GUI toolkit is a set of widgets and APIs that can be used and extended to construct a graphical user interface application. At a minimum a GUI toolkit will provide generic graphical widgets to display to the screen, and an eventing system to tie interactive widget pieces with other widgets, or to a data model. Most toolkits will provide widget containers for easy layouts, abstract data model types and containers, and an easy to use mechanism for implementing an observer pattern for linking widgets and data structures. Advanced toolkits, such as Qt, will even offer convenience widgets for advanced data display, concurrent programming abstractions, or even a whole browser backend (based on Webkit, in Qt's case). Ideally a toolkit would work across several different operating systems with very minimal changes to the application code or compilation process.
Most GUI toolkits are natively composed in C++. Object-oriented language features are all but required for the level of base functionality extension required in a large GUI systems. In many cases, though, bindings for the toolkit will spring up in different languages, and usually the most useful bindings will be in a dynamic scripting language such as Python, or Ruby. This page will talk about several GUI toolkit bindings in the Ruby language.
Dynamically typed languages offer many different advantages for GUI development. Since GUIs typically work with many different simple and composite data types, and the toolkit itself adds a large number of class types on top of that, defining class interfaces and usable data structures, and making them available to the right widgets at the right time within the application can be tedious in statically typed languages. Dynamic languages offer the ability to define, and redefine these things, allowing very rapid development.
The only downside to coding with the dynamic languages is that the speed of the application will suffer due to interpreter overhead, but even for large applications this may be acceptable if the application does not require a particularly high frame rate under heavy load. Logistically, however, in many cases there are problems with the level of support and maintenance in a particular binding project. It is always useful to look at when the last version control checkin was made for a project if that is available, and try to compare the latest binding release date with the latest native implementation release date. Also, it is usually harder to find documentation for the specific dynamic language that you are using, and you may be stuck reading C++ API documentation, and potentially source code for the project when you hit something you did not expect. There are also usually slight complications with deployment, and there may be licensing discrepancies between the C++ and Python/Ruby versions as well.
Overview of Ruby GUI Toolkits
Ruby/Tk
Tk is an older GUI toolkit, originally written in Tcl. Tk offers a good set of generic widgets, widget containers for relatively easy layouts, a Canvas, and event binding. Unfortunately none of these features are very advanced, and they're generally quirky to use once you've used either a wxWidgets base system or a Qt system. For example, Tk appears to only give you a single callback or variable binding for widget output and events, instead of providing a more robust mechanism for observing data changes through events or signals. You could roll your own mechanism with those features, but that could get tedious in a hurry. Also, the widgets are drawn in a distinctly Tk-style, instead of in the native style of the OS. It is highly desirable for a production GUI application to offer the standard idioms that a user expects in a native OS application, so Tk probably should never be used for a globally deployed application.
Example
Hello World
This is a simple hello world application. It demonstrates how to create a root-level frame, and add a single label to it with the given text.
require 'tk'

root = TkRoot.new { title "Hello, World!" }
TkLabel.new(root) do
   text 'Hello, World!'
   pack { padx 15 ; pady 15; side 'left' }
end
Tk.mainloop
When run, this program will display the following:
Hello World button
This short example replaces the label from above with a TkButton, and connects the button to the "printHello" function via the "command" argument.
require 'tk'

def printHello
    puts "Hello, world!"
end

root = TkRoot.new { title "Hello, World!" }
helpButton = TkButton.new(root) do
   text "Hello, world!"
   command proc { printHello }
   pack { padx 15 ; pady 15; side 'left' }
end
Tk.mainloop
Pros and Cons
Pros
- Well-supported
- Tk has an implementation in a great many languages
- Well-documented
Cons
- Very old
- Does not use native OS widgets
- Generally considered quirky and hard to use.
QtRuby
Qt is well-supported open source GUI toolkit that is available under the LGPL license. QtRuby attempts to offer the vast array of functionality provided by Qt in Ruby form. One useful and distinguishing characteristic of Qt is the signal/slot mechanism, which allows you to register an arbitrary number of "slots" to receive a particular "signal." Signals are generally emitted through interacting with widgets on the screen, but can be emitted from anywhere in the code. This allows a very powerful method of "observing" the behavior of a particular widget.
Qt is very robust, and works across all three major operating systems. QtRuby strives to achieve the same feat.
Unfortunately it appears that QtRuby is not being actively maintained, as the last release was in August of 2009.
Examples
Hello World!
This is a very easy way to get started, and to make sure you've installed QtRuby correctly. Simply paste the code below into a file "hello_world.rb", and execute `ruby hello_world.rb`. It's just that easy.
require 'Qt4'
app = Qt::Application.new(ARGV)

hello = Qt::PushButton.new('Hello World!')
hello.resize(100, 30)
hello.show()

app.exec()
The example is relatively straightforward. The first line includes the Qt4 module. The second line instantiates an Qt "application" instance, for which they will only ever be one instance for the duration of the Qt portion of your application. The application contains the main event loop, some event handling mechanism, and just a few global variables that can be accessed from within your application. However, the application is relatively useless without some widgetry added. This program simply instantiates a "QPushButton" instance, and sets the size, and then tells it to show itself. Here is what it looks like:
Signal/Slot setup
As mentioned, Qt's signal/slot mechanism is relatively unique in the GUI toolkit world, and is extremely easy to use. This is a quick demonstration showing how to create a new custom widget by subclassing the QWidget class, and then creating a vertical box layout, add three buttons to it, and connect those buttons to three different slots:
require 'Qt4'

class MyWidget < Qt::Widget
    slots 'button1()', 'button2()', 'button3()'
    def initialize(parent = nil)
        super
        setFixedSize(200, 120)


        button1 = Qt::PushButton.new(tr('Button1'), self)
        button2 = Qt::PushButton.new(tr('Button2'), self)
        button3 = Qt::PushButton.new(tr('Button3'), self)

        buttonLayout = Qt::VBoxLayout.new()
        buttonLayout.addWidget(button1)
        buttonLayout.addWidget(button2)
        buttonLayout.addWidget(button3)
        setLayout(buttonLayout)

        connect(button1, SIGNAL('clicked()'), self, SLOT('button1()'))
        connect(button2, SIGNAL('clicked()'), self, SLOT('button2()'))
        connect(button3, SIGNAL('clicked()'), self, SLOT('button3()'))
    end

    def button1()
        puts "Button 1 pressed!"
    end

    def button2()
        puts "Button 2 pressed!"
    end

    def button3()
        puts "Button 3 pressed!"
    end
end

app = Qt::Application.new(ARGV)

widget = MyWidget.new()
widget.show()

app.exec()
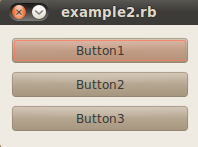
Here is what this application looks like when you run it:
As you may expect, it prints out "Button X pressed!" whenever the button X is pressed. Unfortunately, QtRuby makes you declare your slots upfront instead of allowing any method to be used as a slot.
QtRuby slider
require 'Qt4'

class MyWidget < Qt::Widget
  def initialize()
    super()
    quit = Qt::PushButton.new('Quit')
    quit.setFont(Qt::Font.new('Times', 18, Qt::Font::Bold))

    lcd = Qt::LCDNumber.new(2)

    slider = Qt::Slider.new(Qt::Horizontal)
    slider.setRange(0, 99)
    slider.setValue(0)

    connect(quit, SIGNAL('clicked()'), $qApp, SLOT('quit()'))
    connect(slider, SIGNAL('valueChanged(int)'), lcd, SLOT('display(int)'))

    layout = Qt::VBoxLayout.new()
    layout.addWidget(quit)
    layout.addWidget(lcd)
    layout.addWidget(slider)
    setLayout(layout)
  end
end

app = Qt::Application.new(ARGV)

widget = MyWidget.new()

widget.show()
app.exec()
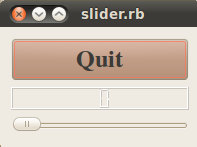
This example illustrates how to create an LCDNumber widget, and a slider widget, add them to a layout, then connect the slider signal to the lcd slot. It ends up looking like this:
Pros and Cons
Pros
- Excellent documentation
- Easy to use
- Extensive widget collection and default signals/slots
- Generally very good native OS look and feel reproduction
Cons
- Requires you to declare slots upfront, instead of being able to use any method, or generic callable as a slot.
- Unfortunately QtRuby may not be well-supported anymore.
wxRuby
wxWidgets is a very popular GUI toolkit as it has been under an open license resembling the LGPL for much longer than Qt. It is entirely open source and never developed exclusively by a for-profit company. Documentation for wxWidgets is generally very good, although a lot of documentation for wxPython is generally found when hitting google.
Examples
Hello World
This is a simple "hello world" application in wxRuby. It demonstrates a way to create an "App" instance, and display a frame.
require "wx"
include Wx
# a new class which derives from the Wx::App class
class HelloWorld < App
  # we're defining what the application is going to do when it starts
  def on_init
    # it's going to make a frame entitled "Hello World"
    helloframe = Frame.new(nil, -1, "Hello World")
    # it's going to put the text "Hello World" in that frame
    StaticText.new(helloframe,-1,"Hello World")
    # and then it's going to make the window appear
    helloframe.show()
  end
end
# and this line makes it actually do it!
HelloWorld.new.main_loop
wxRuby requires you to inherit and instantiate a WX::App, and create widgetry from there. A "Frame" is a generic top-level container for more widgets, and here it is being made to be the parent of the StaticText widget, which is just a label, or sorts.
More Complex
require 'wx'
include Wx

class MyFrame < Frame
  def initialize()
        super(nil, -1, 'My Frame Title')
        # First create the controls
        @my_panel = Panel.new(self)
        @my_label = StaticText.new(@my_panel, -1, 'My Label Text', DEFAULT_POSITION, DEFAULT_SIZE, ALIGN_CENTER)
        @my_textbox = TextCtrl.new(@my_panel, -1, 'Default Textbox Value')
        @my_combo = ComboBox.new(@my_panel, -1, 'Default Combo Text', DEFAULT_POSITION, DEFAULT_SIZE, ['Item 1', 'Item 2', 'Item 3'])
        @my_button = Button.new(@my_panel, -1, 'My Button Text')
        # Bind controls to functions
        evt_button(@my_button.get_id()) { |event| my_button_click(event)}
        # Now do the layout
        @my_panel_sizer = BoxSizer.new(VERTICAL)
        @my_panel.set_sizer(@my_panel_sizer)
        @my_panel_sizer.add(@my_label, 0, GROW|ALL, 2)
        @my_panel_sizer.add(@my_textbox, 0, GROW|ALL, 2)
        @my_panel_sizer.add(@my_combo, 0, GROW|ALL, 2)
        @my_panel_sizer.add(@my_button, 0, GROW|ALL, 2)
        show()
    end

    def my_button_click(event)
        puts "Button clicked!"
    end

end

class MyApp < App
  def on_init
    MyFrame.new
  end
end

MyApp.new.main_loop()
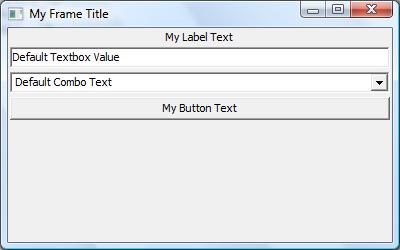
This example looks like this:
You can see one of the easier ways to connect the button to a randomly specified function, by using a code block. This feature greatly facilitates rapid GUI development, as you do not have to keep up with event numbers, or slots, like in wxRuby.
Pros and cons
Pros
- Very good C++ documentation
- Widely supported
- Longer time under the LGPL means it's generally used more often in the industry for rapid prototyping
- Works on Windows, Linux, Mac, and BSD.
- Generic code blocks may be connected to default widget event emitters.
Cons
- Proper event management and usage can get tricky with large applications, though see above about connections with generic code blocks.
- Not as many native widgets as Qt
- Generally not as intuitive as Qt.
Other GUI toolkits
- FXRuby
- Ruby-GNOME2
- Shoe


