CSC/ECE 517 Fall 2014/ch1a a7 ch: Difference between revisions
No edit summary |
|||
| (56 intermediate revisions by 2 users not shown) | |||
| Line 1: | Line 1: | ||
= Web2py Framework = | = Web2py Framework = | ||
Web2py is a free open source full-stack framework for rapid development of fast, scalable, secure and portable database-driven web-based applications written in Python.<sup><span id="1body">[[#1foot|[1]]]</span></sup> | |||
== Background == | |||
Web2py was originally introduced as a teaching tool to used to demonstrate ease of use and deployment. It was modeled after [http://en.wikipedia.org/wiki/Ruby_on_Rails Ruby on Rails] and [http://en.wikipedia.org/wiki/Django_(web_framework) Django], and as such focuses on rapid development and adheres to the [http://en.wikipedia.org/wiki/Model%E2%80%93view%E2%80%93controller Model View Controller] architecture pattern. | |||
Here are some of the features of Web2py<sup><span id="3body">[[#3foot|[2]]]</span></sup><sup><span id="4body">[[#4foot|[3]]]</span></sup>: | |||
* Web2py runs on Windows, Mac, Unix/Linux, Google App Engine, Amazon EC2, and almost any web hosting via Python 2.5/2.6/2.7/pypy, or Java with Jython. | |||
* Accessible anywhere, without any installation required | |||
* Open source licensed under the [http://www.gnu.org/licenses/lgpl.html GNU LGPL v3.0 License] | |||
* Support for mutiple databases including: SQLite, PostgreSQL, MySQL, MSSQL, FireBird, Oracle, IBM DB2, Informix, Ingres, and Google App Engine | |||
* Equipped with a Data Abstraction Layer that removes the requirement of knowing how to write SQL by doing it for you in real-time | |||
* Role-based authorization of resources | |||
* Error logging and ticketing system | |||
* An web-based administrative interface for ease of interaction | |||
== Examples == | == Examples == | ||
== | There are [http://web2py.com/poweredby several websites] currently powered by Web2py, including a [http://pymines.appspot.com/ website] hosting the ever-popular game [http://en.wikipedia.org/wiki/Minesweeper_(video_game) Minesweeper]. | ||
== | |||
[http://www.web2py.com/examples/static/ | As previously mentioned, Web2py doesn't require that you install anything, you may access and demo the capabilities online through their [http://www.web2py.com/demo_admin/default/site demo administrative interface]. At the time of this article's writing, the save demo is not fully-functional. | ||
You may download and run web2py by following the instructions on [http://www.web2py.com/init/default/download this page]. | |||
===Code Examples=== | |||
A complete list web2py-provided examples can be found [http://www.web2py.com/init/default/examples here]. | |||
====Hello World==== | |||
Creating a web2py application can be as simple as writing a few lines in a single controller file (default.py): | |||
<pre> | |||
def index(): return "Hello World" | |||
</pre> | |||
====File Upload<sup><span id="3body">[[#3foot|[3]]]</span></sup>==== | |||
In the Model: | |||
<pre> | |||
db=DAL('sqlite://storage.db') | |||
db.define_table('image', | |||
Field('name', notnull=True), | |||
Field('file','upload')) | |||
</pre> | |||
In the Controller: | |||
<pre> | |||
def index(): | |||
form = SQLFORM(db.image).process() | |||
if form.accepted: | |||
response.flash = 'image uploaded' | |||
return locals() | |||
</pre> | |||
In the View: | |||
<pre> | |||
{{extend 'layout.html'}} | |||
<h1>Image upload form</h1> | |||
{{=form}} | |||
</pre> | |||
[[File:ImageUpload.PNG]] | |||
====Forms<sup><span id="5body">[[#5foot|[5]]]</span></sup>==== | |||
In the Model: | |||
<pre> | |||
db = DAL('sqlite://webform.sqlite') | |||
db.define_table('register', | |||
Field('first_name', requires=IS_NOT_EMPTY()), | |||
Field('last_name', requires=IS_NOT_EMPTY()), | |||
Field('email', requires=IS_NOT_EMPTY())) | |||
</pre> | |||
In the Controller: | |||
<pre> | |||
def display_your_form(): | |||
form = SQLFORM(db.register) | |||
return dict(form=form) | |||
</pre> | |||
In the View: | |||
<pre> | |||
<center> | |||
<br /><br /><br /> | |||
<h1>Web Form</h1> | |||
<br /> | |||
<h2>Inputs:</h2> | |||
{{=form}} | |||
<h2>Submitted variables:</h2> | |||
{{=BEAUTIFY(request.vars)}} | |||
</center> | |||
</pre> | |||
[[File:Webform.png]] | |||
==Architecture== | |||
Web2py follows a Model-View-Controller (MVC) architecture. | |||
* '''Model''' - The data | |||
* '''View''' - Presents the data in a user-friendly way. | |||
* '''Controller''' - Acts as the glue between the model and view and handles the logic for displaying the data. | |||
[[File:MVC-Process.png]] | |||
This diagram shows an example of how web2py handles requests and renders the request to the browser: | |||
[[File:Architecture.PNG]] | |||
==Comparison to other Frameworks== | |||
Since web2py was inspiried by Rails and Django, it draws ideas from each. | |||
The creators of web2py borrowed the Ruby on Rails approach of convention over configuration and Django's approach of generating forms from database tables and including a large amount of validators out of the box. | |||
Overall, web2py can be viewed as less encompassing than Ruby on Rails and is directed towards a less advanced audience. It does not implement Active-Record or dependency injection and relies on a simplified database scheme. Because it relies on Python, it is a compiled language with more basic versioning, encryption, and custom queries and covers a less broad coding style (no imperative programming or aspect-oriented programming). | |||
Django and web2py share a lot of common ground and many common features. They both are pre-compiled, Python-based, and have nearly identical database schemes (object-relational and document-relational). Django uses a unique template system called (wait for it) the Django Template System, supports a wide variety of version control, and has greater support for cloud hosting solutions. | |||
===<u>Controllers</u>=== | |||
====Ruby on Rails==== | |||
<pre> | |||
class MyTestController < ApplicationController | |||
def index | |||
render_text “Hello World” | |||
end | |||
end | |||
</pre> | |||
====Django==== | |||
Django requires the user to specify all of his/her imports in the code: | |||
<pre> | |||
from django.http import HttpResponse | |||
def index(request): | |||
return HttpResponse("Hello World”) | |||
</pre> | |||
====Web2py==== | |||
<pre> | |||
def index(): | |||
return "Hello World" | |||
</pre> | |||
===<u>Models</u>=== | |||
====Ruby on Rails==== | |||
<pre> | |||
class Article < ActiveRecord::Migration | |||
def self.up | |||
create_table :articles do |t| | |||
t.column :name, :string | |||
t.column :description, :text | |||
end | |||
end | |||
end | |||
</pre> | |||
====Django==== | |||
<pre> | |||
class Article(models.Model): | |||
name = models.StringField() | |||
description = models.TextField() | |||
</pre> | |||
====Web2py==== | |||
<pre> | |||
Article=db.define_table(‘Article’, | |||
SQLField(‘email’,’string’), | |||
SQLField(‘description’,’text’) | |||
</pre> | |||
===<u>Views</u>=== | |||
====Ruby on Rails==== | |||
<pre> | |||
<table> | |||
<% @recipes.each do |recipe| %> | |||
<tr> | |||
<td><%= recipe.name %></td> | |||
</tr> | |||
<% end %> | |||
</table> | |||
</pre> | |||
====Django==== | |||
<pre> | |||
<table> | |||
{% for recipe in recipes %} | |||
<tr> | |||
<td>{{recipe.name}}</td> | |||
</tr> | |||
{% endfor %} | |||
</table> | |||
</pre> | |||
====Web2py==== | |||
<pre> | |||
<table> | |||
{{for recipe in recipes:}}> | |||
<tr> | |||
<td>{{=recipe.name}}</td> | |||
</tr> | |||
{{pass}} | |||
</table> | |||
</pre> | |||
== Distinguishing Features == | |||
=== Model/Controller Execution === | |||
In web2py, the Model and Controller code is not modual; rather, they are executed in a global environment with each individual HTTP request. This is different from most web development frameworks and presents a unique set of advantages and disadvantages. | |||
Advantages: | |||
*Simplifies development - no need to import | |||
*Provides a clean reset of objects with every HTTP request - no need to worry about object states, overriding requests, conflicting HTTP, etc. | |||
*Multiple applications can exist within the same instance without conflicting with one another | |||
Disadvantages: | |||
*Models and Controllers are not class based - code sometimes must be frequently repeated | |||
*Inability to inherit | |||
*Non-modular; the developer must be mindful of the order of execution | |||
=== Online IDE === | |||
web2py is fully supported by an online IDE. This covers the full development spectrum, including debugging, testing, maintenance, databases, internationalization, etc. This makes it simple to begin developement without setting up any kind of environment or even installing an IDE. | |||
== Getting Started in web2py == | |||
Hosting your own Debian/Ubuntu installation: | |||
<ol start="1"> | |||
<li>Install the 'unzip' package if you do not have it | |||
<pre>sudo apt-get update | |||
sudo apt-get install unzip</pre> | |||
<li>Download the framework from the website and unzip it | |||
<pre>wget http://www.web2py.com/examples/static/web2py_src.zip | |||
unzip web2py_src.zip | |||
cd web2py</pre> | |||
<li>Run the web interface | |||
<pre>python web2py.py</pre> | |||
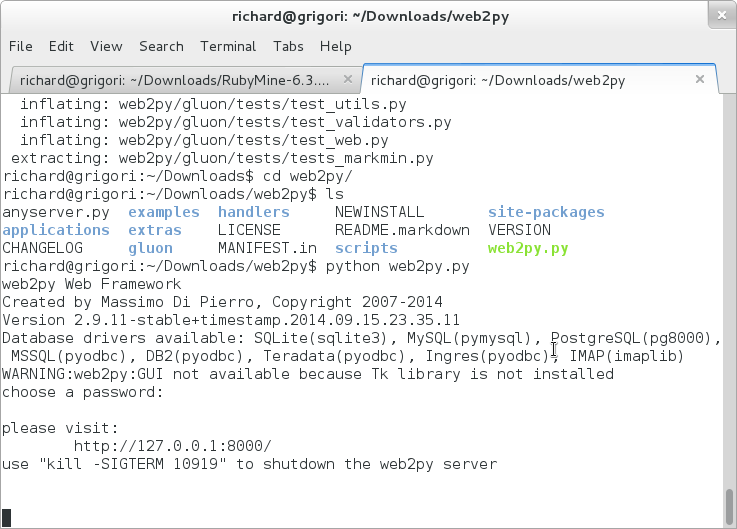
<li>If all goes well, you should be see your local web2py server running in the terminal window. Ctrl + C will terminate it. | |||
[[File:web2pyserver.png]] | |||
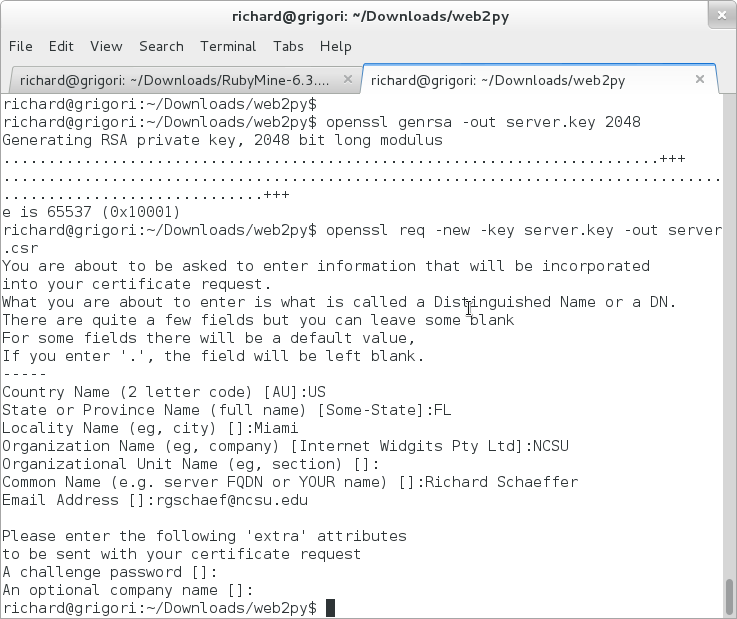
<li>To create SSL certificates for remote access, generate an RSA key and then output the file with the following commands: | |||
<pre>openssl genrsa -out server.key 2048 | |||
openssl req -new -key server.key -out server.csr | |||
openssl x509 -req -days 365 -in server.csr -signkey server.key -out server.crt</pre> | |||
[[File:rsa.png]] | |||
<li>Now you can enable remote access by passing in a few parameters when you start up your server: | |||
<pre>python web2py.py -a 'admin_password' -c server.crt -k server.key -i 0.0.0.0 -p 8000</pre> | |||
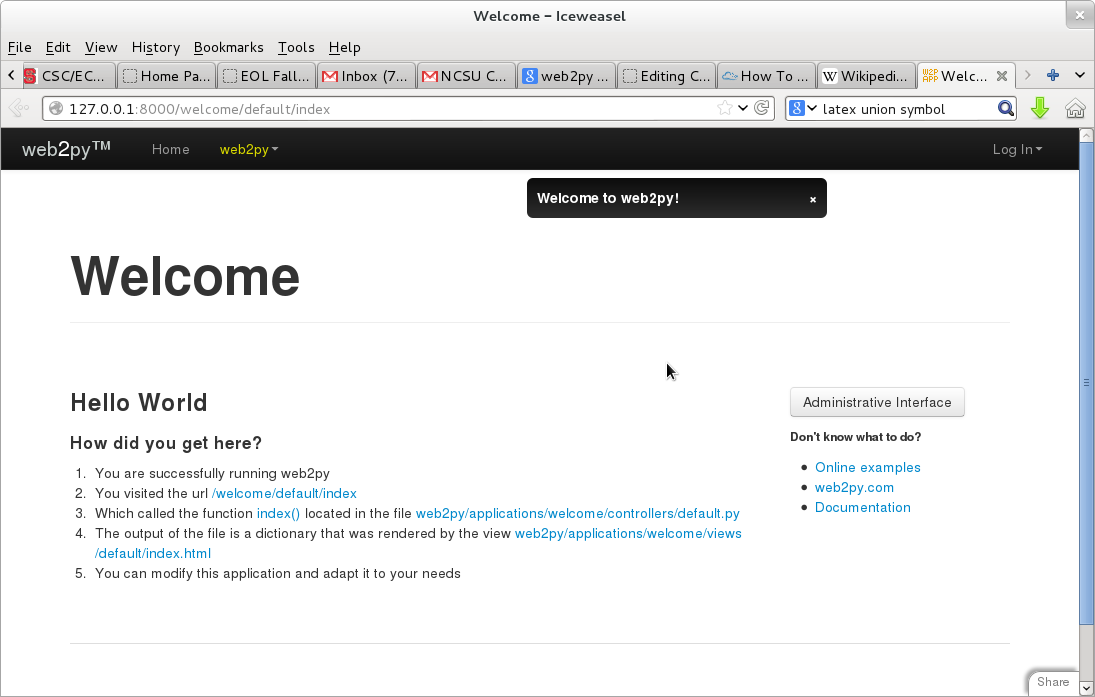
<li>You can access your IDE through most browsers at https://your_ip:8000 (e.g. 127.0.0.1:8000 if accessing locally) | |||
[[File:ide.png]] | |||
</ol> | |||
== References == | == References == | ||
<span id="1foot">[[#1body|1.]]</span> http://www.web2py.com/init/default/index <br> | |||
<span id="2foot">[[#2body|2.]]</span> http://en.wikipedia.org/wiki/Web2py <br> | |||
<span id="3foot">[[#3body|3.]]</span> http://www.web2py.com/init/default/what <br> | |||
<span id="4foot">[[#4body|4.]]</span> http://wiki.expertiza.ncsu.edu/index.php/CSC/ECE_517_Fall_2013/oss_SocialMediaFeeds <br> | |||
<span id="5foot">[[#5body|5.]]</span> http://mherman.org/blog/2012/12/01/crash-course-in-web2py-part-2-web-forms/#.VBT9d_ldVuJ <br> | |||
<span id="6foot">[[#6body|6.]]</span> http://www.web2py.com/examples/static/web2py_vs_others.pdf/ Web2py vs other frameworks <br> | |||
<span id="7foot">[[#7body|7.]]</span> https://www.digitalocean.com/community/tutorials/how-to-use-the-web2py-framework-to-quickly-build-your-python-app<br> | |||
Latest revision as of 02:46, 30 September 2014
Web2py Framework
Web2py is a free open source full-stack framework for rapid development of fast, scalable, secure and portable database-driven web-based applications written in Python.[1]
Background
Web2py was originally introduced as a teaching tool to used to demonstrate ease of use and deployment. It was modeled after Ruby on Rails and Django, and as such focuses on rapid development and adheres to the Model View Controller architecture pattern.
Here are some of the features of Web2py[2][3]:
- Web2py runs on Windows, Mac, Unix/Linux, Google App Engine, Amazon EC2, and almost any web hosting via Python 2.5/2.6/2.7/pypy, or Java with Jython.
- Accessible anywhere, without any installation required
- Open source licensed under the GNU LGPL v3.0 License
- Support for mutiple databases including: SQLite, PostgreSQL, MySQL, MSSQL, FireBird, Oracle, IBM DB2, Informix, Ingres, and Google App Engine
- Equipped with a Data Abstraction Layer that removes the requirement of knowing how to write SQL by doing it for you in real-time
- Role-based authorization of resources
- Error logging and ticketing system
- An web-based administrative interface for ease of interaction
Examples
There are several websites currently powered by Web2py, including a website hosting the ever-popular game Minesweeper.
As previously mentioned, Web2py doesn't require that you install anything, you may access and demo the capabilities online through their demo administrative interface. At the time of this article's writing, the save demo is not fully-functional.
You may download and run web2py by following the instructions on this page.
Code Examples
A complete list web2py-provided examples can be found here.
Hello World
Creating a web2py application can be as simple as writing a few lines in a single controller file (default.py):
def index(): return "Hello World"
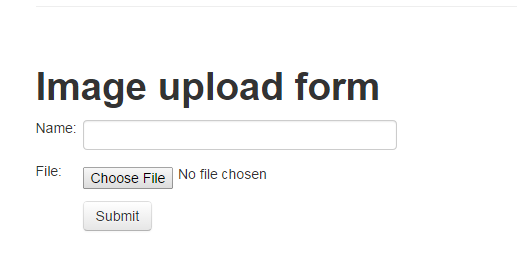
File Upload[3]
In the Model:
db=DAL('sqlite://storage.db')
db.define_table('image',
    Field('name', notnull=True),
    Field('file','upload'))
In the Controller:
def index():
    form = SQLFORM(db.image).process()
    if form.accepted:
        response.flash = 'image uploaded'
    return locals()
In the View:
{{extend 'layout.html'}}
<h1>Image upload form</h1>
{{=form}}
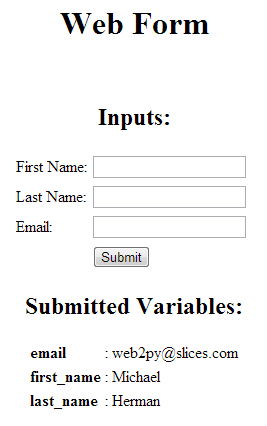
Forms[5]
In the Model:
db = DAL('sqlite://webform.sqlite')
db.define_table('register',
    Field('first_name', requires=IS_NOT_EMPTY()),
    Field('last_name', requires=IS_NOT_EMPTY()),
    Field('email', requires=IS_NOT_EMPTY()))
In the Controller:
def display_your_form():
    form = SQLFORM(db.register)
    return dict(form=form)
In the View:
<center>
<br /><br /><br />
<h1>Web Form</h1>
<br />
<h2>Inputs:</h2>
{{=form}}
<h2>Submitted variables:</h2>
{{=BEAUTIFY(request.vars)}}
</center>
Architecture
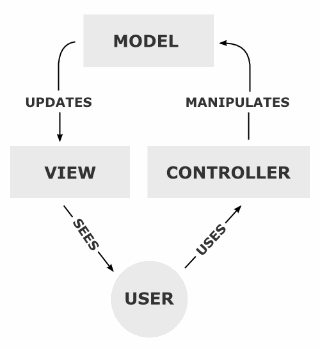
Web2py follows a Model-View-Controller (MVC) architecture.
- Model - The data
- View - Presents the data in a user-friendly way.
- Controller - Acts as the glue between the model and view and handles the logic for displaying the data.
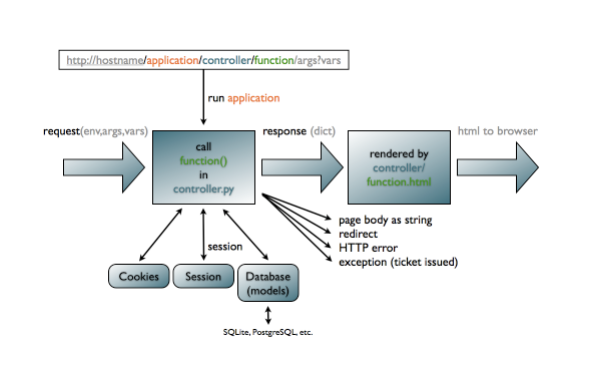
This diagram shows an example of how web2py handles requests and renders the request to the browser:
Comparison to other Frameworks
Since web2py was inspiried by Rails and Django, it draws ideas from each.
The creators of web2py borrowed the Ruby on Rails approach of convention over configuration and Django's approach of generating forms from database tables and including a large amount of validators out of the box.
Overall, web2py can be viewed as less encompassing than Ruby on Rails and is directed towards a less advanced audience. It does not implement Active-Record or dependency injection and relies on a simplified database scheme. Because it relies on Python, it is a compiled language with more basic versioning, encryption, and custom queries and covers a less broad coding style (no imperative programming or aspect-oriented programming).
Django and web2py share a lot of common ground and many common features. They both are pre-compiled, Python-based, and have nearly identical database schemes (object-relational and document-relational). Django uses a unique template system called (wait for it) the Django Template System, supports a wide variety of version control, and has greater support for cloud hosting solutions.
Controllers
Ruby on Rails
class MyTestController < ApplicationController
 def index
 render_text “Hello World”
 end
end
Django
Django requires the user to specify all of his/her imports in the code:
from django.http import HttpResponse
def index(request):
 return HttpResponse("Hello World”)
Web2py
def index():
 return "Hello World"
Models
Ruby on Rails
class Article < ActiveRecord::Migration
 def self.up
 create_table :articles do |t|
 t.column :name, :string
 t.column :description, :text
 end
 end
end
Django
class Article(models.Model):
 name = models.StringField()
 description = models.TextField()
Web2py
Article=db.define_table(‘Article’,
 SQLField(‘email’,’string’),
 SQLField(‘description’,’text’)
Views
Ruby on Rails
<table>
 <% @recipes.each do |recipe| %>
 <tr>
 <td><%= recipe.name %></td>
 </tr>
 <% end %>
</table>
Django
<table>
{% for recipe in recipes %}
 <tr>
 <td>{{recipe.name}}</td>
 </tr>
{% endfor %}
</table>
Web2py
<table>
 {{for recipe in recipes:}}>
 <tr>
 <td>{{=recipe.name}}</td>
 </tr>
 {{pass}}
</table>
Distinguishing Features
Model/Controller Execution
In web2py, the Model and Controller code is not modual; rather, they are executed in a global environment with each individual HTTP request. This is different from most web development frameworks and presents a unique set of advantages and disadvantages.
Advantages:
- Simplifies development - no need to import
- Provides a clean reset of objects with every HTTP request - no need to worry about object states, overriding requests, conflicting HTTP, etc.
- Multiple applications can exist within the same instance without conflicting with one another
Disadvantages:
- Models and Controllers are not class based - code sometimes must be frequently repeated
- Inability to inherit
- Non-modular; the developer must be mindful of the order of execution
Online IDE
web2py is fully supported by an online IDE. This covers the full development spectrum, including debugging, testing, maintenance, databases, internationalization, etc. This makes it simple to begin developement without setting up any kind of environment or even installing an IDE.
Getting Started in web2py
Hosting your own Debian/Ubuntu installation:
- Install the 'unzip' package if you do not have it
sudo apt-get update
sudo apt-get install unzip
- Download the framework from the website and unzip it
wget http://www.web2py.com/examples/static/web2py_src.zip
unzip web2py_src.zip
cd web2py
- Run the web interface
python web2py.py
- If all goes well, you should be see your local web2py server running in the terminal window. Ctrl + C will terminate it.
- To create SSL certificates for remote access, generate an RSA key and then output the file with the following commands:
openssl genrsa -out server.key 2048
openssl req -new -key server.key -out server.csr
openssl x509 -req -days 365 -in server.csr -signkey server.key -out server.crt
- Now you can enable remote access by passing in a few parameters when you start up your server:
python web2py.py -a 'admin_password' -c server.crt -k server.key -i 0.0.0.0 -p 8000
- You can access your IDE through most browsers at https://your_ip:8000 (e.g. 127.0.0.1:8000 if accessing locally)
References
1. http://www.web2py.com/init/default/index
2. http://en.wikipedia.org/wiki/Web2py
3. http://www.web2py.com/init/default/what
4. http://wiki.expertiza.ncsu.edu/index.php/CSC/ECE_517_Fall_2013/oss_SocialMediaFeeds
5. http://mherman.org/blog/2012/12/01/crash-course-in-web2py-part-2-web-forms/#.VBT9d_ldVuJ
6. http://www.web2py.com/examples/static/web2py_vs_others.pdf/ Web2py vs other frameworks
7. https://www.digitalocean.com/community/tutorials/how-to-use-the-web2py-framework-to-quickly-build-your-python-app
