CSC/ECE 517 Fall 2017/E17A5 Allow users to create an account and submit work to an "assignment" (e.g., for conference reviewing): Difference between revisions
No edit summary |
No edit summary |
||
| (18 intermediate revisions by 2 users not shown) | |||
| Line 101: | Line 101: | ||
Table to handle many to many relationship between contributors and paper writer. | Table to handle many to many relationship between contributors and paper writer. | ||
[[File: | [[File:Adi-Cap2.PNG]] | ||
We have reused the users database tables to save the writers and the co-authors by simply assigning a new role to the system and saving that role in the roles database. | |||
The | The assignments database was not reused for the papers as the extra attributes needed for the papers would result in many holes in the database and hence wastage of memory. The database design of the papers is: | ||
[[File:Capture1.PNG]] | |||
The teams database could not be reused because in this case the team size is not fixed. Thus, the limited size constraint was not put up. The design of database stays same, just without the constraint. | |||
=='''Class Diagram'''== | =='''Class Diagram'''== | ||
| Line 234: | Line 228: | ||
[[File:Signup.png]] | [[File:Signup.png]] | ||
The User Signup screen: The user needs to signup to submit his/her paper for reviewing. The user can signup using this signup page. | |||
[[File:Login.png]] | [[File:Login.png]] | ||
The Login Screen: The user, after signup, will be redirected to this page. The account successfully created notification will be displayed on the top. Now the user can login to his/her account from this page. | |||
[[File:NewResearchPAper1.png]] | [[File:NewResearchPAper1.png]] | ||
To submit a paper for conference reviewing, the writer needs to create a paper and provide details about it like conference where it is being presented, primary topic of the papers, etc. The user can upload multiple papers related to a particular conference to this single paper instance created. | |||
[[File:ShowPAper.png]] | [[File:ShowPAper.png]] | ||
Once the paper has been created, the user sees the above screen as a confirmation that the paper has successfully been created. | |||
[[File:PaperDisplay.png]] | |||
The home screen of the user displays all the paper submitted by the user. The user thus can view all of them and edit them using the SHOW link provided next to each paper. | |||
[[File:ShowCommandsforBlackHolePaper.png]] | |||
The show button is provided next to the listing of all the papers for a particular user. This button redirects to the page where one can edit the details of the paper uploaded. The user can edit details like paper name, date, contributors, etc. as well upload or change the files submitted. | |||
[[File:NotUploaded.png]] | |||
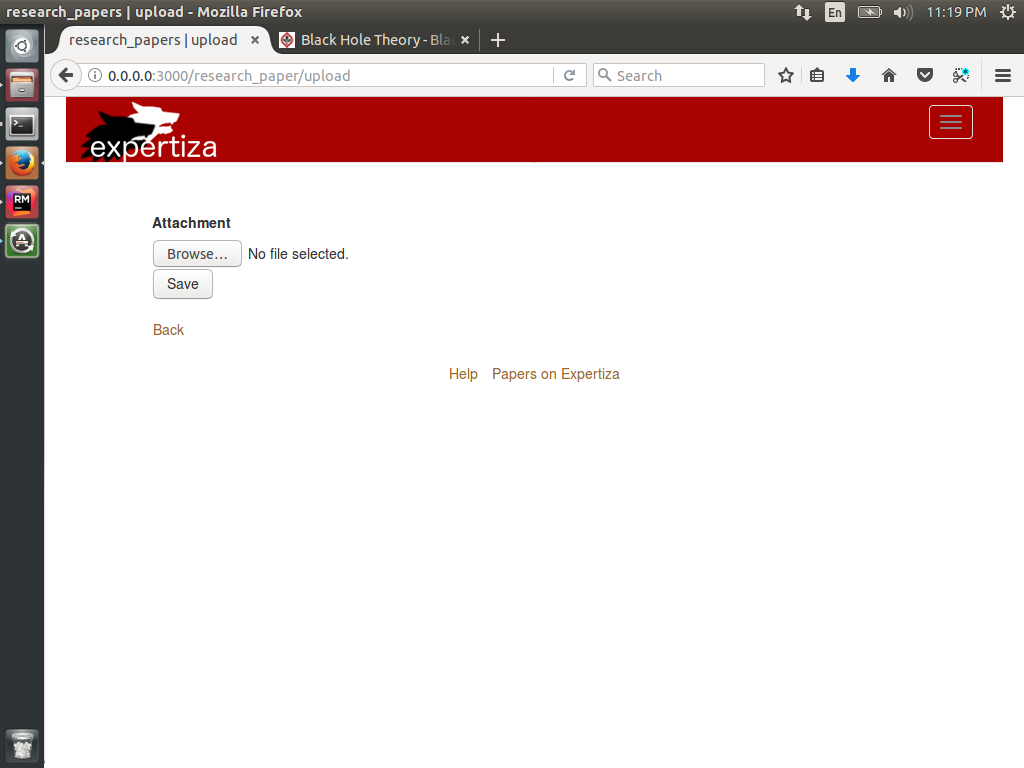
The user can upload the files from this page. The user can click on browse button to select a file from the local computer and upload it as a part of the submission. | |||
The files uploaded by the writer will be uploaded to the given upload path: | |||
pg_data/research_paper/paperID.paperName | |||
[[File:FIleSelectionforUpload.png]] | |||
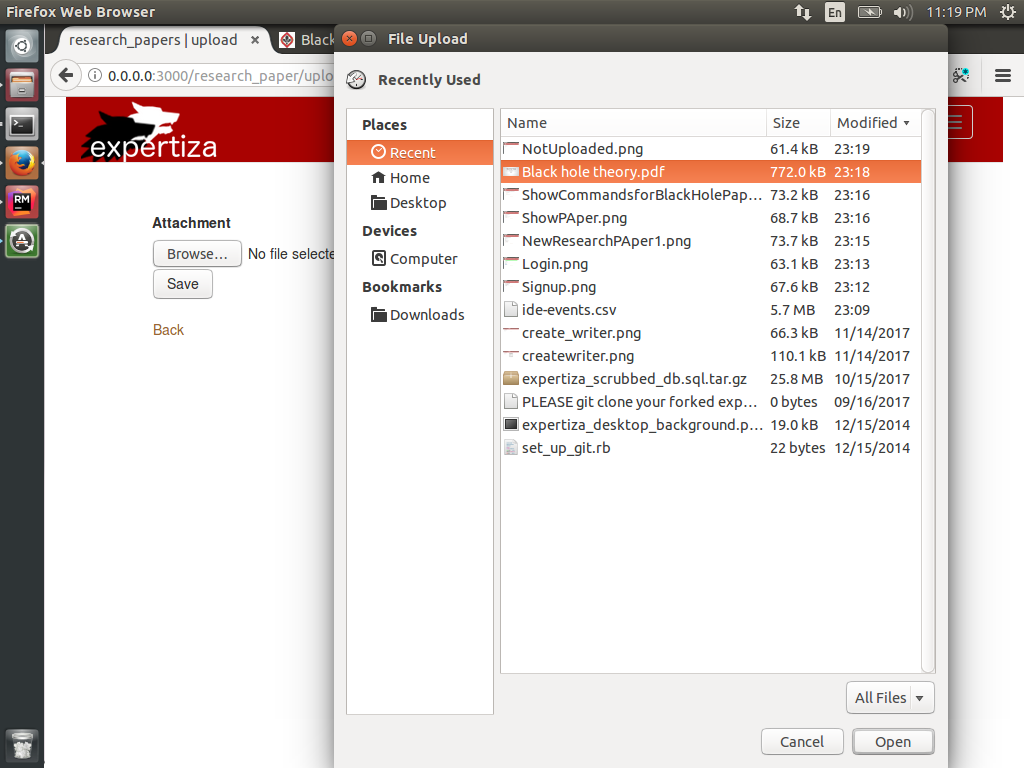
The user can select a file from personal computer device to upload it for conference reviewing. | |||
[[File:AddCOntributor.png]] | |||
The user can add contributors to add their inputs to a paper. The user can enter the email address and name of the contributor to send an invite to join the system for contribution. | |||
[[File:EmailSenttoAddedContributor.png]] | |||
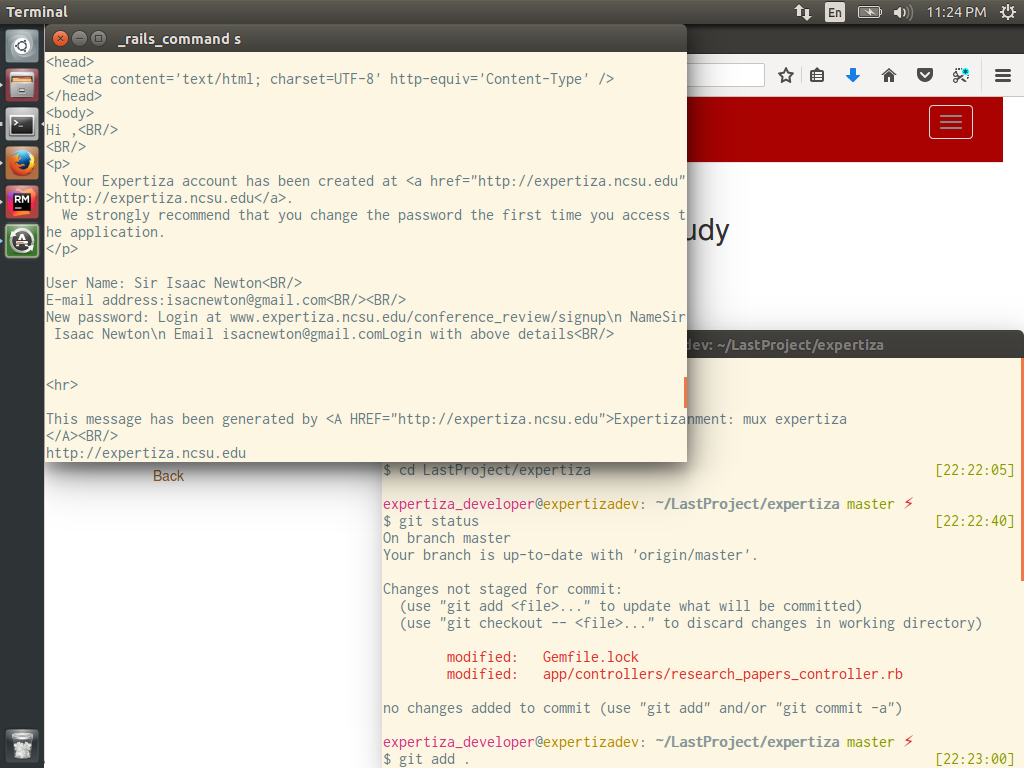
As this is not a deployed version, the invite email sent out cannot be checked from email account, but can be checked on the terminal. This is a screenshot of a typical mail that will be sent out to the contributors when invited by the author of the paper. | |||
[[File:DisplayCOntributors.png]] | |||
Once the contributor has been added, the user can see all the contributors in the Your Team section. The User himself is also listed as a contributor. | |||
Link to Screencast: https://youtu.be/CqcXHD_mWYY | |||
For further queries, contact: | For further queries, contact: | ||
Latest revision as of 21:42, 16 December 2017
Introduction
Problem Definition
Expertiza is mainly a peer-assessment system for the students to review submissions made by their peers. For a similar system for journals and conferences, there is one stark difference from the standard peer assessment system. For journals and papers, we need to allow the user to create an account to submit the paper, unlike the standard system where the instructor is supposed to create account for all the students. Also, when a user wants to add a co-author for his/her paper/submission, he should be able to invite them irrespective of the fact that the invited user has an account or not. If the invited user does not have an account, a new account must be created for him/her. For the new system, submitting and reviewing is same as the peer assessment system.
Scope
This project aims at extending the application of the expertiza system towards reviewing of journals and conferences by peer authors and relevant users. Hence, it enhances the utility of the expertiza platform for better knowledge sharing beyond the simple assignment submission and reviewing.
Requirements
1. Any non-Expertiza user can sign up, for submitting his/her work
2. Document upload privileges for that user.
3. Adding co-authors to a paper being submitted for reviewing.
4. View for scores/reviews submitted by reviewers.
Use Cases
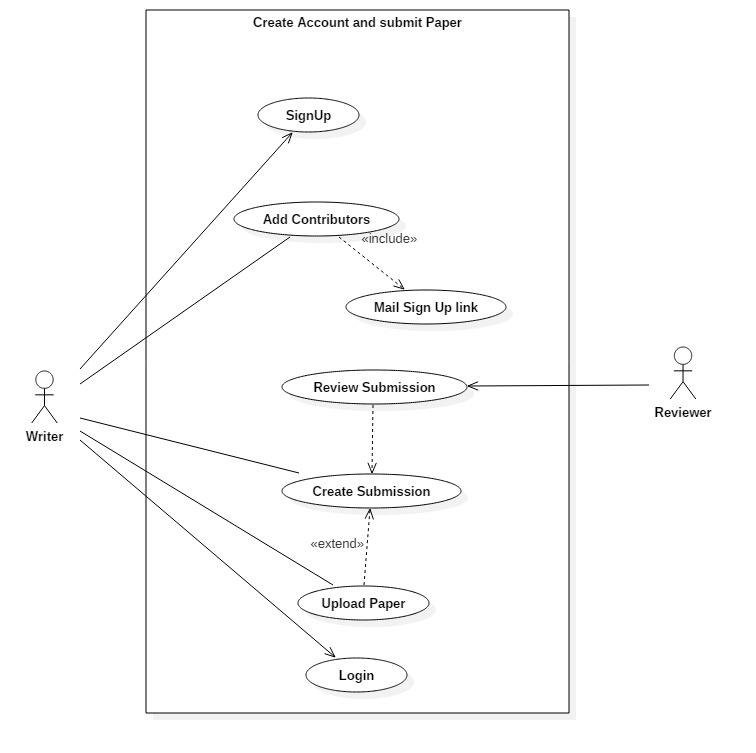
Name: Sign up
Actor: Writer
Other Participants: None
Precondition: He/she should not have existing account on Expertiza
Primary Sequence:
1. Go to Conference Reviewing section
2. Provide information in form for signup
Captcha
3. Activate account by opening link, provided via e-mail
Name: Add contributors
Actor: Writer
Other Participants: None
Precondition: Writer must have uploaded a paper for reviewing
Primary Sequence:
1. Sign in
2. Select the uploaded document
3. Select option to add contributors
4. Add information of co-authors. Email, Name, etc
Name: Create a submission
Actor: Writer
Other Participants: None
Precondition: The user is logged in and wants to submit a paper.
Primary Sequence:
1. Selects the “Submit your work” button
2. Enter the details of the paper, like track of paper (which can be selected from a dropdown).
3. The writer is redirected to an upload page where the user can upload the submission.
Name: Upload Paper
Actor: Writer
Other Participants: None
Precondition: The writer has already created a submission window and is at the upload page.
Primary Sequence:
1. The writer clicks the “Upload paper”button.
2. The writer selects the paper to be submitted from local device.
3. The writer clicks the “Submit” button.
Database Design
Table to handle many to many relationship between contributors and paper writer.
We have reused the users database tables to save the writers and the co-authors by simply assigning a new role to the system and saving that role in the roles database.
The assignments database was not reused for the papers as the extra attributes needed for the papers would result in many holes in the database and hence wastage of memory. The database design of the papers is:
The teams database could not be reused because in this case the team size is not fixed. Thus, the limited size constraint was not put up. The design of database stays same, just without the constraint.
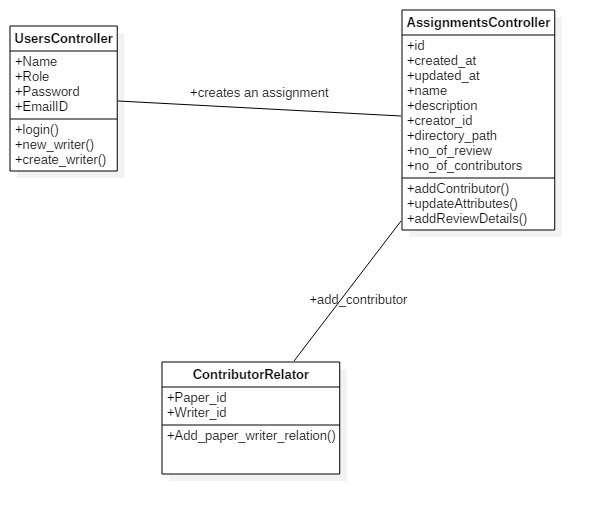
Class Diagram
Files to be created
1. new_writer_signup.html.erb : /app/views/users/
Needed to allow the author/writer of paper to signup to expertiza. As signup is not part of the current system, this needs to be explicitly created.
2. writer_homepage.html.erb :
This is the homepage of the writer. He can view his submissions and access the functionalities available to him.
3. add_coauthors.html.erb :
This file is needed to allow the writer to invite co-authors for his/her paper. The writer enters the details of the co-author to be invited in this page.
4. writer_paper_mapping.rb :
This is the model needed to map the papers to their authors. As papers and writers have a many to many relation, it needs to be handled by this model.
Files to be edited
1. users_controller.rb
Methods added:
1. create_writer : for implementing the sign-up for a writer
2. new_writer : creates an instance of user class
2. assignments_controller.rb
Methods added:
1. addContributor : for adding co-authors to already submitted papers
2. updateAttributes : for updating the attributes of the submitted paper
3. addReviewDetails : to control the number of reviews, etc. for a given paper
Implementation
Here is a sample code snippet:
View:
    <%= form_for @user , :url => url_for(:controller => 'users', :action => 'create_writer') do |f|%>
        <%= f.label :name %>
        <%= f.text_field :name %>
        <%= f.label :email %>
        <%= f.text_field :email %>
        <%= f.label :password %>
        <%= f.text_field :crypted_password %>
        <%=submit_tag "Create Writer"%>
    <%end%>
Controller:
    def new_writer
      @user = User.new
      render 'new_writer_signup.html.erb'
    end
    def create_writer
      @user = User.new(user_params)
      @user.role_id = 8;
      @user.is_new_user = 1;
      if @user.save
        flash[:success] = "Your account has been successfully created"
        render 'new_writer_signup.html.erb'
      else
        render 'new_writer_signup.html.erb'
      end
    end
Designing Practices
The designing practices used will be determined as the project proceeds and the requirements are handled. But for starting the project we will be following the following standard design practices:
1. Model-View-Controller architecture
2. Using standard naming convention for variables and methods, like name_variable, singular words for class name, etc.
3. Try not to violate DRY principle
Test Plan
The automated tests will be implemented based on final implementation of the project as many functions to be used are already defined and tested. But for manual testing, the following test plan can be used.
Test plan for Publishing a paper
1) Click on the link from conference website
2) Enter name, password, and email ID
3) Publish paper
4) Fill in the details for the paper to be published
5) upload paper
6) add collaboraters (enter name and email of contributors)
Test plan for editing paper attributes
1) Login
2) Select paper from displayed paper list
3) update attributes and save.
4) Logout
Screenshot
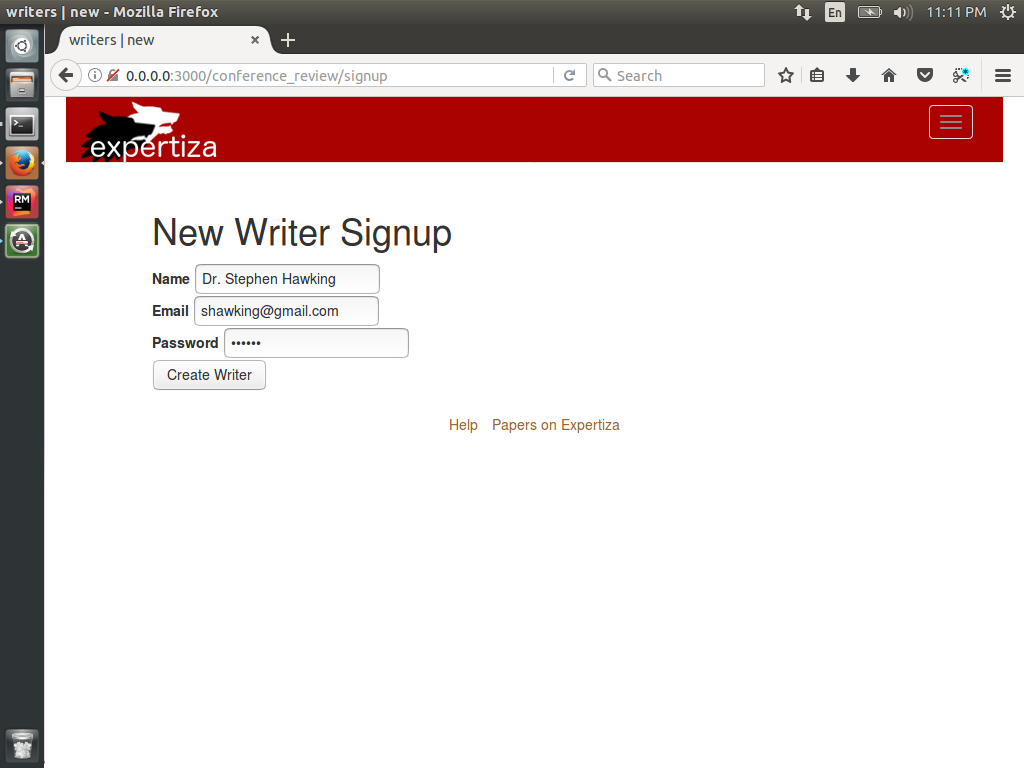
The User Signup screen: The user needs to signup to submit his/her paper for reviewing. The user can signup using this signup page.
The Login Screen: The user, after signup, will be redirected to this page. The account successfully created notification will be displayed on the top. Now the user can login to his/her account from this page.
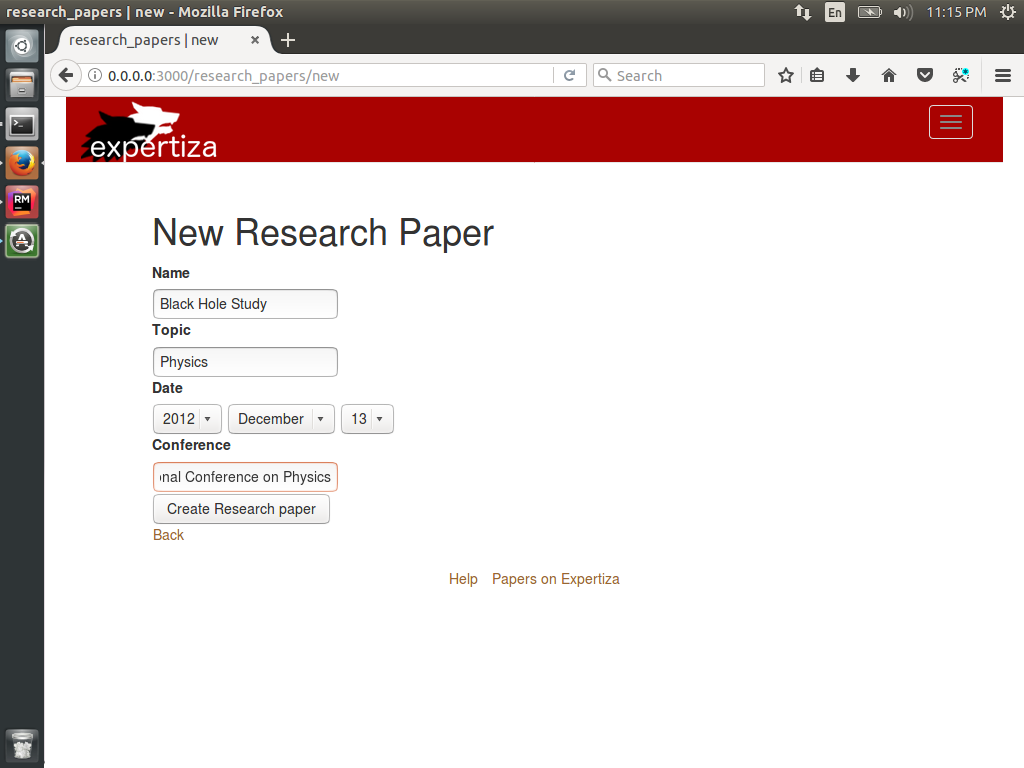
To submit a paper for conference reviewing, the writer needs to create a paper and provide details about it like conference where it is being presented, primary topic of the papers, etc. The user can upload multiple papers related to a particular conference to this single paper instance created.
Once the paper has been created, the user sees the above screen as a confirmation that the paper has successfully been created.
The home screen of the user displays all the paper submitted by the user. The user thus can view all of them and edit them using the SHOW link provided next to each paper.
The show button is provided next to the listing of all the papers for a particular user. This button redirects to the page where one can edit the details of the paper uploaded. The user can edit details like paper name, date, contributors, etc. as well upload or change the files submitted.
The user can upload the files from this page. The user can click on browse button to select a file from the local computer and upload it as a part of the submission.
The files uploaded by the writer will be uploaded to the given upload path:
pg_data/research_paper/paperID.paperName
The user can select a file from personal computer device to upload it for conference reviewing.
The user can add contributors to add their inputs to a paper. The user can enter the email address and name of the contributor to send an invite to join the system for contribution.
As this is not a deployed version, the invite email sent out cannot be checked from email account, but can be checked on the terminal. This is a screenshot of a typical mail that will be sent out to the contributors when invited by the author of the paper.
Once the contributor has been added, the user can see all the contributors in the Your Team section. The User himself is also listed as a contributor.
Link to Screencast: https://youtu.be/CqcXHD_mWYY
For further queries, contact:
adupadhy@ncsu.edu
dkamin@ncsu.edu
vnpatel@ncsu.edu
uparikh@ncsu.edu
