CSC/ECE 517 Fall 2014/oss M1454 rss: Difference between revisions
No edit summary |
|||
| (25 intermediate revisions by 3 users not shown) | |||
| Line 6: | Line 6: | ||
= Introduction = | = Introduction = | ||
[http://en.wikipedia.org/wiki/Mozilla Mozilla] is currently working on a research project called Servo<ref> | [http://en.wikipedia.org/wiki/Mozilla Mozilla] is currently working on a research project called Servo<ref>http://en.wikipedia.org/wiki/Servo_(layout_engine)</ref><ref>http://www.zdnet.com/servo-inside-mozillas-mission-to-reinvent-the-web-browser-for-the-multi-core-age-7000026606/</ref>, which is a Web browser engine for a new generation of hardware: mobile devices, multi-core processors and high-performance [http://en.wikipedia.org/wiki/Graphics_processing_unit GPUs]. With the main goal of creating an architecture that is parallel at many levels, common sources of bugs and security vulnerabilities associated with incorrect memory management are thereby eliminated. | ||
For the new browser Mozilla servo, SpiderMonkey<ref>https://developer.mozilla.org/en-US/docs/Mozilla/Projects/SpiderMonkey</ref> has been used as the [http://en.wikipedia.org/wiki/JavaScript JavaScript] search engine. SpiderMonkey basically exposes a user-specifiable callback that executes JS and throws an exception that is not caught. SpiderMonkey has been written in C/C++. Initially, the library (which wraps the C-based mozjs aka SpiderMonkey) named ''rust-mozjs'' library sets this callback to a simple function that pushed the error logs on to the terminal. Thus, as a part of our OSS project, based on the requirements, we have presented a way to replace this in Servo with an ErrorEvent interface which has methods that implements the error reporting specification for web browsers. | For the new browser Mozilla servo, SpiderMonkey<ref>https://developer.mozilla.org/en-US/docs/Mozilla/Projects/SpiderMonkey</ref> has been used as the [http://en.wikipedia.org/wiki/JavaScript JavaScript] search engine. SpiderMonkey basically exposes a user-specifiable callback that executes JS and throws an exception that is not caught. SpiderMonkey has been written in C/C++. Initially, the library (which wraps the C-based mozjs aka SpiderMonkey) named ''rust-mozjs'' library sets this callback to a simple function that pushed the error logs on to the terminal.We need to replace this in Servo with an appropriate function which implements the error reporting specification for web browsers. Thus, as a part of our OSS project, based on the requirements, we have presented a way to replace this in Servo with an ErrorEvent interface which has methods that implements the error reporting specification for web browsers. | ||
== RUST Programming Language == | == RUST Programming Language == | ||
[http://en.wikipedia.org/wiki/Servo_(layout_engine) Servo] is written in RUST<ref>http:// | [http://en.wikipedia.org/wiki/Servo_(layout_engine) Servo] is written in RUST<ref>http://en.wikipedia.org/wiki/Rust_(programming_language)</ref> programming language which is developed by Mozilla research. It is memory safe thereby ensuring a high degree of assurance in the browser’s trusted computing base. RUST also guarantees concurrency thus avoiding the problem of ‘data races’ and ensures safety and speed. Rust’s lightweight task mechanism also allows fine-grained isolation between browser components. | ||
== Servo == | == Servo == | ||
| Line 19: | Line 19: | ||
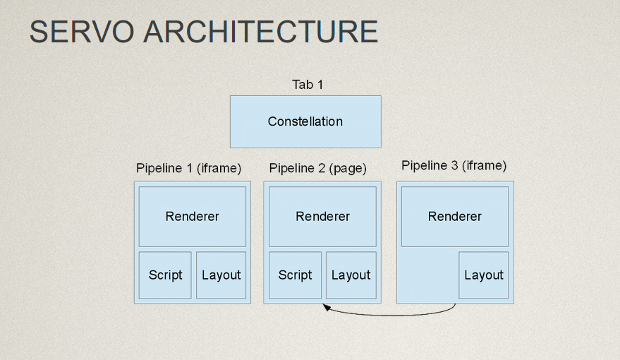
[[File:Servo arch.png|frame|center|alt = Servo Architecture|Servo Achitecture]] | [[File:Servo arch.png|frame|center|alt = Servo Architecture|Servo Achitecture]] | ||
= | = Implementation Steps = | ||
==='''Step 1: Build Servo'''=== | |||
====Prerequisites==== | |||
= | =====Rust is installed===== | ||
==''' | Follow [https://github.com/rust-lang/rust#building-from-source 'this link'] to build and install Rust: | ||
====Building Servo==== | |||
./ | Follow [https://github.com/servo/servo 'this link'] to build Servo | ||
====How to guide for setting up servo on a virtual machine running Ubuntu on a windows host machine==== | |||
[http://wiki.expertiza.ncsu.edu/index.php/CSC/ECE_517_Fall_2014/oss_M1454_rss#How_to_Guide:_Setting_up_servo_on_a_virtual_machine_running_Ubuntu_on_a_windows_host_machine 'Setting up Servo'] | |||
=='''Step 2'''== | ==='''Step 2: Add ErrorEvent interface files'''=== | ||
Once the Servo is built, the next step is to create an errorevent interface by adding a new WebIDL binding. The following are the steps to create a new WebIDL file: | Once the Servo is built, the next step is to create an errorevent interface by adding a new WebIDL binding. The following are the steps to create a new WebIDL file: | ||
*Create a new file [https://github.com/RonakNisher/servo/blob/master/components/script/dom/webidls/ErrorEvent.webidl 'ErrorEvent.webidl'] and add it to ''components/script/dom/webidls''. | *Create a new file [https://github.com/RonakNisher/servo/blob/master/components/script/dom/webidls/ErrorEvent.webidl 'ErrorEvent.webidl'] and add it to ''components/script/dom/webidls''. | ||
| Line 39: | Line 38: | ||
*Add the implementation's module to the script crate lib.rs to ensure it is compiled. | *Add the implementation's module to the script crate lib.rs to ensure it is compiled. | ||
*Build servo and fix any compile errors in the implementation. | *Build servo and fix any compile errors in the implementation. | ||
= Steps to execute our program = | |||
*The first step is to install Rust in your machine. Steps can be found at <ref>https://github.com/rust-lang/rust/wiki/Note-getting-started-developing-Rust</ref> | |||
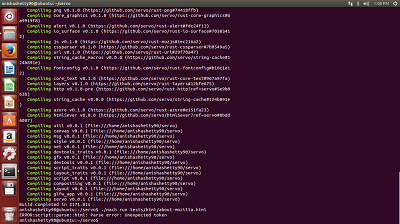
*The next step is to build Servo. Steps can be found at <ref>https://github.com/servo/servo</ref> | |||
[[File:Build servo.png]] | |||
<br><br> | |||
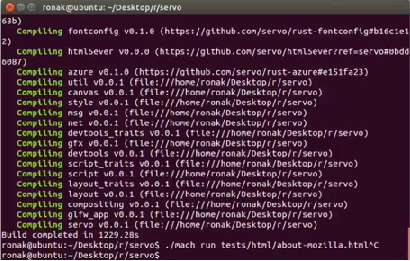
[[File:Building servo fin.png]] | |||
*Our implementation files are “[https://github.com/RonakNisher/servo/blob/master/components/script/dom/errorevent.rs errorevent.rs]” and “[https://github.com/RonakNisher/servo/blob/master/components/script/dom/webidls/ErrorEvent.webidl errorevent.webidl]”. | |||
*Binding will be automatically generated. The binding file is “ErrorEventBinding.rs” | |||
*Build servo again | |||
<pre> | <pre> | ||
./mach build | ./mach build | ||
</pre> | </pre> | ||
* | *We can now run the servo using the following command | ||
<pre> | <pre> | ||
./mach run tests/html/about-mozilla.html | ./mach run tests/html/about-mozilla.html | ||
</pre> | </pre> | ||
[[File:After running program.png]] | |||
= Design Principles = | = Design Principles = | ||
| Line 56: | Line 65: | ||
= Future work = | = Future work = | ||
* Replicate the existing "Logging Error reporter" and use this replicated version | |||
* Get the Global Object in the error reporter and unwrap it into a window | |||
* Create an ErrorEvent and send it to the window to look for and report errors | |||
* Implement the error reporting algorithm | |||
* Do the same work for workers as well | |||
= How to Guide: Setting up servo on a virtual machine running Ubuntu on a windows host machine= | |||
==''Prerequisite''== | |||
* The Virtual Machine should have atleast 4GB of RAM | |||
* The Virtual Machine should have atleast 30GB of disk space | |||
* The VM should have a 64 bit image of Ubuntu running (as of now, major manual steps are required to use Servo on 32 bit as 32 bit snapshots are not yet supported) | |||
==''Steps''== | |||
Install the dependencies | |||
<pre> | |||
sudo apt-get install curl freeglut3-dev \ | |||
libfreetype6-dev libgl1-mesa-dri libglib2.0-dev xorg-dev \ | |||
msttcorefonts gperf g++ cmake python-virtualenv \ | |||
libssl-dev libglfw-dev | |||
</pre> | |||
Clone Rust | |||
<pre> | |||
git clone https://github.com/rust-lang/rust.git | |||
cd rust | |||
</pre> | |||
Configure and Build Rust (This step will take a long time. If you use RAM less than 1.5 GB, you'll be pretty much stuck at this point for 8 hours or so. We recommend having a RAM of at least 4GB.) | |||
<pre> | |||
sudo make && make install | |||
</pre> | |||
Clone Servo | |||
<pre> | |||
git clone https://github.com/servo/servo | |||
cd servo | |||
</pre> | |||
Build Servo. This step will take about 30 minutes. (Make sure you are running on a 64 bit VM image otherwise this step will fail) | |||
<pre> | |||
./mach build | |||
</pre> | |||
Test that Servo was build successfully | |||
<pre> | |||
./mach run tests/html/about-mozilla.html | |||
</pre> | |||
= References = | = References = | ||
<references /> | <references /> | ||
Latest revision as of 14:26, 29 October 2014
Implementing proper JS error reporting
This wiki page contains the implementation of JS error reporting for the Mozilla project using RUST programming language.
Introduction
Mozilla is currently working on a research project called Servo<ref>http://en.wikipedia.org/wiki/Servo_(layout_engine)</ref><ref>http://www.zdnet.com/servo-inside-mozillas-mission-to-reinvent-the-web-browser-for-the-multi-core-age-7000026606/</ref>, which is a Web browser engine for a new generation of hardware: mobile devices, multi-core processors and high-performance GPUs. With the main goal of creating an architecture that is parallel at many levels, common sources of bugs and security vulnerabilities associated with incorrect memory management are thereby eliminated.
For the new browser Mozilla servo, SpiderMonkey<ref>https://developer.mozilla.org/en-US/docs/Mozilla/Projects/SpiderMonkey</ref> has been used as the JavaScript search engine. SpiderMonkey basically exposes a user-specifiable callback that executes JS and throws an exception that is not caught. SpiderMonkey has been written in C/C++. Initially, the library (which wraps the C-based mozjs aka SpiderMonkey) named rust-mozjs library sets this callback to a simple function that pushed the error logs on to the terminal.We need to replace this in Servo with an appropriate function which implements the error reporting specification for web browsers. Thus, as a part of our OSS project, based on the requirements, we have presented a way to replace this in Servo with an ErrorEvent interface which has methods that implements the error reporting specification for web browsers.
RUST Programming Language
Servo is written in RUST<ref>http://en.wikipedia.org/wiki/Rust_(programming_language)</ref> programming language which is developed by Mozilla research. It is memory safe thereby ensuring a high degree of assurance in the browser’s trusted computing base. RUST also guarantees concurrency thus avoiding the problem of ‘data races’ and ensures safety and speed. Rust’s lightweight task mechanism also allows fine-grained isolation between browser components.
Servo
Mozilla has planned to deliver its new browser Servo which facilitates great features like parallel processing in the browser in order to utilize many cores present in the modern mobile devices such as smartphones and tablets in order to carry out tasks concurrently. Even the giant and famous browsers like Chrome, Internet Explorer, Firefox, Safari, have tried to implement parallel processing via different ways such as aggregating the JIT (Just in Time)<ref>http://en.wikipedia.org/wiki/Just-in-time_compilation</ref> compilation technique to their JS engines. But, performance and security gains need re-modelling the browser stacks of these browsers. Servo, that is being designed to be compatible with the Android OS devices, will work with the Arm-based processors<ref>http://en.wikipedia.org/wiki/ARM_architecture</ref>.

Implementation Steps
Step 1: Build Servo
Prerequisites
Rust is installed
Follow 'this link' to build and install Rust:
Building Servo
Follow 'this link' to build Servo
How to guide for setting up servo on a virtual machine running Ubuntu on a windows host machine
Step 2: Add ErrorEvent interface files
Once the Servo is built, the next step is to create an errorevent interface by adding a new WebIDL binding. The following are the steps to create a new WebIDL file:
- Create a new file 'ErrorEvent.webidl' and add it to components/script/dom/webidls.
- Create the 'errorevent.rs' file containing a Reflector at minimum, as well as implementation of the Reflectable trait and add it at the components/script/dom location.
- Add the implementation's module to the script crate lib.rs to ensure it is compiled.
- Build servo and fix any compile errors in the implementation.
Steps to execute our program
- The first step is to install Rust in your machine. Steps can be found at <ref>https://github.com/rust-lang/rust/wiki/Note-getting-started-developing-Rust</ref>
- The next step is to build Servo. Steps can be found at <ref>https://github.com/servo/servo</ref>
- Our implementation files are “errorevent.rs” and “errorevent.webidl”.
- Binding will be automatically generated. The binding file is “ErrorEventBinding.rs”
- Build servo again
./mach build
- We can now run the servo using the following command
./mach run tests/html/about-mozilla.html
Design Principles
- Simple: We have tried to not complicate the code but keep it simple.
- Readable: By adding necessary and required comments, we have made our code readable to other programmers.
- Reusable: We have tried and made our code capable of being used in a completely different setting.
- Efficient: Our code gives the results in reasonable amount of time.
Future work
- Replicate the existing "Logging Error reporter" and use this replicated version
- Get the Global Object in the error reporter and unwrap it into a window
- Create an ErrorEvent and send it to the window to look for and report errors
- Implement the error reporting algorithm
- Do the same work for workers as well
How to Guide: Setting up servo on a virtual machine running Ubuntu on a windows host machine
Prerequisite
- The Virtual Machine should have atleast 4GB of RAM
- The Virtual Machine should have atleast 30GB of disk space
- The VM should have a 64 bit image of Ubuntu running (as of now, major manual steps are required to use Servo on 32 bit as 32 bit snapshots are not yet supported)
Steps
Install the dependencies
sudo apt-get install curl freeglut3-dev \
    libfreetype6-dev libgl1-mesa-dri libglib2.0-dev xorg-dev \
    msttcorefonts gperf g++ cmake python-virtualenv \
    libssl-dev libglfw-dev
Clone Rust
git clone https://github.com/rust-lang/rust.git
cd rust
Configure and Build Rust (This step will take a long time. If you use RAM less than 1.5 GB, you'll be pretty much stuck at this point for 8 hours or so. We recommend having a RAM of at least 4GB.)
sudo make && make install
Clone Servo
git clone https://github.com/servo/servo
cd servo
Build Servo. This step will take about 30 minutes. (Make sure you are running on a 64 bit VM image otherwise this step will fail)
./mach build
Test that Servo was build successfully
./mach run tests/html/about-mozilla.html
References
<references />


