E1842 Issues Related To Participants: Difference between revisions
| (47 intermediate revisions by 3 users not shown) | |||
| Line 1: | Line 1: | ||
== | This page provides a description of the Expertiza based OSS project. | ||
__TOC__ | |||
=='''About Expertiza'''== | |||
[http://expertiza.ncsu.edu/ Expertiza] is an open source project developed using Ruby on Rails framework.Expertiza allows the instructor to create new assignments and customize new or existing assignments.The application allows students to submit and peer-review learning objects (articles, code, web sites, etc)[1].Expertiza supports submission across various document types, including the URLs and wiki pages. | |||
==='''Problem Statement'''=== | ==='''Problem Statement'''=== | ||
In Expertiza, an instructor is responsible for adding a participant to his course or assignment. This makes the course material available to the participant (or student per se). Since the instructor has admin rights, he is capable of impersonating the participant. This creates a few problems. This project addresses those issues. | In Expertiza, an instructor is responsible for adding a participant to his course or assignment. This makes the course material available to the participant (or student per se). Since the instructor has admin rights, he is capable of impersonating the participant. This creates a few problems. This project addresses those issues. | ||
| Line 60: | Line 67: | ||
a) Assign the instructor/TA data to a session variable and use this data when instructor/TA tries to switch back to their original role. | a) Assign the instructor/TA data to a session variable and use this data when instructor/TA tries to switch back to their original role. | ||
This data is used during data filtering also. | # This data is used during data filtering also. | ||
original_user = session[:super_user] || session[:user] | original_user = session[:super_user] || session[:user] | ||
| Line 79: | Line 86: | ||
'''2. Data Filtering:''' | '''2. Data Filtering:''' | ||
Logged in user's role data and impersonation status is used to filter | Logged in user's role data and impersonation status is used to filter the data for populating the assignments list. | ||
This is implemented in student_task_controller.rb file: | |||
// check if the user is impersonating as TA | // check if the user is impersonating as TA | ||
| Line 104: | Line 111: | ||
end | end | ||
end | end | ||
'''Why this approach?''' | |||
We wanted some way to maintain the details of the logged in user to be available throughout the session and across all the controllers. | |||
So, we have used session variables to store the user data and impersonation flag. Then, we use this impersonation flag and user data (role details) to decide whether to return whole or filtered results. | |||
==='''Issue #1185 '''=== | ==='''Issue #1185 '''=== | ||
The user (instructor, TA or admin) has to click the ''Add'' button on the course or assignment page to add a new participant to the course or assignment. On click of the button, the browser initiates an AJAX request and gets a response HTML representing success or failure of the action. The failure case was already handled - an error message appears at the top of the page. | |||
On success, it was observed that, though the HTML for a new table row (representing the just added participant) was part of the response, it was not being appended properly to the page's DOM. | |||
This is fixed by giving an '''id''' to the ''table'' HTML element, and appending the new row to its ''tbody'' element. | |||
'''Why this approach?''' | |||
Since we are appending to a html <nowiki><tbody></nowiki> element, we need a way to identify it. We could select the table body or the table itself. However, it looks more optimal to provide an id to the <nowiki><table></nowiki> that contains this <nowiki><tbody></nowiki> element, since this provides a way to edit other parts of this table in future. | |||
After appending, we must also ensure that the "Submit" button which is part of the new HTML must be functional. So, an onchange listener is added to the button element (in the file add.js.erb). | |||
In app/views/shared_scripts/_user_list.html.erb: | |||
<nowiki><</nowiki>table id="table_list" class="table table-striped" style="font-size: 15px"<nowiki>></nowiki> | |||
In app/views/participants/add.js.erb | |||
$("#table_list").find("tbody").append( | |||
"<%= j render :partial => 'participant', :locals => {participant: @participant, :userid => @participant.user_id, :controller => 'participants'} %>"); | |||
) | |||
$('#'.concat(student_id.toString())).change(function(){ | |||
$('#button'.concat(student_id.toString())).css("opacity",1); | |||
}); | |||
---- | ---- | ||
| Line 133: | Line 147: | ||
=='''Test Plan'''== | =='''Test Plan'''== | ||
==='''''Issue #536'''=== | ==='''''Issue #536'''=== | ||
| Line 149: | Line 157: | ||
4) Make ''student6400'' as the participant of that assignment and logout. | 4) Make ''student6400'' as the participant of that assignment and logout. | ||
5) Click on Manage -> Impersonate User and enter ''student6400'' as the user to be impersonated. | |||
6) After impersonation, ''Instructor6'' will be able to see only his/her assignment details and not of any other instructors. | |||
7) We need to login as ''Instructor4'' and verify that ''Instructor4'' is not able to see other assignment details of the other instructors. | |||
8) Login as ''Instructor4''. Click on Manage -> Impersonate user. Enter ''student6400'' as the user to be impersonated. | |||
9) After impersonation, ''Instructor4'' will be able to see only his/her assignment details and not of any other instructors. | |||
10) Login as ''TeachingAssistant1274'' who is a TA for the Course 517, Spring 2016, who is a TA under Instructor6. | |||
11) Create an assignment ''TA_Assignment'' and make ''student6400'' as a participant. | |||
12) Click on Manage->Impersonate user and enter ''student6400'' as the student to be impersonated. | |||
13) After impersonation, ''TeachingAssistant1274'' will be able to see all the assignment details of all courses for which (s)he is the TA and not the details of the other assignments. | |||
14) Now suppose ''Instructor6'' logs in and impersonates the student ''student6400'', he will be able to see all the assignment details under his/her course i.e. all the details of the assignment that was created by ''Instructor6'' himself as well as the assignments created by his TA's. | |||
15) Next, login as student6400 and click on assignments. The student will be able to see all the assignments of all the courses to which he/she is assigned to. | |||
16) This verifies that the bugs have been fixed. | |||
==='''Issue #1185'''=== | ==='''Issue #1185'''=== | ||
| Line 183: | Line 195: | ||
6) This verifies the bug has been fixed. | 6) This verifies the bug has been fixed. | ||
''' | |||
1) | |||
== Screenshots of the flow == | |||
[[File: | ''' | ||
2) | |||
1) Login as ''Instructor4''. Add a new assignment ''Assignment_Instructor4'' under the course ''Course 617, Spring 2016''. | |||
[[File: | |||
[[File: Instructor4 Page with Course.png]] | |||
3) | |||
[[File: | 2) Make ''student6400'' as the participant of that assignment and logout. | ||
[[File: Ins4 with student in course.png]] | |||
4) | |||
3) Login as ''Instructor6''. Add a new assignment ''Assignment_Instructor6'' under the course ''Course 517, Spring 2016''. | |||
[[File:Ins6 homepage.png]] | |||
5)Click on ' | |||
[[File: | 4) Make ''student6400'' as the participant of that assignment and logout. | ||
6) | |||
5) Click on Manage -> Impersonate User and enter ''student6400'' as the user to be impersonated. | |||
[[File: | [[File: Ins6_entering_student_in_impersonate.png]] | ||
7) | |||
- | 6) After impersonation, ''Instructor6'' will be able to see only his/her assignment details and not of any other instructors. | ||
[[File: | [[File: Ins6_result_after_impersonate.png]] | ||
7) We need to login as ''Instructor4'' and verify that ''Instructor4'' is not able to see other assignment details of the other instructors. | |||
[[File: | |||
8) Login as ''Instructor4''. Click on Manage -> Impersonate user. Enter ''student6400'' as the user to be impersonated. | |||
[[File: Ins4_impersonating_6400.png]] | |||
[[File: | |||
9) After impersonation, ''Instructor4'' will be able to see only his/her assignment details and not of any other instructors. | |||
[[File: Ins4_display_res_after_impersonate.png]] | |||
[[File: | |||
10) Login as ''TeachingAssistant1274'' who is a TA for the Course 517, Spring 2016, who is a TA under Instructor6. | |||
[[File: | |||
11) Create an assignment ''TA_Assignment'' and make ''student6400'' as a participant. | |||
[[File: Ta_homepage.png]] | |||
- | |||
12) Click on Manage->Impersonate user and enter ''student6400'' as the student to be impersonated. | |||
[[File: TA_enters_student_impersonate.png]] | |||
13) After impersonation, ''TeachingAssistant1274'' will be able to see all the assignment details of all courses for which (s)he is the TA and not the details of the other assignments. | |||
[[File: TA_impersonate_res.png]] | |||
[[File: | |||
14) Next, login as student6400 and click on assignments. The student will be able to see all the assignments of all the courses to which he/she is assigned to. | |||
[[File: | 15) This verifies that the bugs have been fixed. | ||
[[ | |||
==='''Issue #1185'''=== | |||
1) Login as an ''Instructor'' or ''Admin'' or ''Super-Admin'' or ''TA''. | |||
2) Click on Manage -> Assignments. In the ''Actions'' column click on ''Add Participant''. | |||
3) After the list of all the participants you will be able to see ''Enter a user login'' text box. | |||
4) Enter the user login in the text box (Ex: student9000) and click on ''Add'' button. | |||
[[File:Ins_adding_participant1.png]] | |||
5) After clicking on the ''Add'' button, you will see the participant added at end of the list. | |||
[[File:Added_participant.png]] | |||
6) This verifies the bug has been fixed. | |||
=='''Additional Links and References'''== | |||
*Git pull link: http://github.com/expertiza/expertiza/pull/1250 | |||
#[https://github.com/expertiza/expertiza Expertiza on GitHub] | |||
#[https://github.com/MJSiddu/expertiza GitHub Project Repository Fork] | |||
#[http://expertiza.ncsu.edu/ The live Expertiza website] | |||
==Team== | |||
[mailto:aagniho@ncsu.edu Amogh Agnihotri Subbanna]<br> | |||
[mailto:ckaidab@ncsu.edu Chinmai Kaidabettu Srinivas]<br> | |||
[mailto:smadhur@ncsu.edu Siddu Madhure Jayanna] | |||
Latest revision as of 22:04, 9 November 2018
This page provides a description of the Expertiza based OSS project.
About Expertiza
Expertiza is an open source project developed using Ruby on Rails framework.Expertiza allows the instructor to create new assignments and customize new or existing assignments.The application allows students to submit and peer-review learning objects (articles, code, web sites, etc)[1].Expertiza supports submission across various document types, including the URLs and wiki pages.
Problem Statement
In Expertiza, an instructor is responsible for adding a participant to his course or assignment. This makes the course material available to the participant (or student per se). Since the instructor has admin rights, he is capable of impersonating the participant. This creates a few problems. This project addresses those issues.
Issues to be fixed
Issues as described by the problem statement:
Issue #536
Once the instructor impersonates the participant, he/she is capable of accessing all of participant’s work, irrespective of the course or the assignment. This raises serious security concerns. Suggested solution is to restrict the instructor to view only his coursework.
Issue #1185
After adding a participant, the page has to be manually refreshed to show the name of the participant on the list. This creates a bad user experience and needs to be fixed.
Modified Files
1) app/controllers/auth_controller.rb
2) app/controllers/impersonate_controller.rb
3) app/controllers/student_task_controller.rb
4) app/views/participants/add.js.erb
5) app/views/participants/_participant.html.erb
6) app/views/shared_scripts/_user_list.html.erb
Approach taken to resolve the issues
Issue #536
Once the instructor or teaching assistant impersonates the participant, he/she is capable of accessing all the assignments of this participant irrespective of the course and this raises serious security concerns. Ideally, when this happened, the system should have displayed only those assignments to which he/she is assigned as an instructor or teaching assistant.
This issue has been fixed by modifying the current implementations of data filtering and session/role handling features.
1. Impersonation and Session Handling:
Setting and resetting of all the session data associated with impersonation are handled in auth_controller.rb file.
i] After login, session[:impersonate] value is set to false by default.
session[:impersonate] = false
ii] Once the Instructor tries to impersonate any student, the following actions are performed.
a) Assign the instructor/TA data to a session variable and use this data when instructor/TA tries to switch back to their original role.
     # This data is used during data filtering also.

     original_user = session[:super_user] || session[:user]
     session[:original_user] = original_user
b) Impersonate flag is set to true and the session's user variable is set to the user data of impersonated student.
     session[:impersonate] = true
     session[:user] = user
iii] All the session data is cleared off when the user logs out.
   session[:original_user] = nil
   session[:impersonate] = nil
2. Data Filtering:
Logged in user's role data and impersonation status is used to filter the data for populating the assignments list.
This is implemented in student_task_controller.rb file:
 // check if the user is impersonating as TA
 def impersonating_as_ta?
   original_user = session[:original_user]
   ta_role = Role.where(name:['Teaching Assistant']).pluck(:id)
   ta_role.include? original_user.role_id
 end
 // Filter and populate all the relevant data
 def list
   redirect_to(controller: 'eula', action: 'display') if current_user.is_new_user
   session[:user] = User.find_by(id: current_user.id)
   @student_tasks = StudentTask.from_user current_user
   if session[:impersonate] && !impersonating_as_admin?
     @student_tasks = @student_tasks.select {|t| session[:original_user].id == t.assignment.instructor_id }
      if impersonating_as_ta?
       ta_course_ids = TaMapping.where(:ta_id => session[:original_user].id).pluck(:course_id)
       @student_tasks = @student_tasks.select {|t| ta_course_ids.include?t.assignment.course_id }
     else
       @student_tasks = @student_tasks.select {|t| session[:original_user].id == t.assignment.course.instructor_id }
     end
  end
Why this approach?
We wanted some way to maintain the details of the logged in user to be available throughout the session and across all the controllers. So, we have used session variables to store the user data and impersonation flag. Then, we use this impersonation flag and user data (role details) to decide whether to return whole or filtered results.
Issue #1185
The user (instructor, TA or admin) has to click the Add button on the course or assignment page to add a new participant to the course or assignment. On click of the button, the browser initiates an AJAX request and gets a response HTML representing success or failure of the action. The failure case was already handled - an error message appears at the top of the page. On success, it was observed that, though the HTML for a new table row (representing the just added participant) was part of the response, it was not being appended properly to the page's DOM. This is fixed by giving an id to the table HTML element, and appending the new row to its tbody element.
Why this approach?
Since we are appending to a html <tbody> element, we need a way to identify it. We could select the table body or the table itself. However, it looks more optimal to provide an id to the <table> that contains this <tbody> element, since this provides a way to edit other parts of this table in future.
After appending, we must also ensure that the "Submit" button which is part of the new HTML must be functional. So, an onchange listener is added to the button element (in the file add.js.erb).
 In app/views/shared_scripts/_user_list.html.erb:
 <table id="table_list" class="table table-striped" style="font-size: 15px">

 In app/views/participants/add.js.erb
 $("#table_list").find("tbody").append(
 "<%= j render :partial => 'participant', :locals => {participant: @participant, :userid => @participant.user_id, :controller => 'participants'} %>");
 )
 $('#'.concat(student_id.toString())).change(function(){
   $('#button'.concat(student_id.toString())).css("opacity",1);
 });
Test Plan
Issue #536
1) Login as Instructor4. Add a new assignment Assignment_Instructor4 under the course Course 617, Spring 2016.
2) Make student6400 as the participant of that assignment and logout.
3) Login as Instructor6. Add a new assignment Assignment_Instructor6 under the course Course 517, Spring 2016.
4) Make student6400 as the participant of that assignment and logout.
5) Click on Manage -> Impersonate User and enter student6400 as the user to be impersonated.
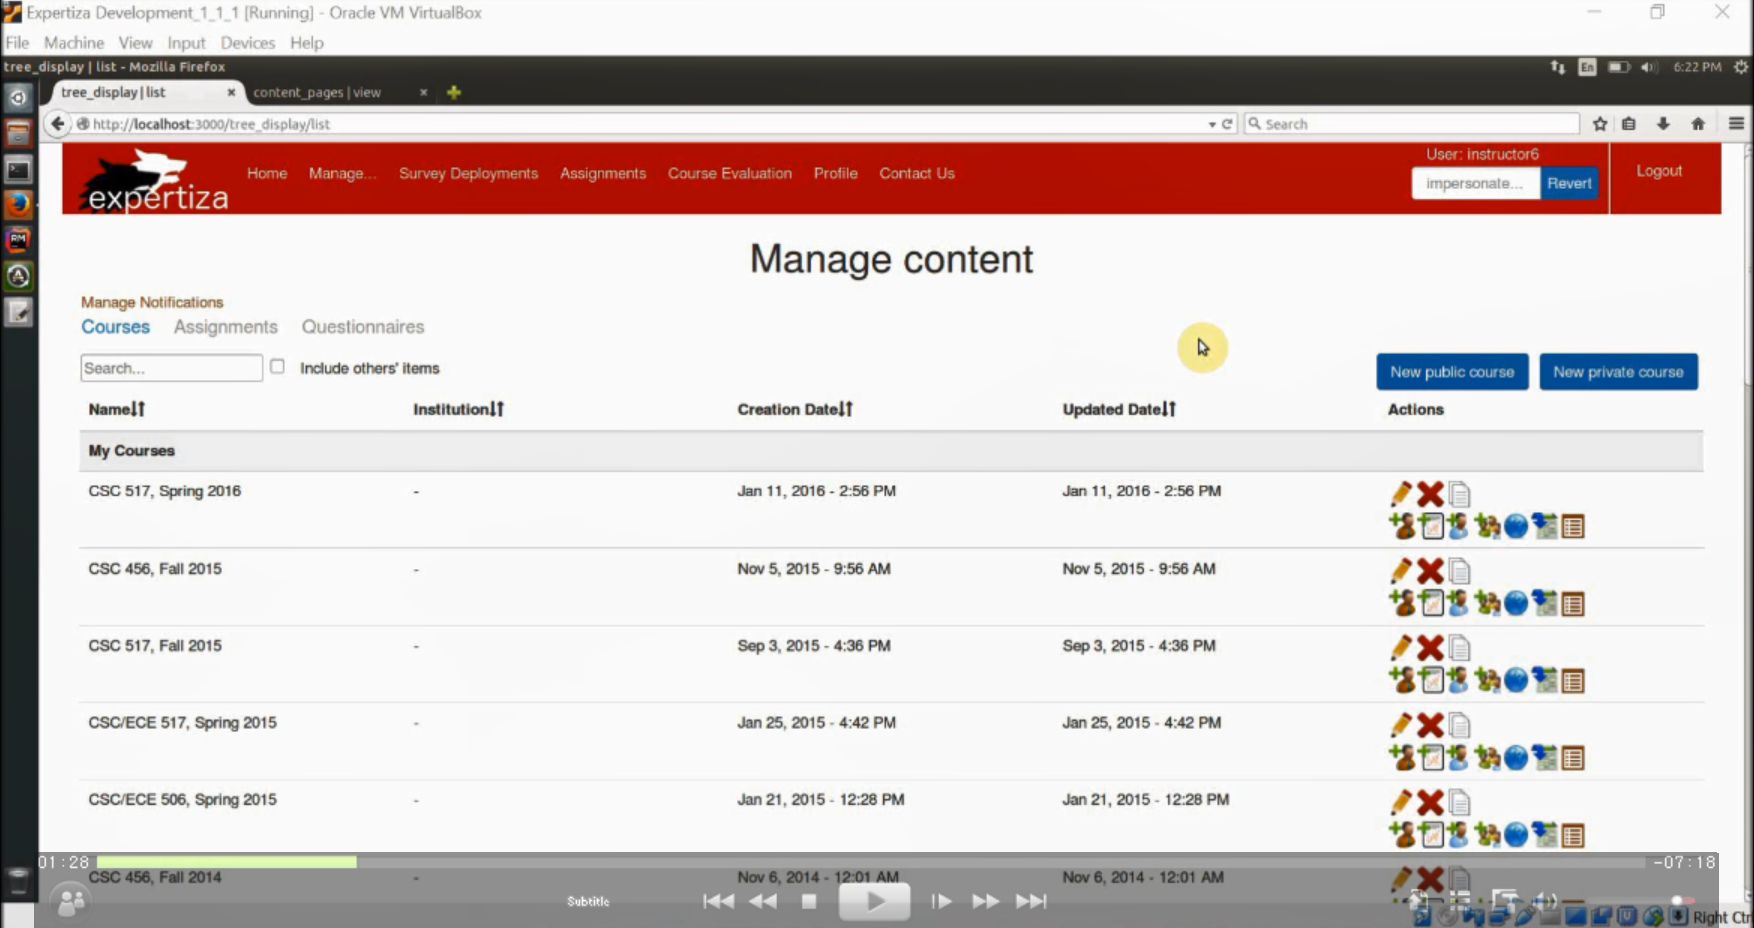
6) After impersonation, Instructor6 will be able to see only his/her assignment details and not of any other instructors.
7) We need to login as Instructor4 and verify that Instructor4 is not able to see other assignment details of the other instructors.
8) Login as Instructor4. Click on Manage -> Impersonate user. Enter student6400 as the user to be impersonated.
9) After impersonation, Instructor4 will be able to see only his/her assignment details and not of any other instructors.
10) Login as TeachingAssistant1274 who is a TA for the Course 517, Spring 2016, who is a TA under Instructor6.
11) Create an assignment TA_Assignment and make student6400 as a participant.
12) Click on Manage->Impersonate user and enter student6400 as the student to be impersonated.
13) After impersonation, TeachingAssistant1274 will be able to see all the assignment details of all courses for which (s)he is the TA and not the details of the other assignments.
14) Now suppose Instructor6 logs in and impersonates the student student6400, he will be able to see all the assignment details under his/her course i.e. all the details of the assignment that was created by Instructor6 himself as well as the assignments created by his TA's.
15) Next, login as student6400 and click on assignments. The student will be able to see all the assignments of all the courses to which he/she is assigned to.
16) This verifies that the bugs have been fixed.
Issue #1185
1) Login as an Instructor or Admin or Super-Admin or TA.
2) Click on Manage -> Assignments. In the Actions column click on Add Participant.
3) After the list of all the participants you will be able to see Enter a user login text box.
4) Enter the user login in the text box (Ex: student9000) and click on Add button.
5) After clicking on the Add button, you will see the participant added at end of the list.
6) This verifies the bug has been fixed.
Screenshots of the flow
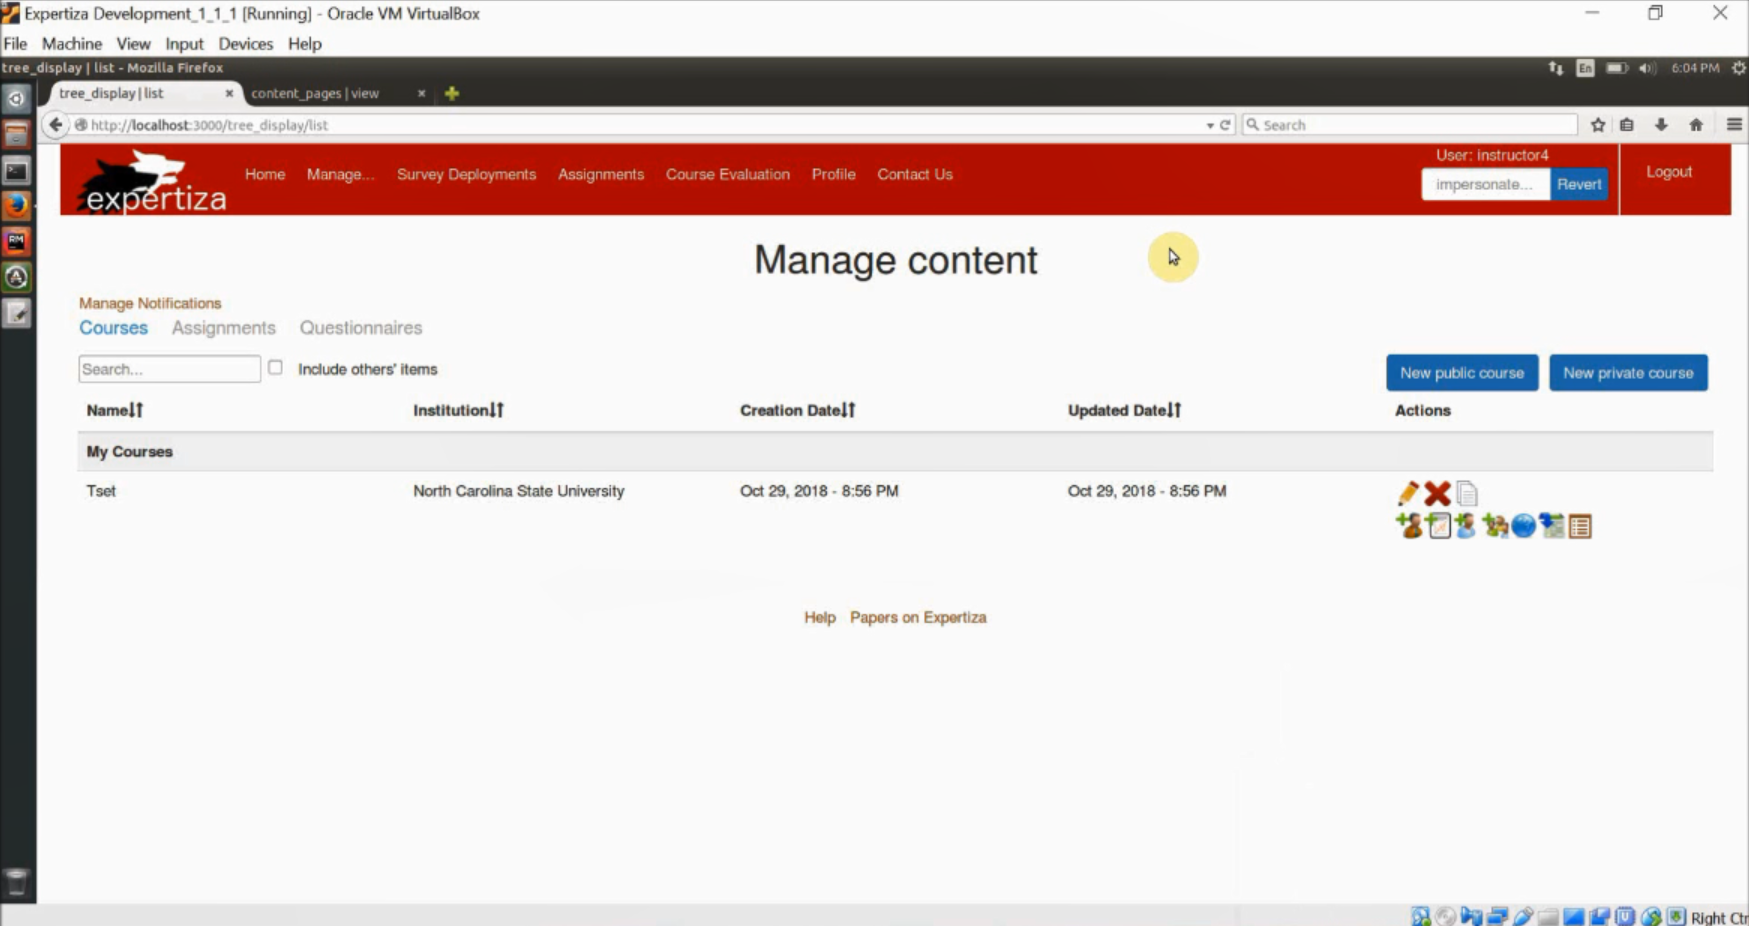
1) Login as Instructor4. Add a new assignment Assignment_Instructor4 under the course Course 617, Spring 2016.
2) Make student6400 as the participant of that assignment and logout.
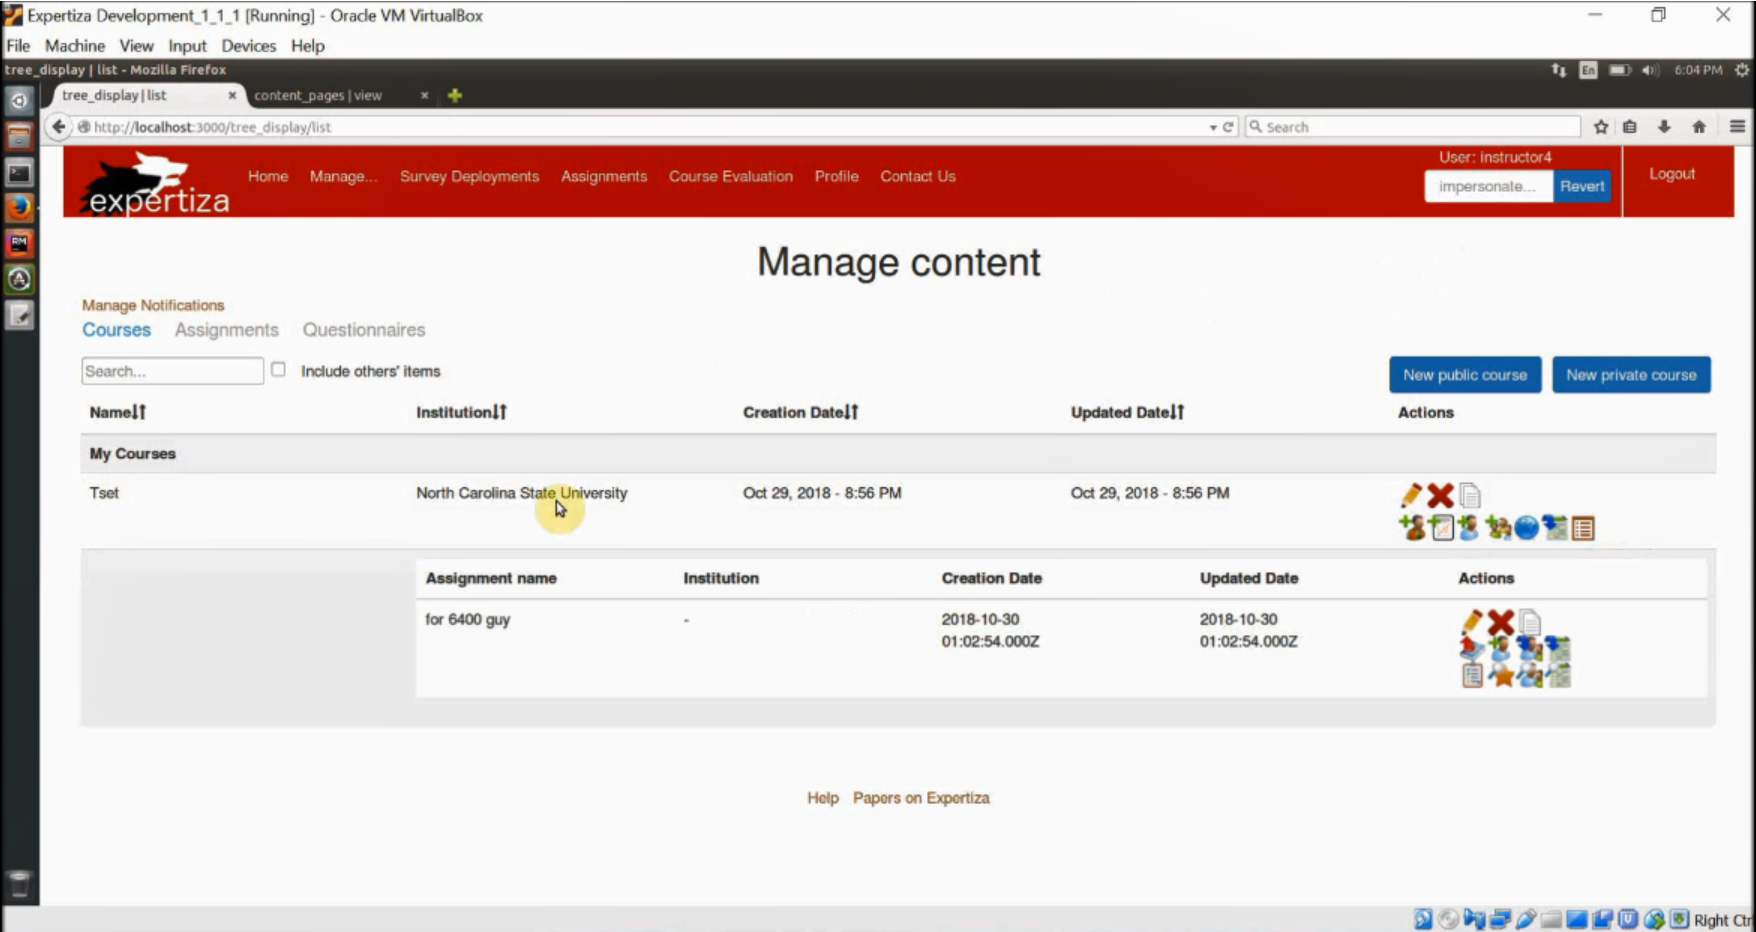
3) Login as Instructor6. Add a new assignment Assignment_Instructor6 under the course Course 517, Spring 2016.
4) Make student6400 as the participant of that assignment and logout.
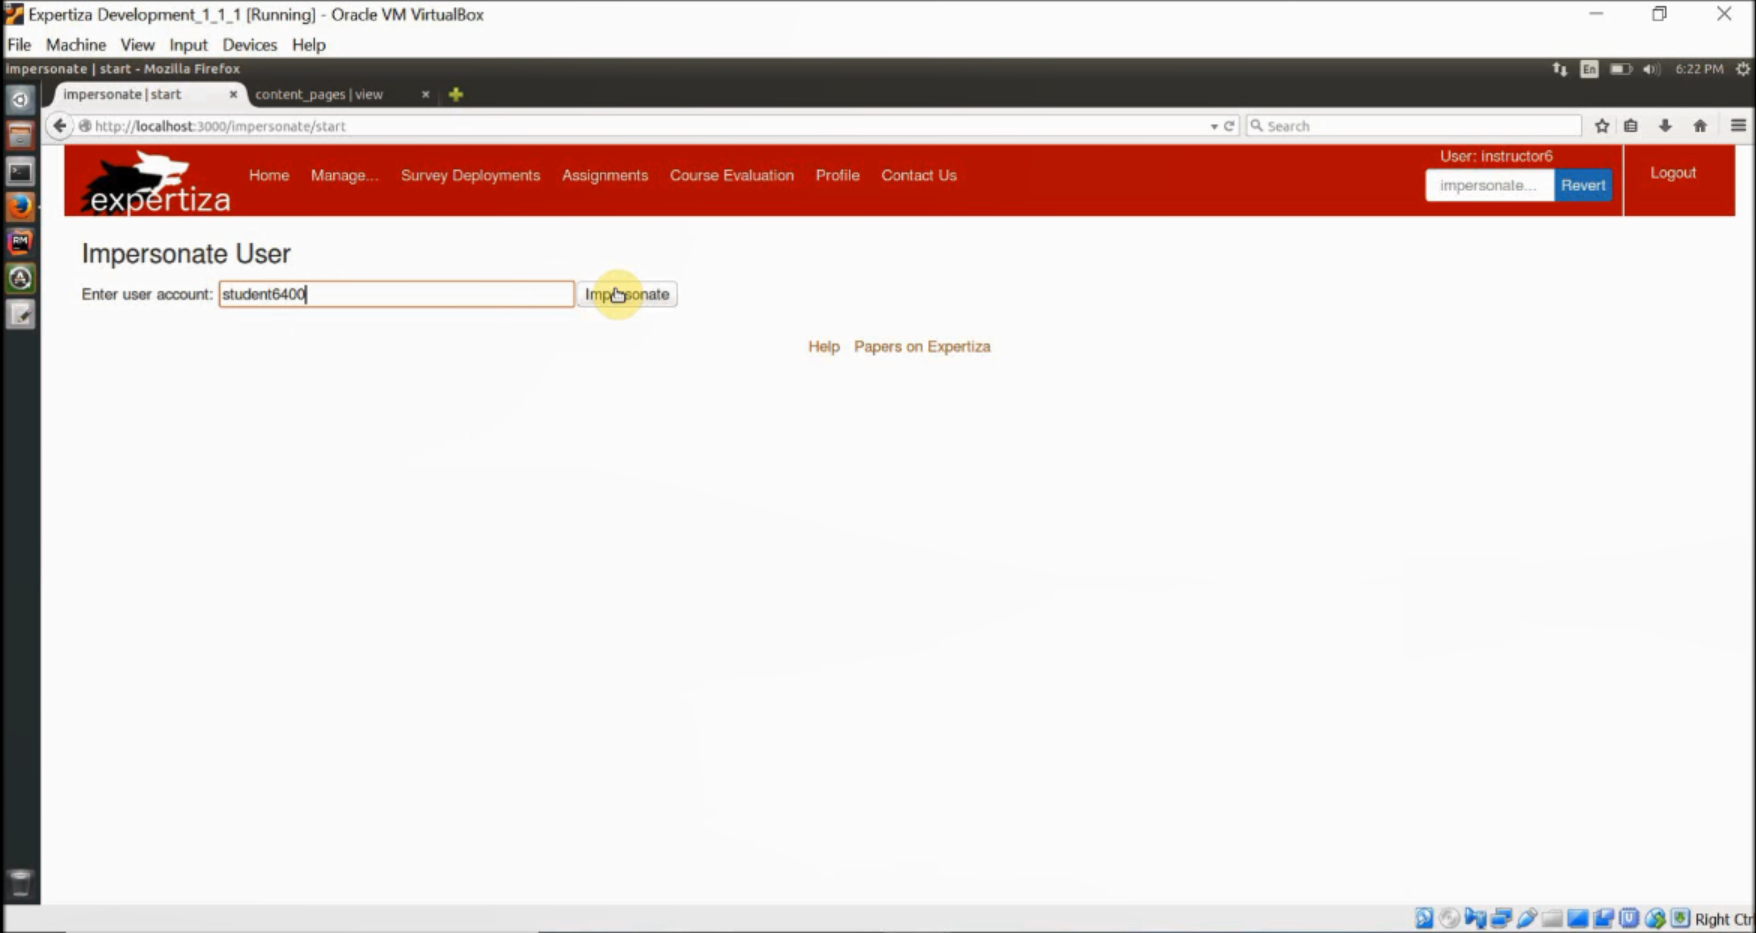
5) Click on Manage -> Impersonate User and enter student6400 as the user to be impersonated.
6) After impersonation, Instructor6 will be able to see only his/her assignment details and not of any other instructors.
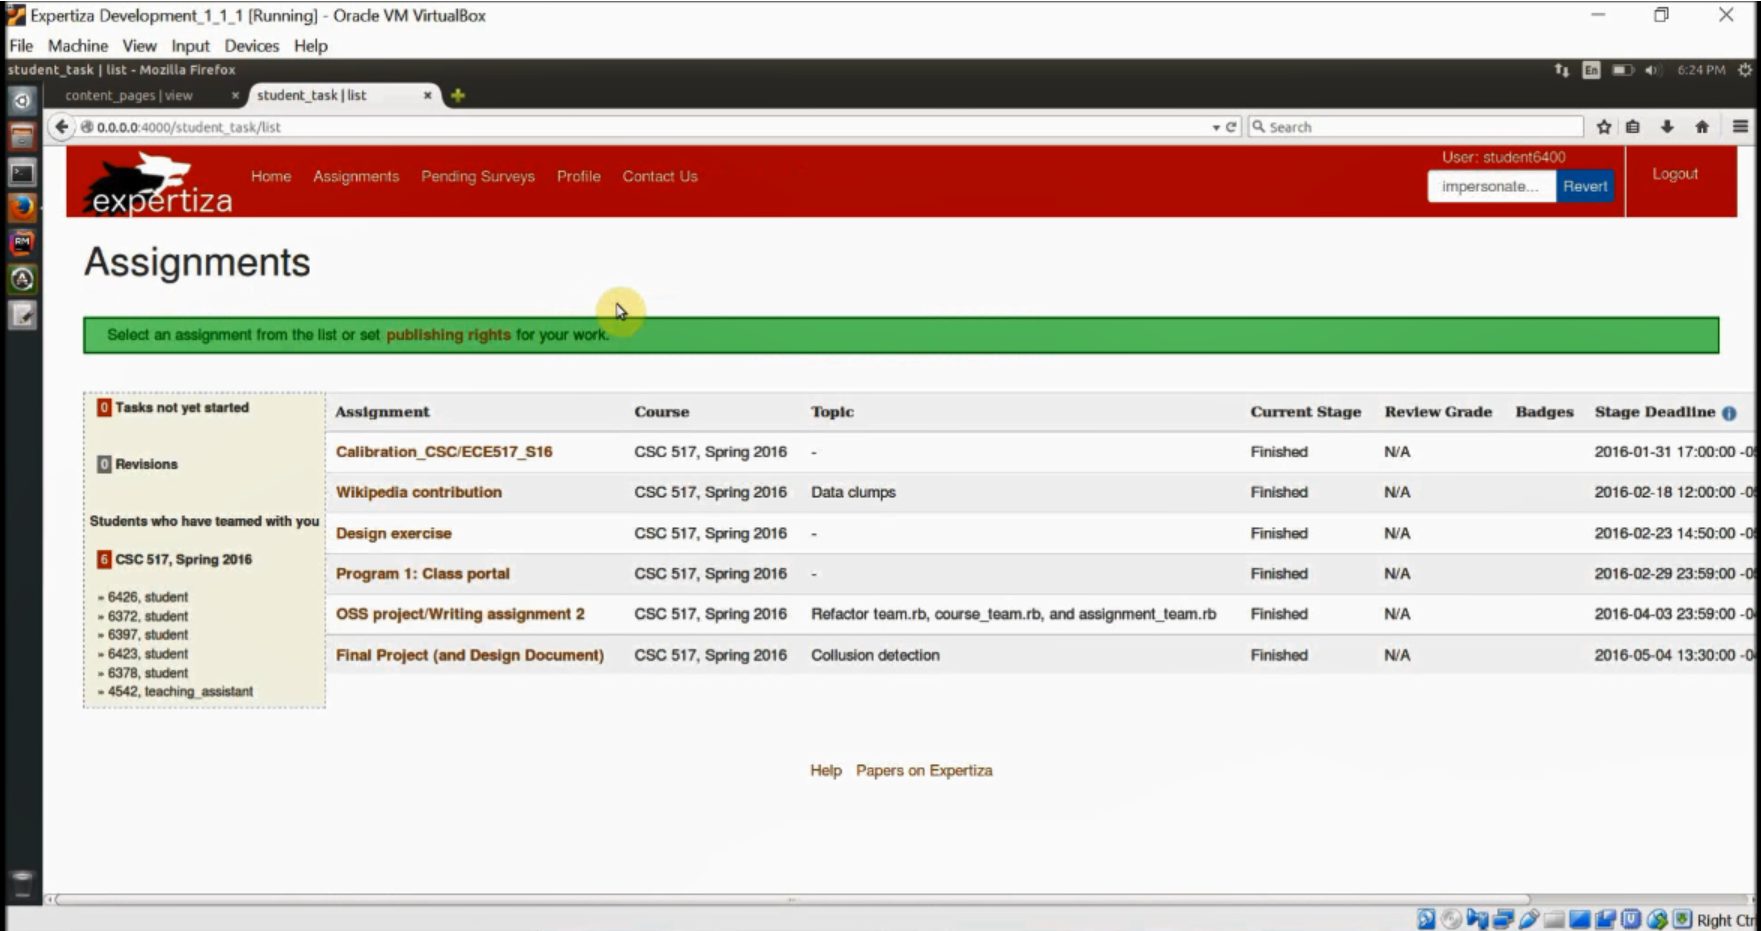
7) We need to login as Instructor4 and verify that Instructor4 is not able to see other assignment details of the other instructors.
8) Login as Instructor4. Click on Manage -> Impersonate user. Enter student6400 as the user to be impersonated.
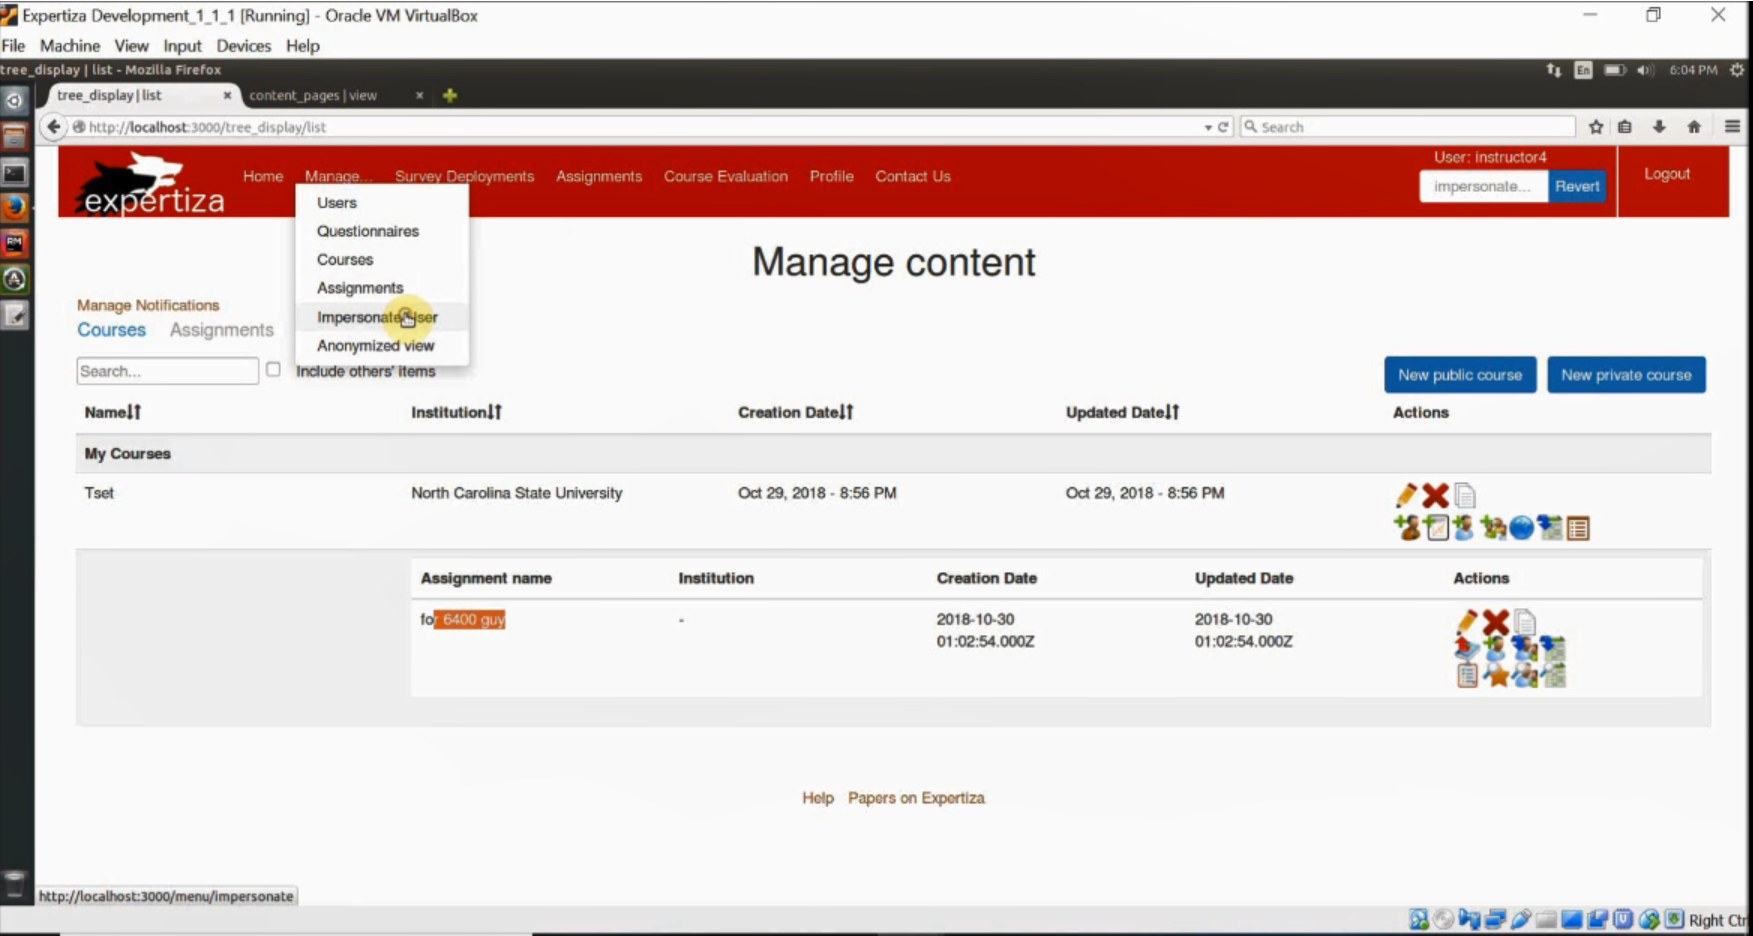
9) After impersonation, Instructor4 will be able to see only his/her assignment details and not of any other instructors.
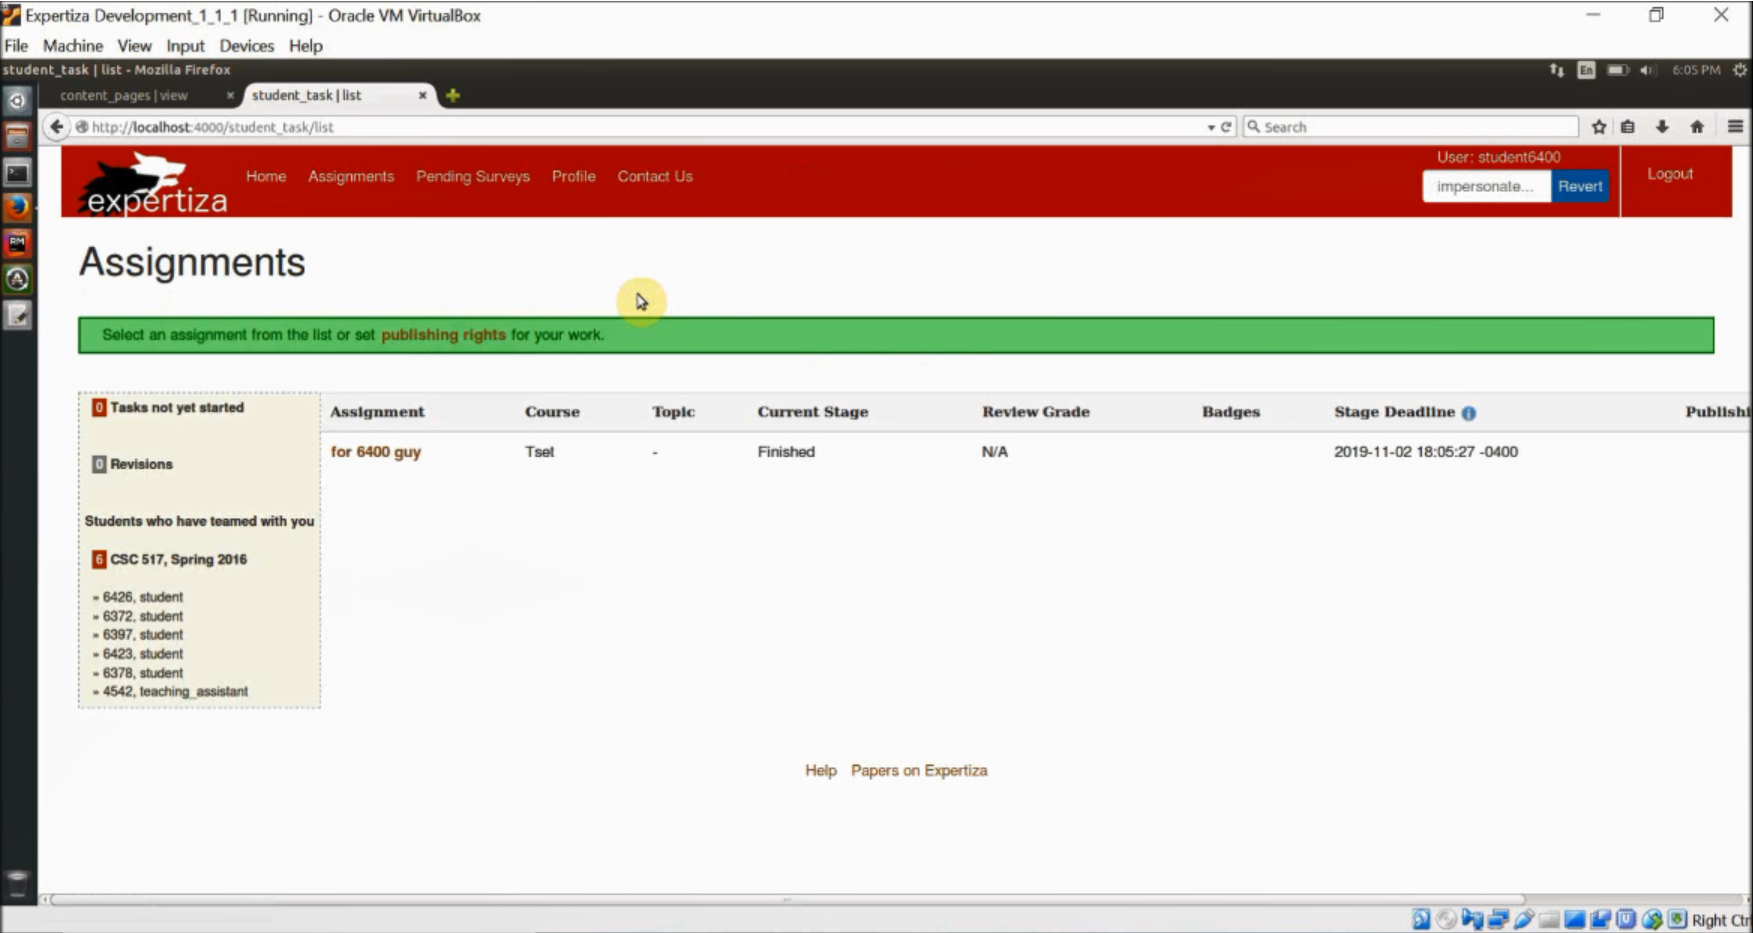
10) Login as TeachingAssistant1274 who is a TA for the Course 517, Spring 2016, who is a TA under Instructor6.
11) Create an assignment TA_Assignment and make student6400 as a participant.
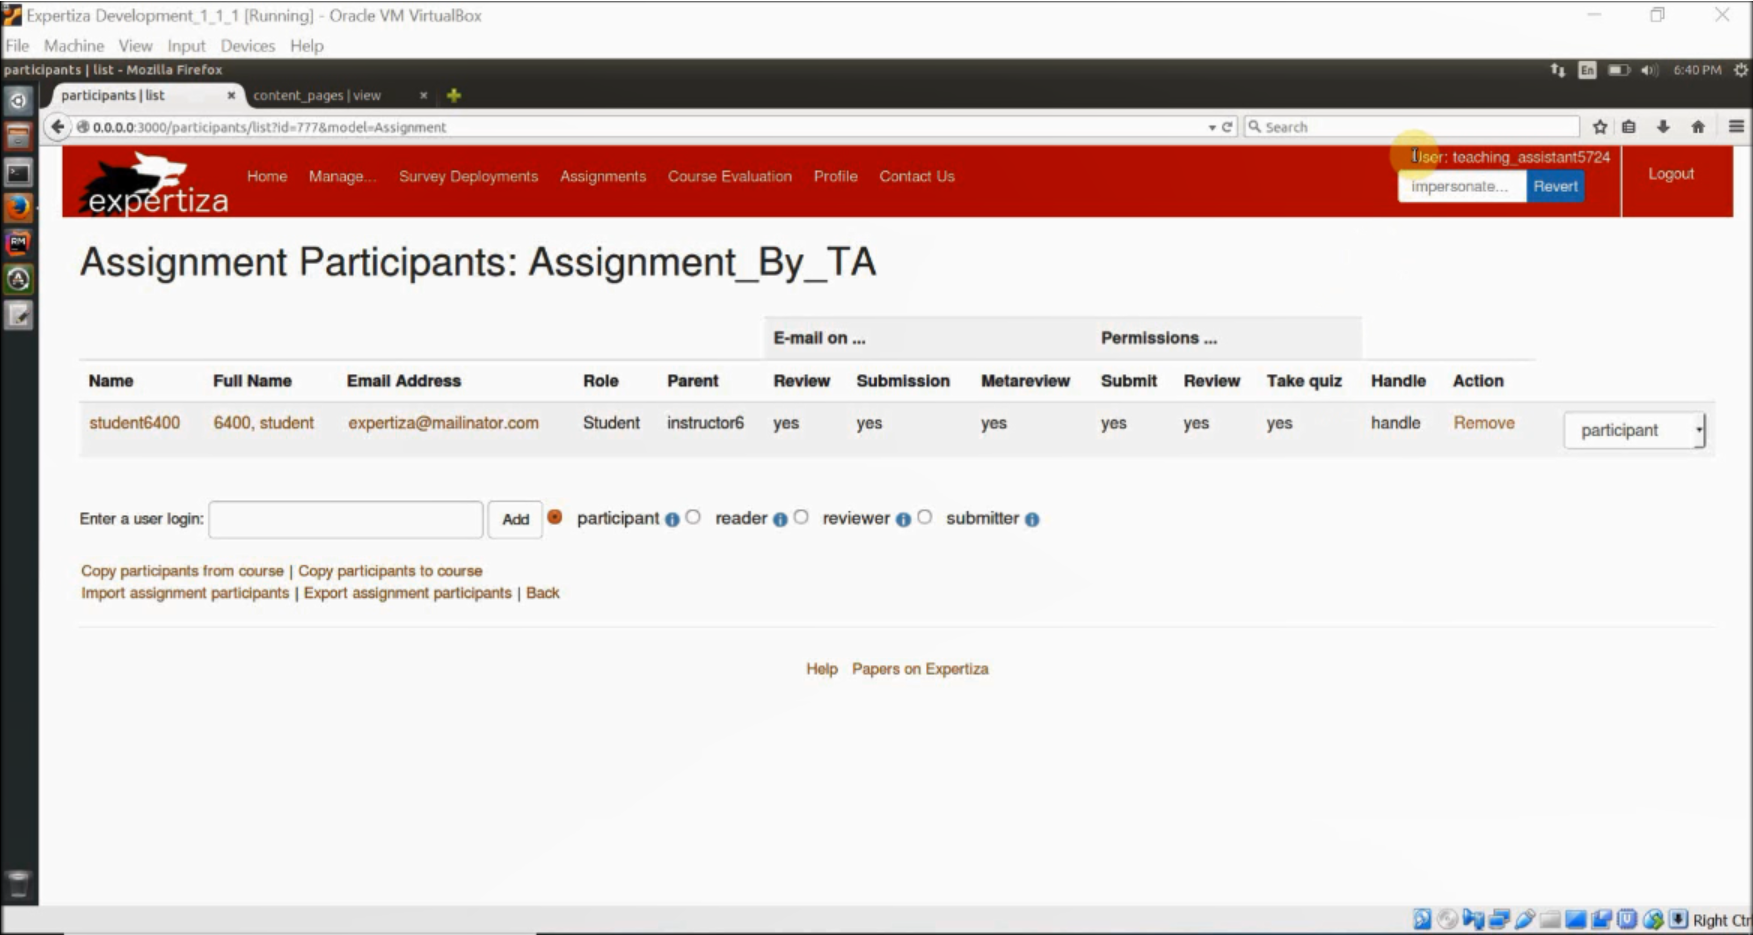
12) Click on Manage->Impersonate user and enter student6400 as the student to be impersonated.
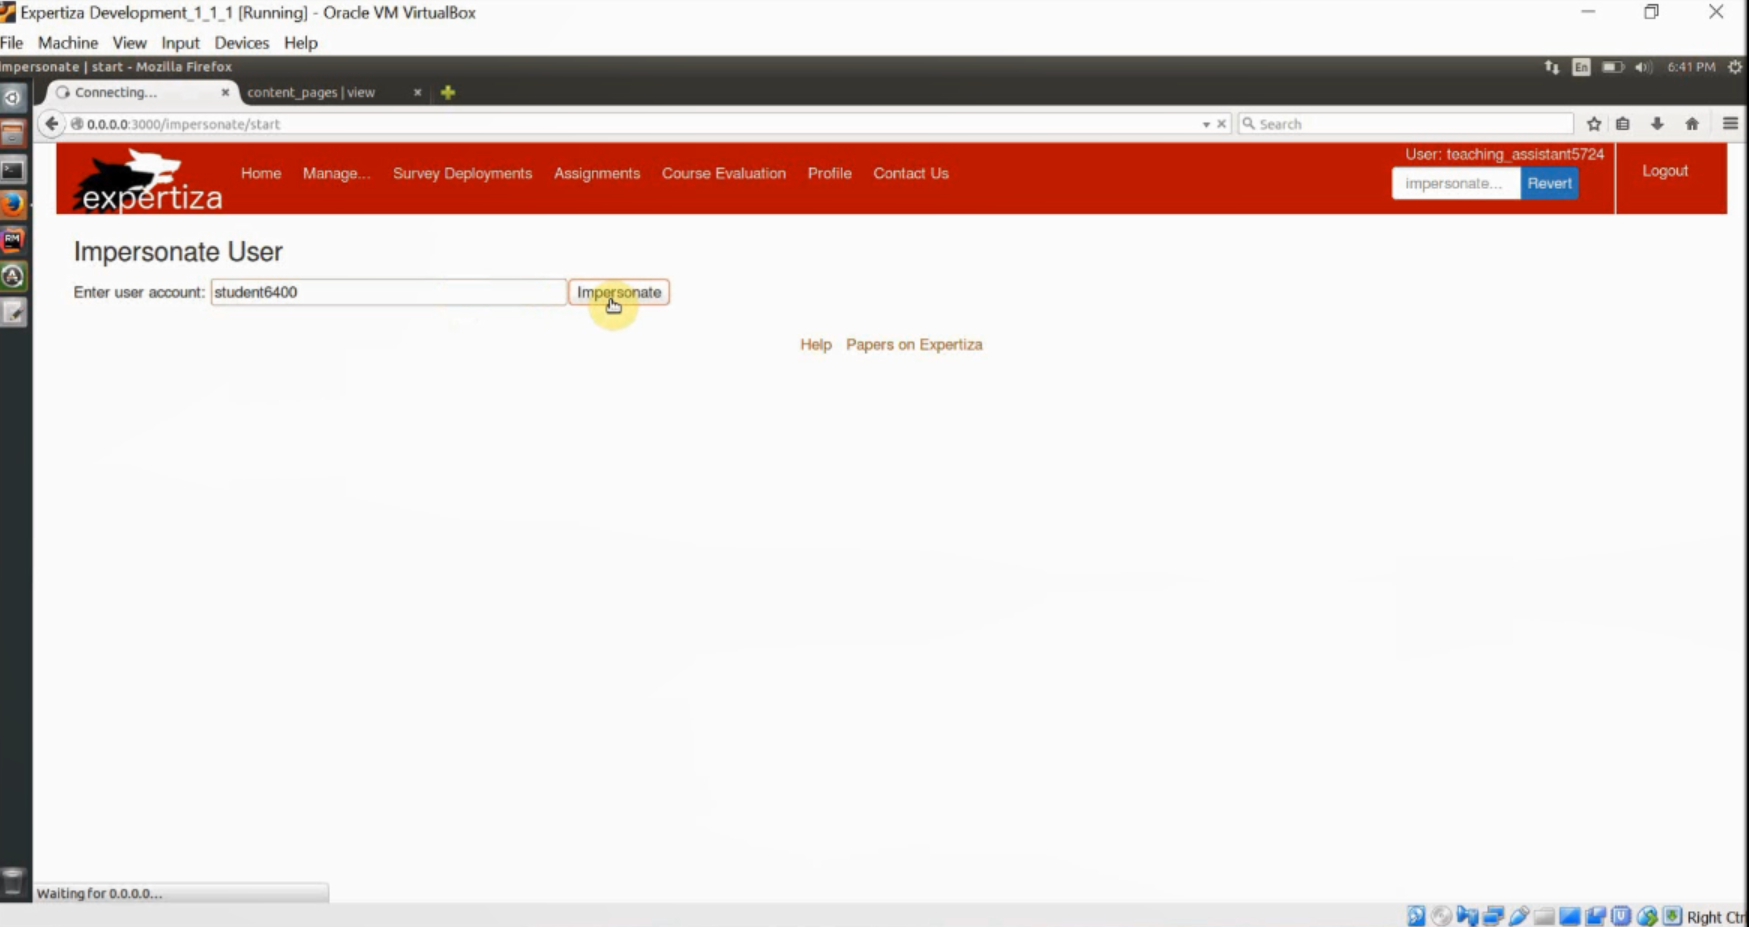
13) After impersonation, TeachingAssistant1274 will be able to see all the assignment details of all courses for which (s)he is the TA and not the details of the other assignments.
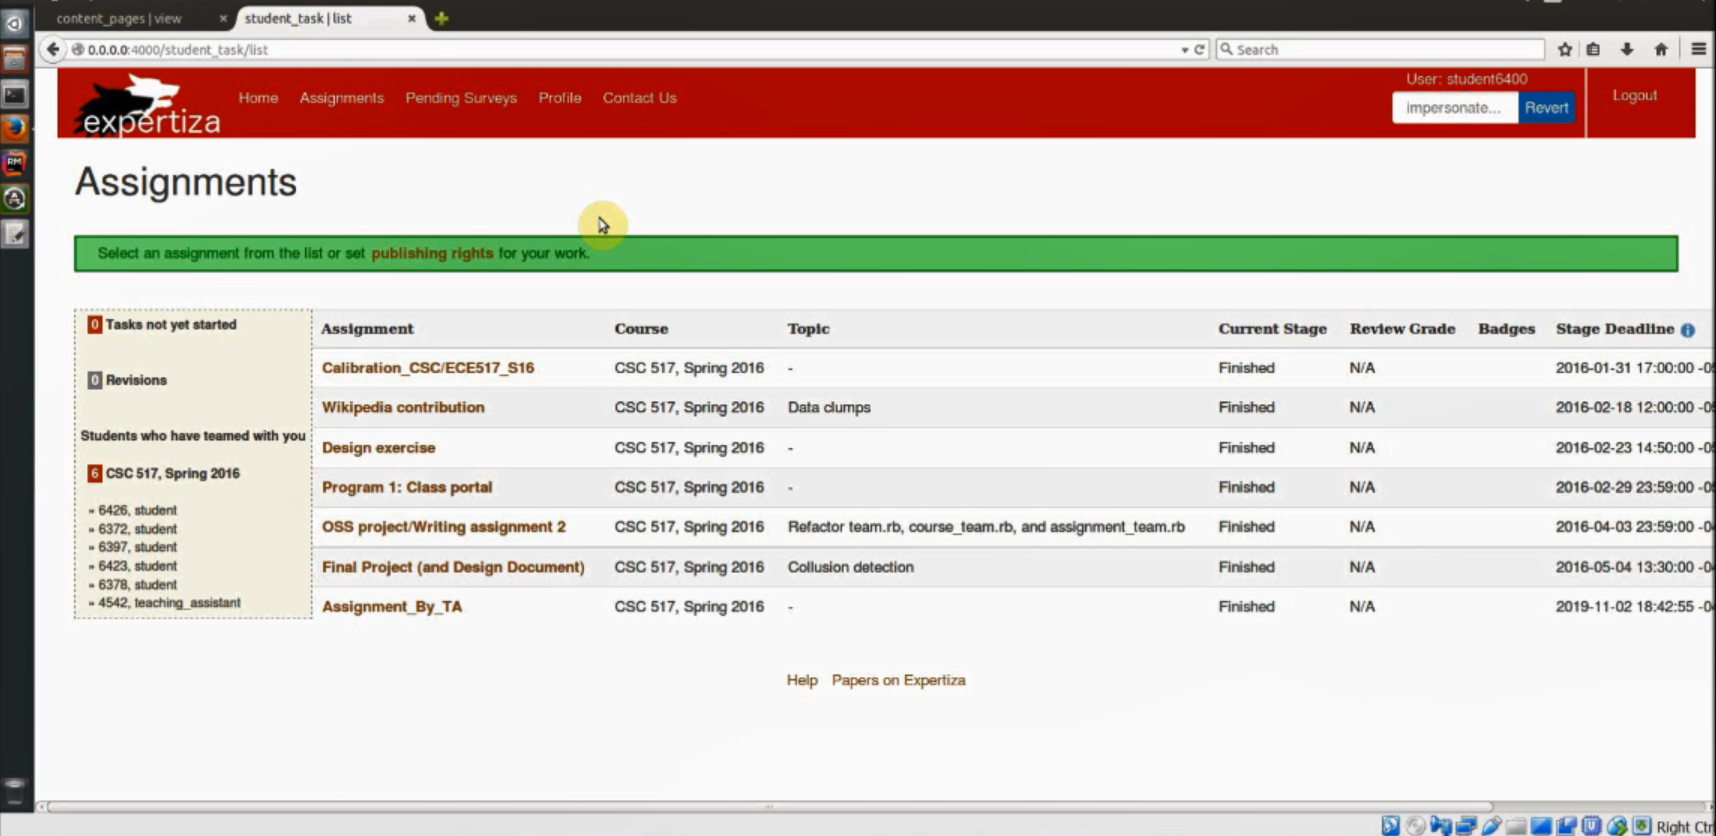
14) Next, login as student6400 and click on assignments. The student will be able to see all the assignments of all the courses to which he/she is assigned to.
15) This verifies that the bugs have been fixed.
Issue #1185
1) Login as an Instructor or Admin or Super-Admin or TA.
2) Click on Manage -> Assignments. In the Actions column click on Add Participant.
3) After the list of all the participants you will be able to see Enter a user login text box.
4) Enter the user login in the text box (Ex: student9000) and click on Add button.
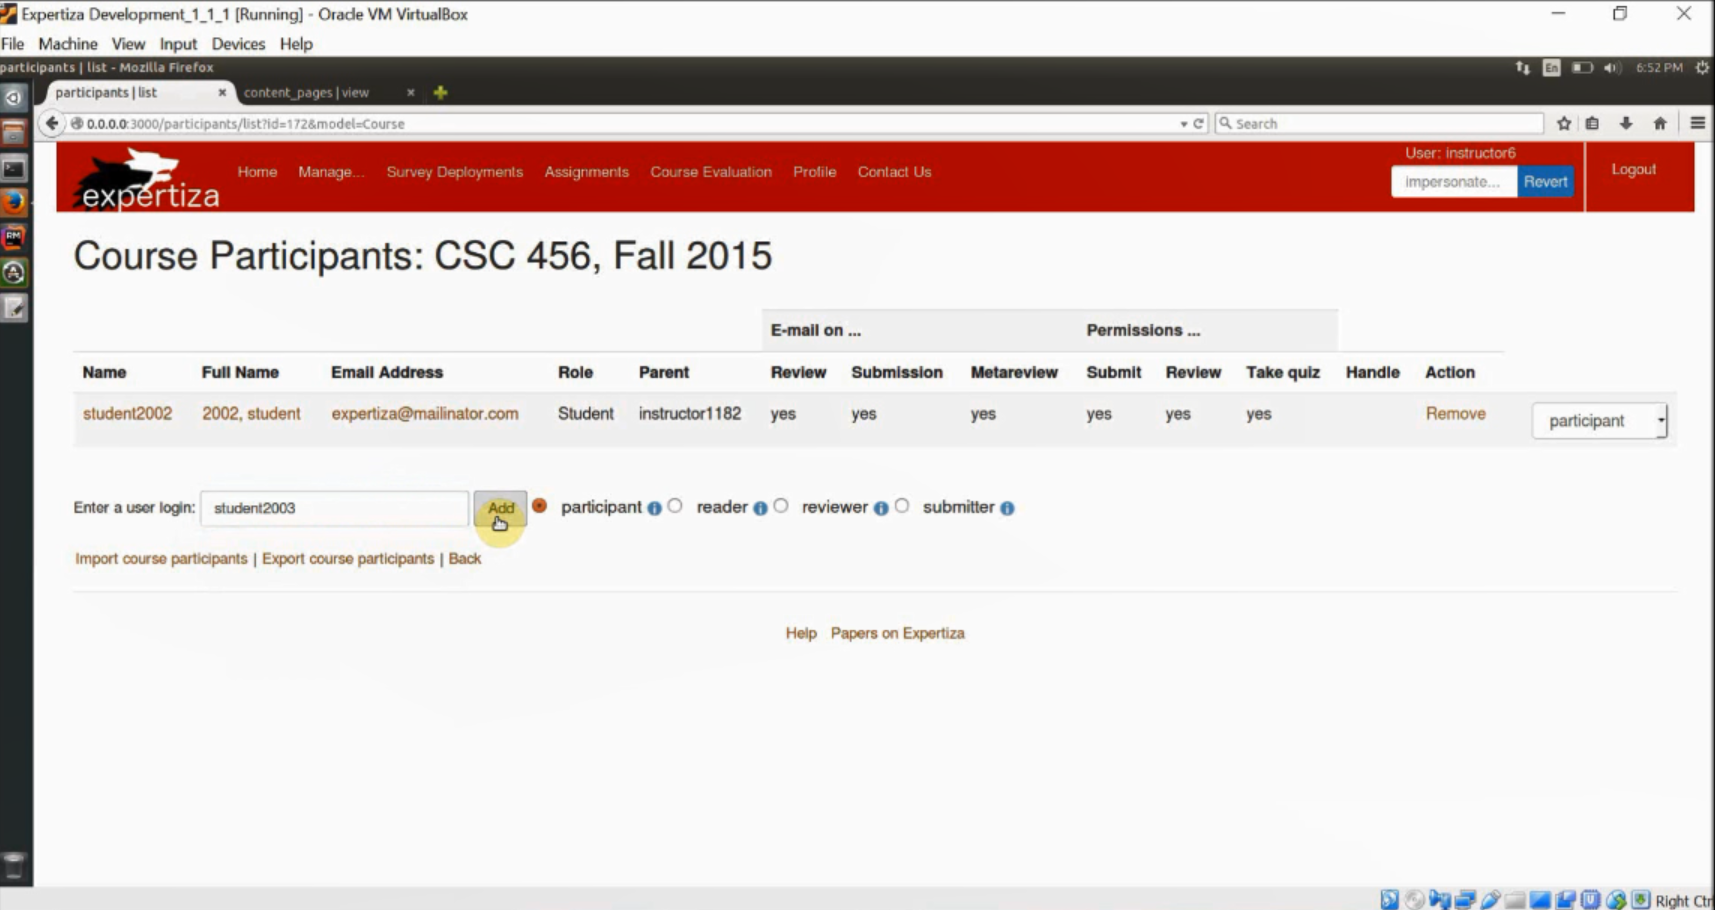
5) After clicking on the Add button, you will see the participant added at end of the list.
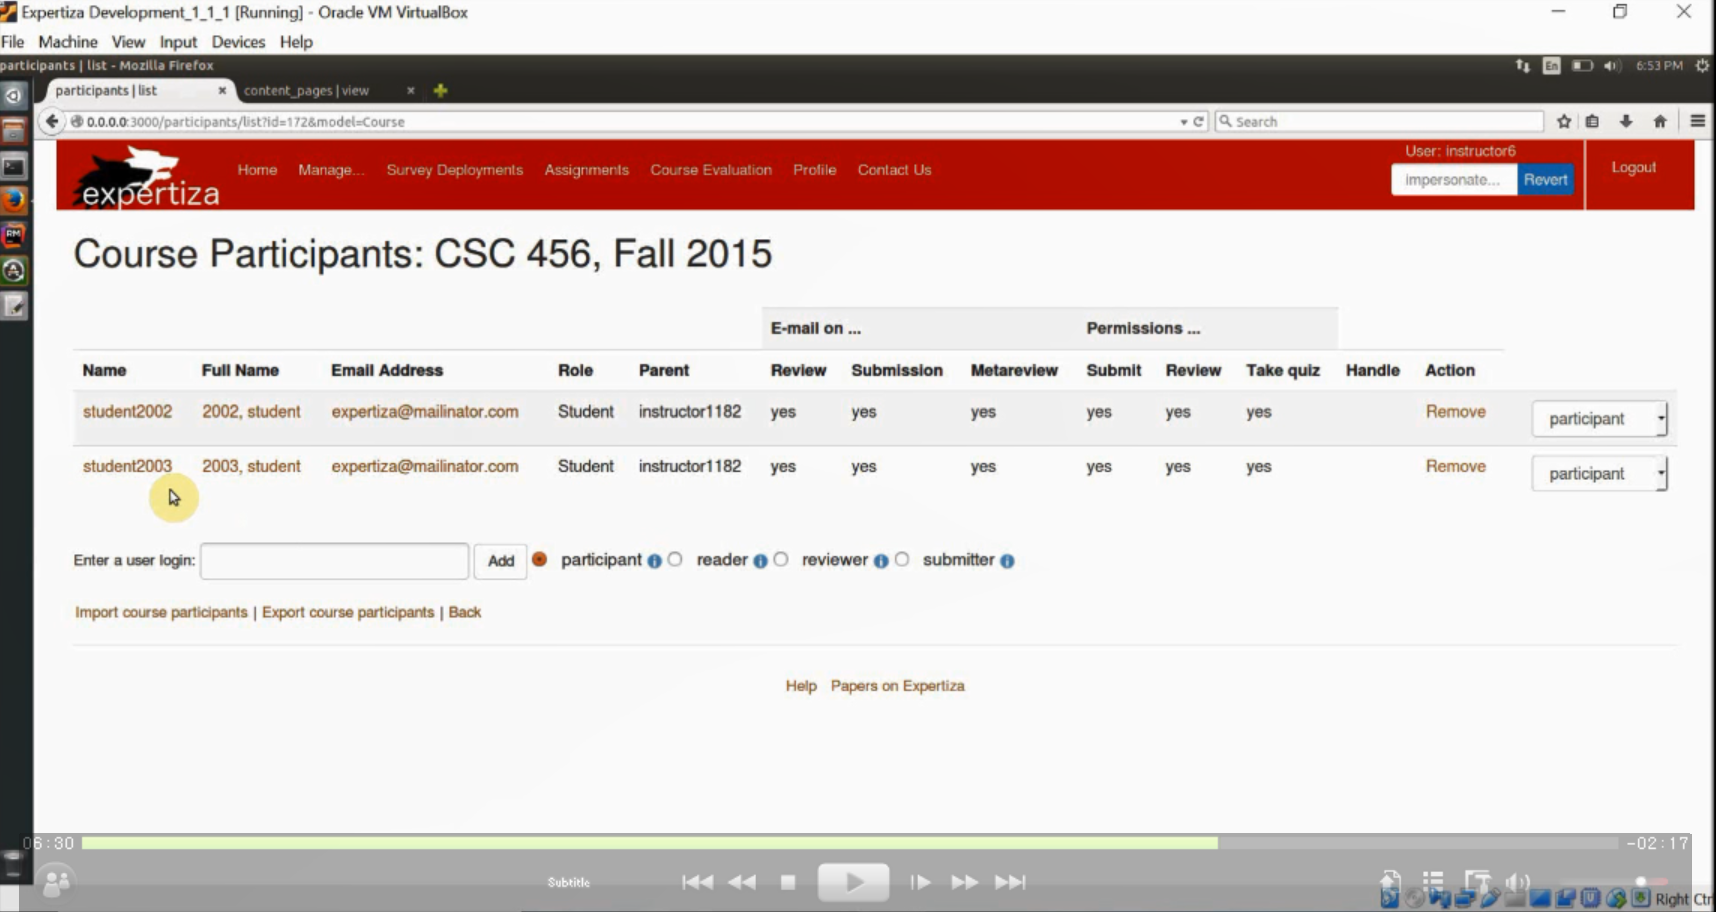
6) This verifies the bug has been fixed.
Additional Links and References
- Git pull link: http://github.com/expertiza/expertiza/pull/1250
Team
Amogh Agnihotri Subbanna
Chinmai Kaidabettu Srinivas
Siddu Madhure Jayanna
