CSC/ECE 517 Fall 2014/final design doc M1451 hsss
This wiki page contains details on the planned course of actions for the project on Implement WebSocket API for the Mozilla research project Servo.
Introduction
About Servo<ref> https://www.mozilla.org/en-US/research/projects/</ref>
Servo is an project to build a Web browser engine for a new generation of hardware. With Servo, we are rethinking the browser at every level of the technology stack — from input parsing to page layout to graphics rendering — to optimize for power efficiency and maximum parallelism.
About Rust<ref>http://en.wikipedia.org/wiki/Rust_%28programming_language%29</ref>
The goal of Rust is to be a good language for the creation of large client and server programs that run over the Internet. This has led to a feature set with an emphasis on safety, control of memory layout and concurrency. Performance of safe code is expected to be slower than C++ if performance is the only consideration, but to be comparable to C++ code that manually takes precautions comparable to what the Rust language mandates.
Purpose
This project is about implementing a protocol to define rules regarding the nature of data being sent/receive between the web page and the server built on a Mozilla Framework. We started by creating a WebSocket interface and its corresponding Rust implementation. The constructor of this interface returns a WebSocket object which will help us in establishing a basic HTTP connection to the server. Thereafter we plan to implement methods like close, open on the API along with the onopen and onclose events.
This WebSocket interface runs on a Servo engine. It is basically a prototype web browser engine written in the Rust language. It is currently developed on 64bit OS X and 64bit Linux. Servo is explicitly not aiming to create a full Web browser (except for demonstration and experimentation purposes). Rather it is focused on creating a solid, embedded engine.
Architecture of system <ref>https://github.com/servo/servo/wiki/Design#task-supervision-diagram</ref>
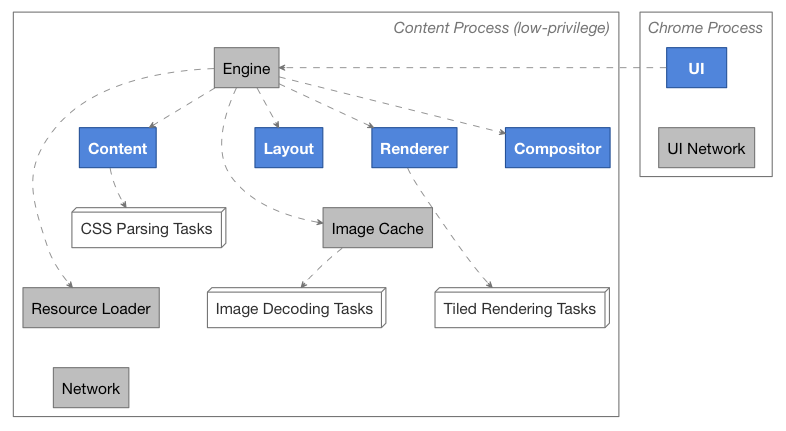
Task Supervision Diagram
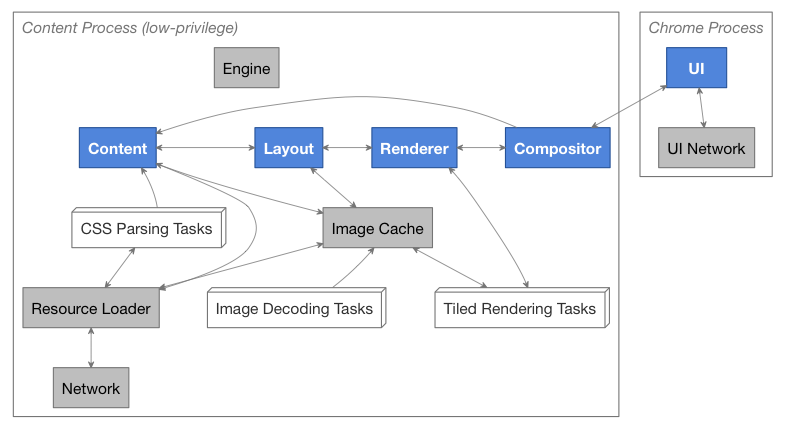
Task Communication Diagram
The above diagrams gives us an overview of the Servo's architecture.
- Each box represents a Rust task.
- Primary tasks are the ones which are represented by blue boxes.
- Gray boxes are for auxiliary tasks.
- White boxes are for worker tasks. Each such box represents several tasks, the precise number of which are decided by the workload.
- Supervisor relationships are shown by dashed lines.
- Communication channels are shown by solid lines.
Requirement analysis<ref>https://github.com/servo/servo/wiki/WebSocket-student-project</ref>
1. The initial step required downloading and building the Rust compiler. To install Rust on the machine, clone the Rust source code from Mozilla's repository on GitHub.
2. Then we had to build the rust compiler.
3. To build the servo, we cloned the source code into the local repository.
4. Then we created a WebSocket.webidl file in the /servo/components/script/dom/webidls/ directory. This file was added in order to create a new interface for the web socket.This interface is inherited from the EventTarget interface in servo.
5. We added several attributes and methods to the WebSocket.webidl file which we plan to execute during the course of the project<ref>https://html.spec.whatwg.org/multipage/comms.html</ref>.
6. We created a corresponding websocket.rs file in the /servo/components/script/dom/ directory. In this file we have currently created a constructor that takes a url as an argument. We have a stub function to return the url that is used for initializing the web socket object through the constructor.
7. We added The WebSocketTypeId to the struct in the eventtarget.rs file.
8. We added the websocket module that we created to the lib.rs file.
9. After making all the changes we build are changes into servo.
10. This was Part One of our project, which was a part of our OSS project.
11. Part Two is our final project and is an extension of our OSS project.
12. Now we will create a constructor which will return an WebSocket object and initiate a basic connection with the server. There are couple of sub parts we will need here:
- A ws scheme protocol handler (just as we have an http scheme protocol handler) that will implement the WS-specific parts of the connection process.
- The ws protocol load method should transparently delegate the initial HTTP connection to http_loader::factory(); this way we do not need to duplicate the HTTP protocol code.
- Using the same technique as the MIME sniffing project, the WS load method should intercept the response from the HTTP load. This will allow us to look at the HTTP response and verify the presence of the required Upgrade header as described in the spec before sending the connection results to the WebSocket implementation
13. In order to allow writing more data to the existing socket connection, we plan to make the stream member in the BufferedResponse in rust-http public.
14. We have to implement closing of connection along with on open and inclose events.
15. Furthermore, we have to implement sending simple short strings that fit within a single frame, receiving simple data and sending fragmented payloads across multiple frames.
Data and component design
Design patterns
Singleton Pattern
We are using "Singleton Pattern" because it will confine the instantiation of class 'WebSocket' to only one object. This ensures that the instance can be accessed from everywhere and hence provide a global point of access.
Adapter Pattern
We are using "Adapter Pattern" to convert the interface of class 'WebSocket' into another interface that the caller expects. "Adapter pattern" allows other classes with incompatible interfaces to work together with class 'WebSocket', which is solely responsible to enable Web applications to maintain bidirectional communications with server-side processes.
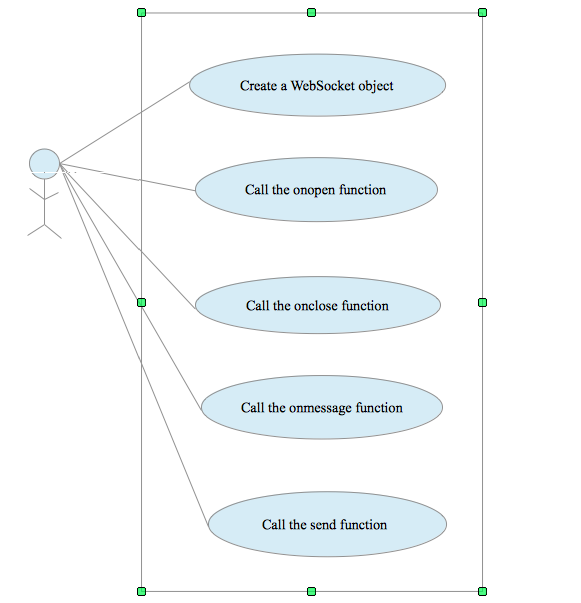
UML diagram: UseCase Diagram
- Create a web socket object:
This object allows a basic connection to the server.
- Call the onopen function:
Connection along with on open event.
- Call the onclose function:
Connection along with on close event.
- Call the onmessage function:
Receiving of simple data and the on message event.
- Call the send function:
Sends fragmented data.
Proposed Test Cases
- Validating the url used to create a websocket object.
- Check for an explicit port.
- Checking if the connection with the remote server is established.
- Check with session variables are reset on creating a new connection.
- Check if the data if the messages are delivered to the remote host.
- When the user agent validates the server's response during the "establish a WebSocket connection" algorithm, if the status code received from the server is not 101 (e.g. it is a redirect), it must fail the WebSocket connection.
Appendix
- Steps used for Installing Rust.
- Steps used for Building Servo.
References
<references/>


